


![] Grand aperçu](https://cloud.netlifyusercontent.com/assets/344dbf88-fdf9-42bb-adb4-46f01eedd629/b9d7de40-0241-4714-912c-4f001ab58b94/porsche140-sketch-tutorial-part-3.png)
L’outil secret pour exploser ton chiffre d'affaires en 2025 !
Comment créer une Porsche 911 avec croquis (partie 3)

Nous continuons notre tutoriel avec les roues de notre Porsche 911 voiture, mais avant de passer aux étapes suivantes, j'aimerais attirer l'attention sur les célèbres roues Fuchs qui ont été conçues sous la forme d'une feuille de trèfle (ou d'une aile). Tout d'abord, un peu d'histoire:
«La roue Fuchs est une roue spéciale conçue pour le premier modèle Porsche 911 / 911S au début des années 60. Conçue en collaboration avec Otto Fuchs KG, le modélisateur Porsche Heinrich Klie et Ferdinand Porsche Jr., la roue Fuchs a été la première roue forgée légère à être montée sur un véhicule automobile de série. Ils ont fourni à la voiture de sport Porsche 911 à moteur arrière une réduction de la masse non suspendue, grâce à une roue en alliage solide et légère. »
– Source: Wikipedia
Nous commencerons par la conception des pneus.
Pneus
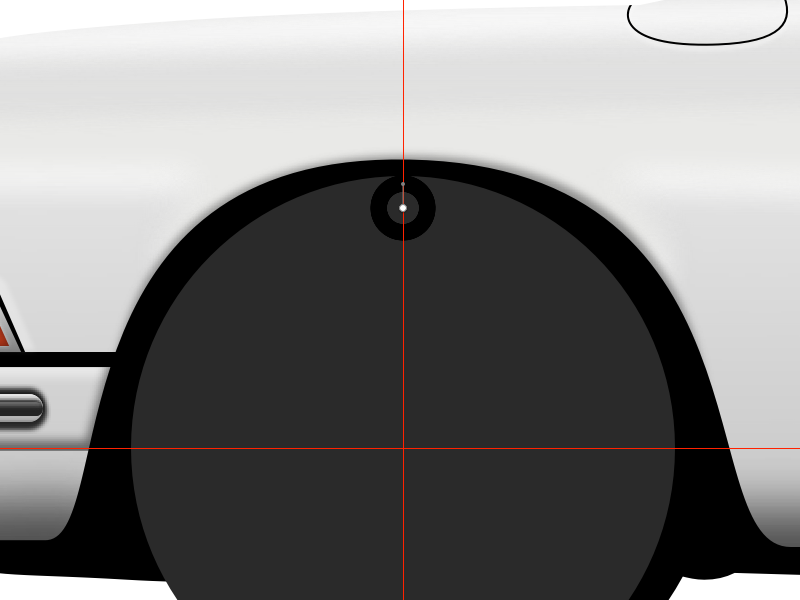
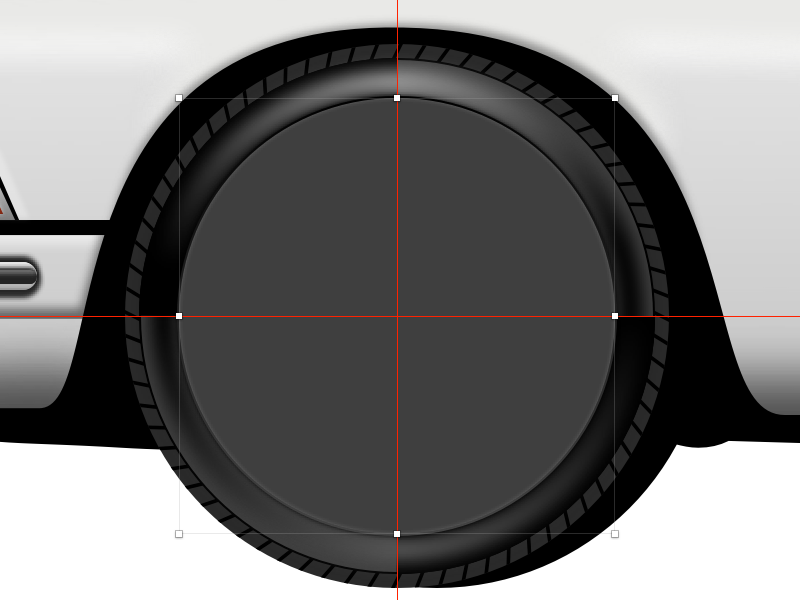
Démasquer l'empattement dans le panneau Couches . Désactivez Bordures et définissez Remplissages sur # 2A2A2A . Ensuite, dupliquez cette forme, changez Fills en # 000000 déplacez-la derrière la roue de base (cliquez dessus avec le bouton droit et choisissez Reculer ) et poussez-le 20px vers la droite.
Astuce : Maintenir Shift + → déplacera la sélection par incréments de 10 pixels

Sélectionnez la roue de base et ajoutez quelques lignes directrices pour faciliter l'alignement de tous les éléments. Pour ce faire, affichez les règles Sketch (appuyez sur Ctrl + R ). Ensuite, ajoutez une ligne de guidage verticale au centre de la roue de base avec un clic sur la règle supérieure, et faites de même pour le guide horizontal sur la règle de gauche.

Désactivez temporairement les lignes directrices en appuyant sur Ctrl + R sur le clavier. Créez un petit rectangle d'une largeur de 2px et d'une hauteur de 8px avec le Fills réglé sur # 000000 et le ] Bordures désactivées. Ce rectangle servira d'unité de base pour créer les bandes de roulement (alias le bande de roulement ). Centrez le rectangle sur la roue de base horizontalement.

Zoom avant assez près (ici, j'ai zoomé à 3200%), choisissez Transformer dans la barre d'outils supérieure, sélectionnez le point central supérieur et appuyez dessus 2px vers la droite, puis sélectionnez le point du bas du milieu et poussez-le 2px vers la gauche pour lui donner un aspect incliné.
Remarque : Si vous ne voyez pas le Outil Transformer dans la barre d'outils supérieure, vous pouvez l'ajouter ici via Affichage → Personnaliser la barre d'outils… ou vous pouvez utiliser le raccourci clavier Cmd + Shift + T .

Revenez sur les lignes directrices ( Ctrl + R ) et assurez-vous que ce rectangle est sélectionné. Mettez le rectangle dans un groupe en appuyant sur Cmd + G sur le clavier. Donnez à ce groupe le nom bandes de roulement .
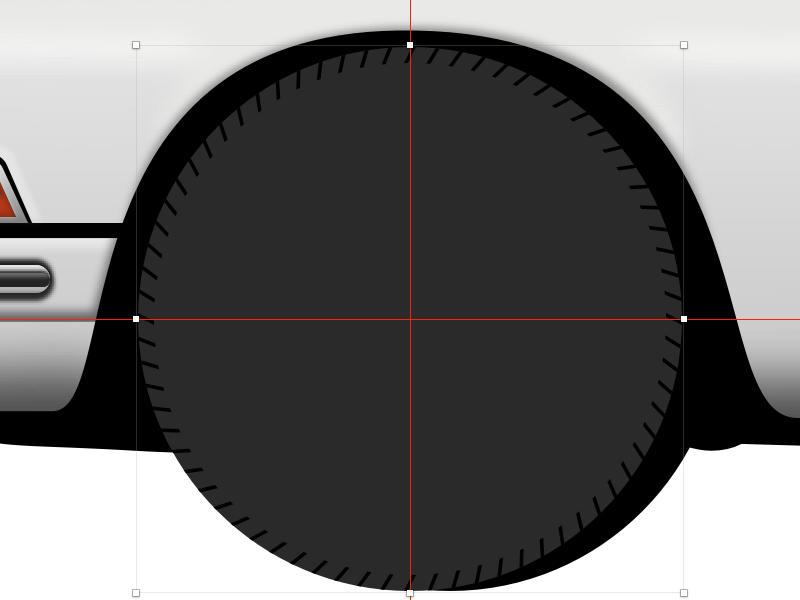
Nous utiliserons l'outil Rotate Copies pour créer les bandes de roulement autour de l'empattement . Comme Créer un symbole Faire pivoter les copies peut être l'une de ces fonctionnalités qui vous feront gagner beaucoup de temps et d'efforts!
Remarque : Si vous utilisez Sketch version 67.0 ou 67.1, vous pouvez rencontrer un bogue avec l'opération Rotation des copies . Si cela se produit, vous devrez créer manuellement les bandes de roulement autour de l'empattement ; ou (mieux), vous devriez mettre à jour vers la version 67.2 (ou ultérieure) où ce problème a été résolu.
Assurez-vous que le rectangle à l'intérieur du groupe marches est sélectionné, puis allez à Calque → Chemin → sélectionnez Rotation des copies . Une boîte de dialogue qui s'ouvre vous permettra de définir le nombre de copies supplémentaires de l'élément sélectionné à faire. Entrez 71 de sorte qu'au total nous aurons 72 rectangles autour de l'empattement qui seront les bandes de roulement. Appuyez sur Rotation dans la boîte de dialogue. Après avoir entré cette valeur dans la boîte de dialogue, vous verrez tous les rectangles et un indicateur circulaire au milieu.
Astuce: Effectuer cette étape dans Sketch est très gourmand en CPU et en mémoire! Si vous travaillez sur une machine moderne, vous ne rencontrerez probablement aucun problème; mais si votre Mac est un peu plus âgé, votre kilométrage peut varier. En général, lorsque vous travaillez avec un grand nombre de copies, essayez d'abord de désactiver Borders pour éviter de rester bloqué et obtenir le résultat de l'opération plus rapidement.

Maintenant, déplacez cet indicateur circulaire vers le bas jusqu'à ce qu'il se trouve précisément à l'intersection des guides – et voilà! nous avons 72 rectangles répartis uniformément autour de l'empattement . Lorsque vous avez terminé, appuyez sur Echap ou Entrez . Notez que si vous manquez de placer l'indicateur circulaire (le centre de rotation) juste à l'intersection des guides, les rectangles ne seront pas parfaitement répartis autour de l'empattement donc soyez prudent.
Note : L'outil Rotation des copies ne crée pas de forme composée dans les versions plus récentes de Sketch (version 52 ou ultérieure) mais crée (et fait pivoter) des copies séparées de la forme. En plaçant la première forme dans un groupe, nous nous sommes assurés que toutes les formes créées et pivotées se trouvent dans ce groupe nommé marches .

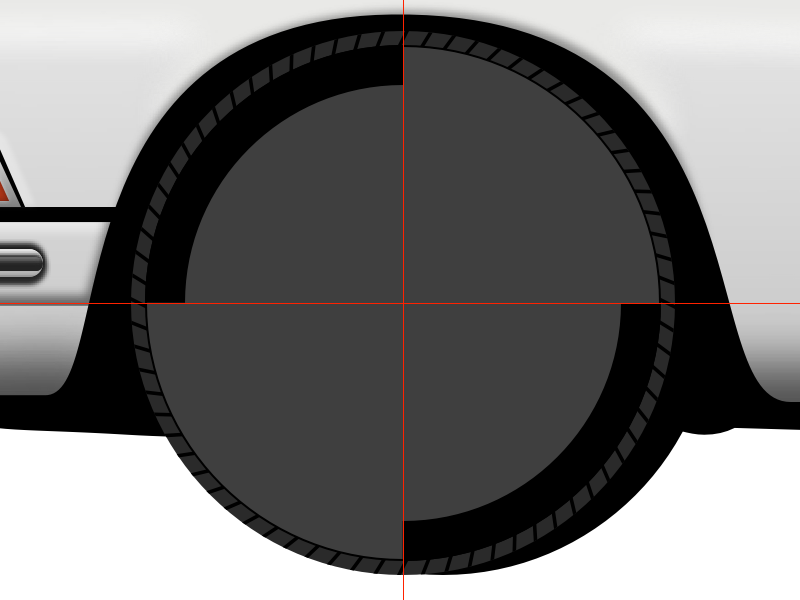
Sélectionnez à nouveau la roue de base dupliquez-la, positionnez-la au-dessus des marches dans la liste du panneau Calques et Réduisez-le de 14px . Remplacez Couleur par # 3F3F3F et activez Bordures – réglez Couleur sur # 000000 Position à Intérieur et Largeur à 1px .

Dupliquez ce cercle, désactivez Remplissages et réglez la Bordure Largeur sur 20px . Nous voulons seulement afficher 2 ⁄ 4 des Borders – 1 ⁄ 4 en haut à gauche et 1 ⁄ 4 en bas à droite. Pour ce faire, tapez dans le champ Dash r * π * 0.25 où r est le diamètre du cercle ( 254px dans mon cas ), 0,25 est 25% (ou 1 ⁄ 4 ) de la frontière, et π est 3,14 .
Dans ce cas, saisissez la formule suivante dans le champ Dash : 254 * 3.14 * 0.25 et appuyez sur Enter (ou Tab ) sur le clavier.
Remarque : Si vous entrez un nombre dans le champ Dash et appuyez sur Tab sur le clavier, Sketch remplira automatiquement le Champ Gap avec le même numéro. La même chose se produira si vous appuyez sur Entrée .

Dupliquez le cercle, réduisez-le un peu, réglez la Borders Width sur 12px et appliquez un Gradient angulaire avec les propriétés suivantes:
# 9D9D9D# 000000# 000000# 595959# 000000# 000000

Ensuite, appliquez un effet Flou gaussien avec un Montant de 4 .

Encore une fois, dupliquez le cercle, désactivez Flou gaussien et réduisez-le. Activez Fills, assurez-vous qu'il est toujours # 3F3F3F réglez Borders sur Outside position et Width à 1px . Remplacez Couleur par Dégradé linéaire et utilisez # 000000 pour le premier arrêt de couleur et # 444444 pour le dernier arrêt de couleur.
Ajoutez Inner Shadows – pour la Color utilisez #FFFFFF at 20% Alpha et réglez Blur sur 2 ; puis appliquez Ombres – pour la Couleur utilisez # 000000 à 90% Alpha et réglez Flou sur 2 .

C'est maintenant le moment idéal pour ajouter un peu de texture! Sélectionnez et copiez la forme de l'empattement collez-la dessus, puis Reculez une fois pour qu'elle se trouve juste sous le cercle que nous venons de créer. Réglez Remplissages sur Remplissage motif Tapez sur Remplissage image et choisissez le motif en bas à droite . Réglez Opacité pour cette forme sur 10% .

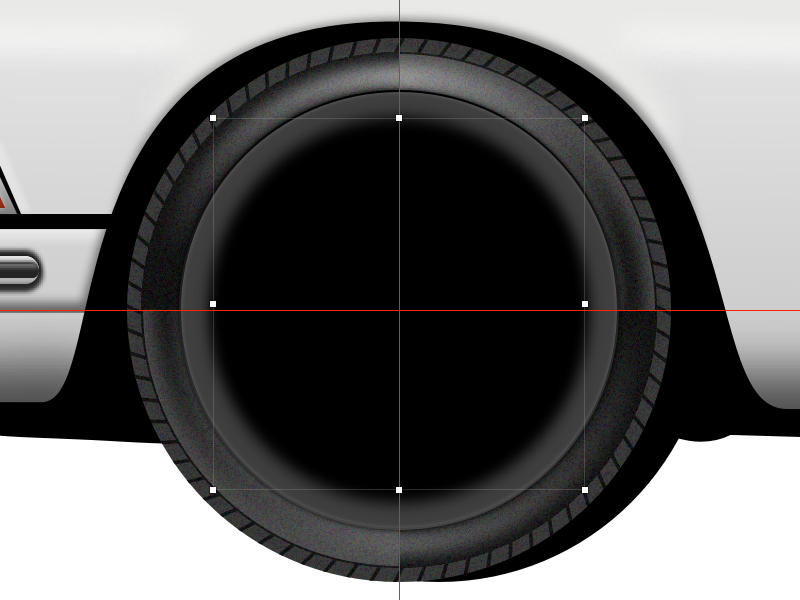
Sélectionnez le cercle en haut, dupliquez, désactivez Bordures Inner Shadows et Shadows . Réglez Fills sur # 000000 et Opacity sur 100% et réduisez ce cercle de 32px . Appliquez un Flou gaussien avec le Amount de 4 .

Poussez-le vers le bas 3px puis dupliquez et déplacez le duplicata 6px vers le haut.

Dupliquer le dernier cercle, désactiver le Flou gaussien, le pousser vers le bas de 3px et le réduire de 4px . Ajoutez un effet Ombres avec Couleur réglé sur #FFFFFF à 90% Alpha et Flou réglé sur 2 .

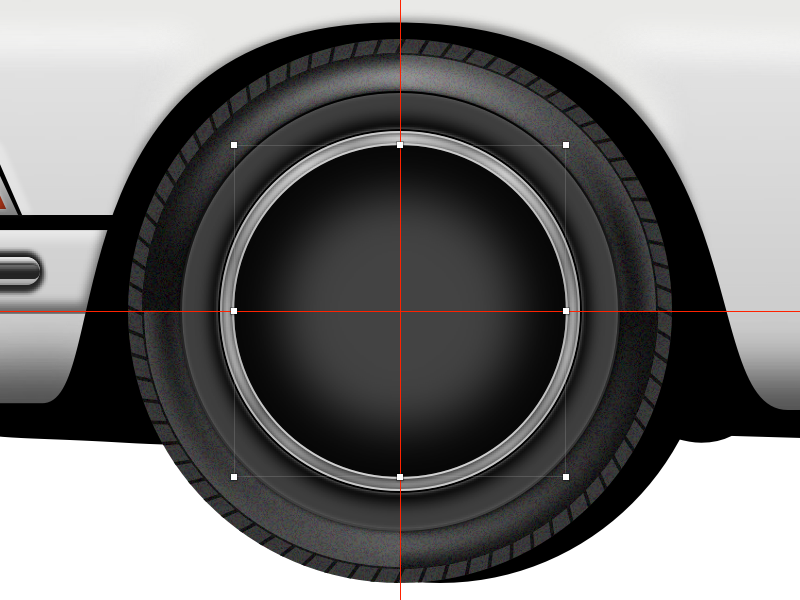
Maintenant, dupliquez ce cercle, désactivez Ombres et réduisez-le un peu (de 2px ). Activez Bordures réglez la position sur Inside Width to 1px et appliquez un Linear Gradient : [19659047] #CCCCCC
# A6A6A6 # A4A4A4 #CFCFCF 
Remplacez Remplissages par Dégradé angulaire avec les propriétés suivantes (attention! C'est une longue liste d'arrêts de couleur):
# D3D3D3#ACACAC# D8D8D8# B4B4B4# 8F8F8F# B2B2B2# C4C4C4# A4A4A4# C3CAD3C# C3CAD3CADADAD# 949494#BBBBBB# 929292# C2C2C2# B4B4B4# 8F8F8F# B4B4B4# D8D8D9 A# D8D8D9 A# D8D8D9 A# D8D8D9] des étapes décrites dans le paragraphe précédent du didacticiel. "/>Appliquer un dégradé angulaire. ( Grand aperçu ) Ensuite, ajoutez un effet Inner Shadows - réglez Couleur sur
# 000000à50%Alpha et définissez Flou et Répartissez sur2.Dupliquer, réduisez-le de
14pxmodifiez ] Remplit à# 434343Solid Color Borders position to Outside et Inner Shadows properties to: Couleur# 000000à90%Alpha, Flou et Spread réglé sur24.Ajoutez ensuite deux effets Ombres :
- d'abord - Couleur :
# 000000à50%Alpha; Y :2; Flou :5 - seconde - Couleur :
# 000000à50%Alpha; Flou :2

Ajoutez deux effets Ombres. ( Grand aperçu ) Encore une fois, dupliquez la forme, réduisez-la de
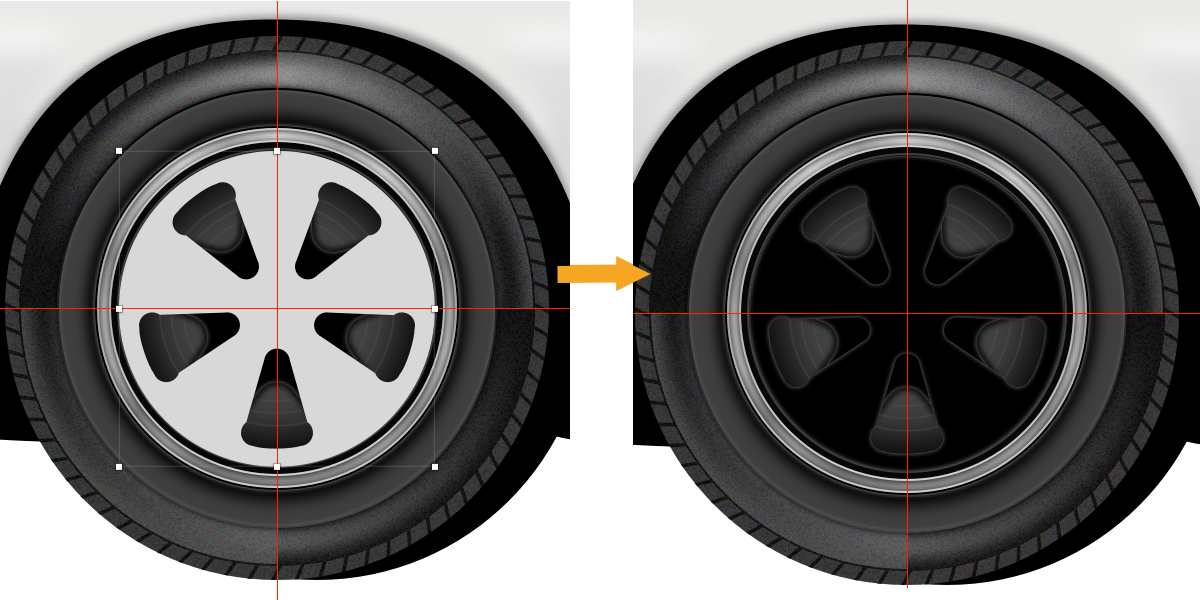
8pxdésactivez Fills Shadows et Inner Shadow et réglez Borders Color sur# 414141.
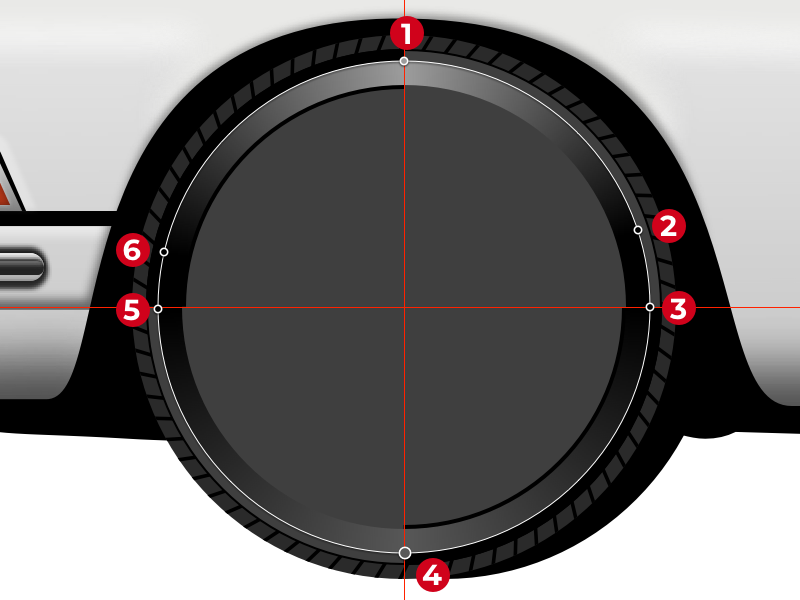
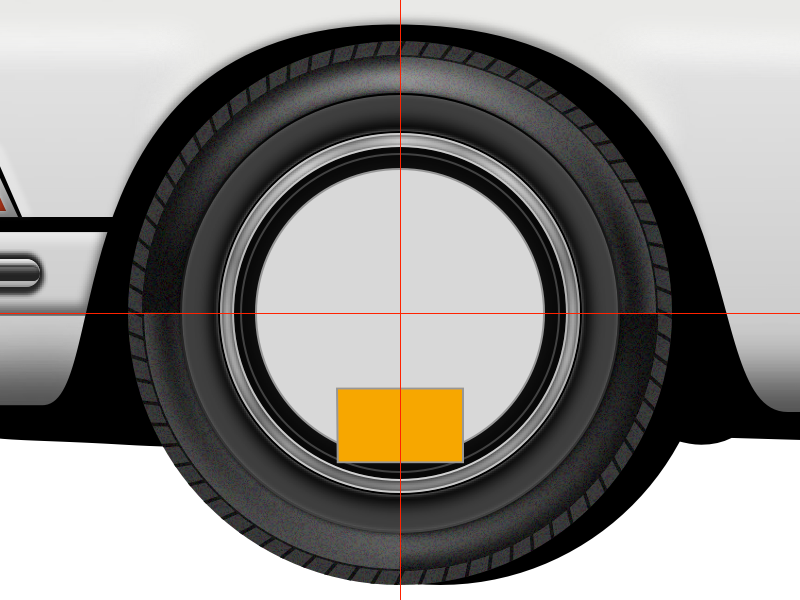
Dupliquez et réduisez le cercle. ( Grand aperçu ) Passez à l'outil Ovale (
O) et tracez un cercle à partir de l'intersection des guides. Désactivez Remplissages définissez Bordures Couleur sur# 575757positionnez-les sur Intérieur et Largeur sur1px.Dupliquez, réduisez un peu la taille et assurez-vous que la largeur de la bordure est
1px. Répétez encore sept fois, donc à la fin vous avez neuf cercles concentriques. Assurez-vous que toutes les Bordures Largeur sont1px. Utilisez l'image ci-dessous comme référence.
Les neuf cercles concentriques. ( Grand aperçu ) Sélectionnez tous les cercles concentriques et mettez-les dans un groupe.
Jantes
Nous commencerons ensuite à travailler sur la conception de la jante.
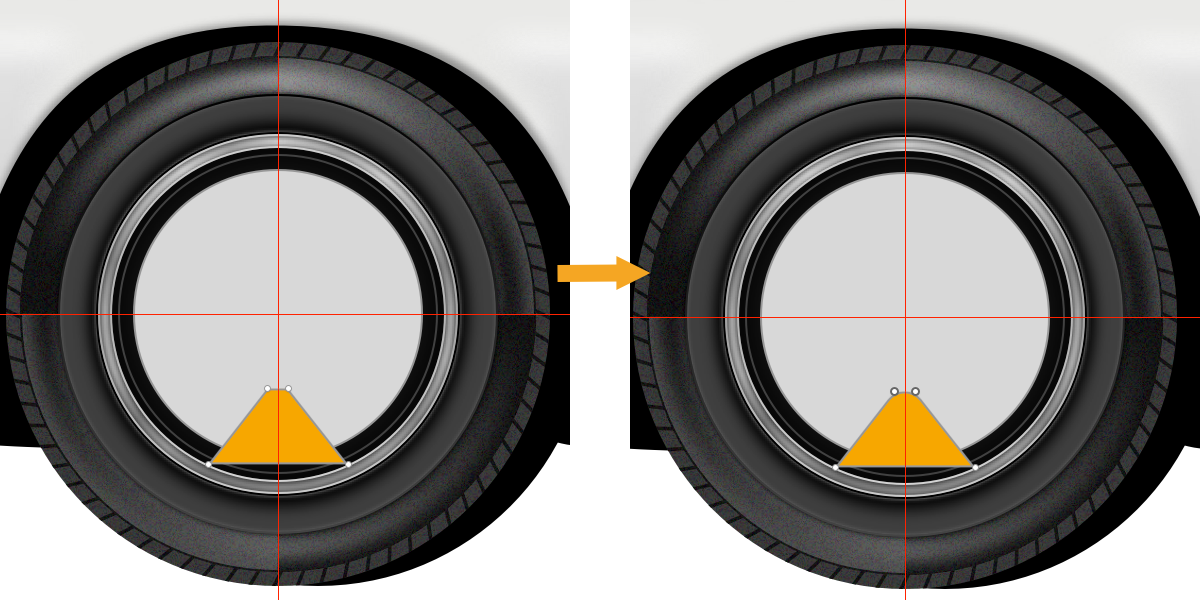
Tracez un cercle à partir du intersection des guides, puis dessinez un rectangle sur le dessus et centrez-le horizontalement sur le cercle.

Commencez à travailler sur la conception de la jante. ( Grand aperçu ) Sélectionnez ce rectangle, double-cliquez dessus pour passer en mode d'édition vecteur et déplacez les points jusqu'à obtenir quelque chose comme sur l'image ci-dessous . Sélectionnez les deux points supérieurs et définissez le Rayon sur
20.
Définissez le rayon des deux premiers points. ( Grand aperçu ) Nous utiliserons à nouveau Rotate Copies pour répartir cette forme autour du cercle. Sélectionnez à la fois - cercle et rectangle modifié - désactivez Bordures et placez-les dans un groupe. Sélectionnez maintenant le rectangle modifié, allez dans Calque → Chemin sélectionnez Rotate Copies entrez
4dans la boîte de dialogue (donc nous ' auront un total de cinq formes), cliquez sur Rotation et alignez l'indicateur circulaire sur l'intersection des guides. Une fois terminé, appuyez surEchapouEntrez.
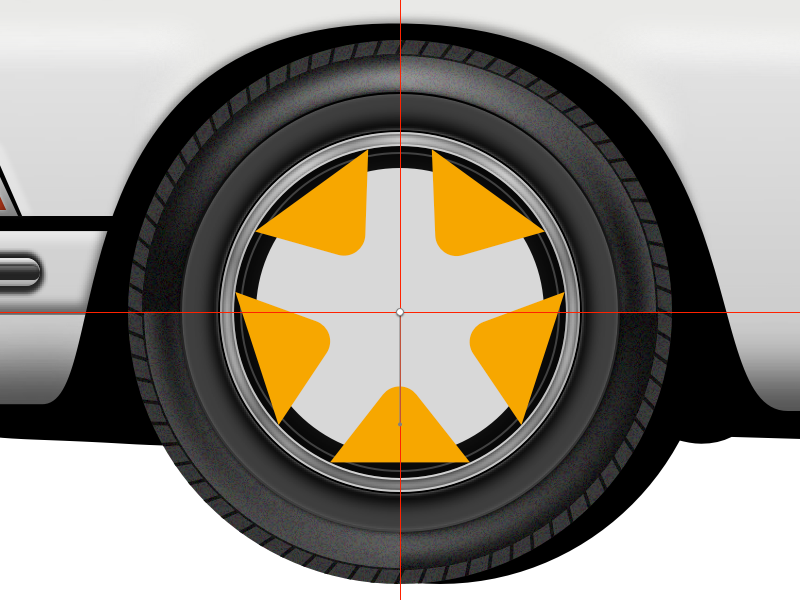
Utilisez Rotate Copies pour répartir cette forme autour du cercle. Nous nous rapprochons de la conception de la feuille de trèfle! ( Grand aperçu ) Sélectionnez toutes les formes à l'intérieur du groupe et appliquez une opération Soustraire de la barre d'outils supérieure. Ajoutez l'effet Inner Shadows - pour la Color utilisez
#FFFFFat50%Alpha et réglez Flur sur2. Ensuite, appliquez Ombres avec Couleur réglé sur# 000000à70%Alpha et les deux Flou et Spread réglé sur2. Enfin, remplacez Fills par# 000000.
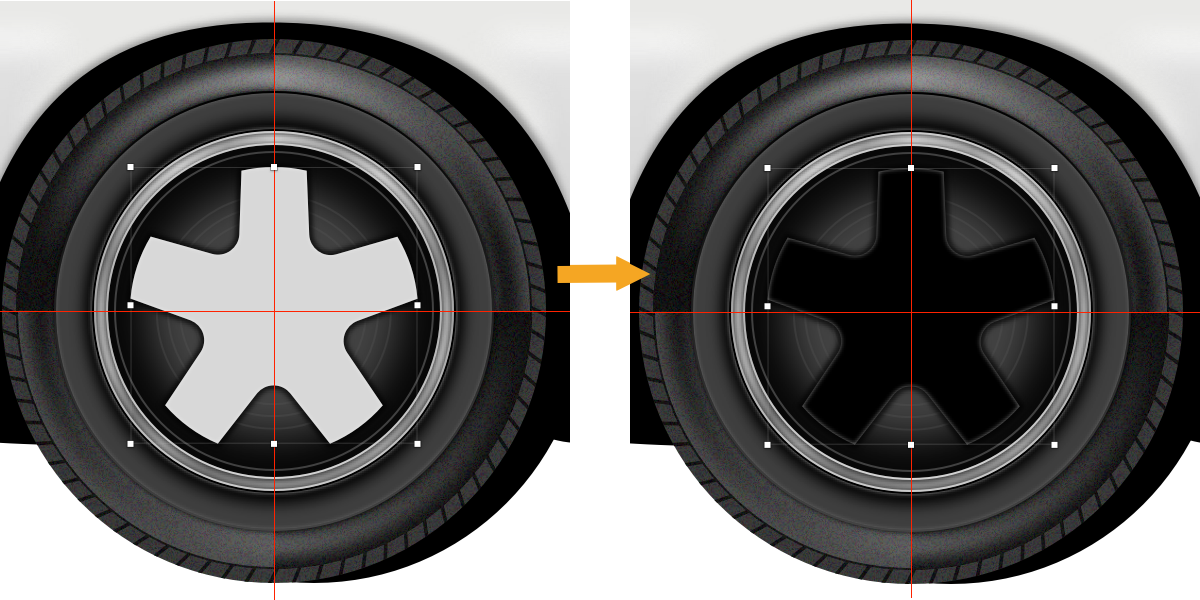
Soustrayez, ajoutez Inner Shadows and Shadows, remplacez Fills par noir. ( Grand aperçu ) Dessinez un cercle à partir de l'intersection des repères, mais agrandissez-le un peu plus que la forme ci-dessous, puis tracez une forme et centrez-la horizontalement par rapport au cercle. Sélectionnez les deux, désactivez Bordures et mettez-les dans un groupe. Sélectionnez la forme et effectuez une opération Rotation des copies . Entrez
4dans la boîte de dialogue (donc encore une fois, nous aurons un total de cinq formes), cliquez sur Rotation et alignez l'indicateur circulaire sur l'intersection des repères. Lorsque vous êtes prêt, appuyez surEchapouEntrée.
La fonction Rotation des copies est à nouveau utile. ( Grand aperçu ) Sélectionnez toutes les formes à l'intérieur du groupe et appliquez une opération Soustraire de la barre d'outils supérieure. Ajoutez un effet Inner Shadows - pour la Color utilisez
#FFFFFat50%Alpha et réglez Blur sur2. Remplacez Fills par# 131313.
Soustrayez, puis ajoutez Inner Shadows. ( Grand aperçu ) Maintenant, nous allons créer une tête de boulon de jante.
Zoomez assez près (j'ai zoomé à 400%) et dessinez un cercle. Réglez Remplissages sur
# 4F4F4Fmodifiez la position Borders sur Outside Width to1pxet utilisez# 8F8F8Fpour la Couleur . Ajoutez une autre bordure, mais cette fois, utilisez# 000000pour la Couleur réglez la position sur Centre et assurez-vous que la Width est] 1px.
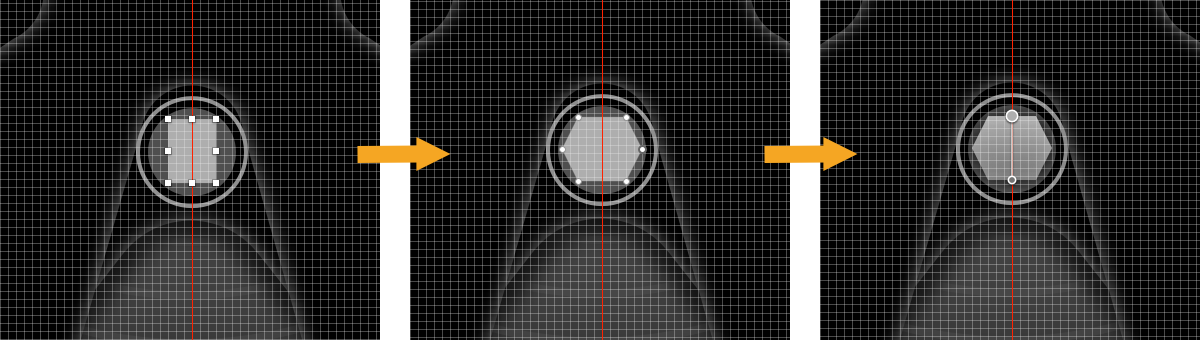
Créer une tête de boulon - premiers pas. ( Grand aperçu ) Tracez un rectangle au milieu du cercle, désactivez Bordures entrez vector mode d'édition maintenez ] Shift et cliquez sur le segment de droite pour ajouter un point au milieu, puis faites de même pour le segment de gauche. Poussez ces points
2pxvers la gauche et vers la droite pour créer une forme hexagonale. Appliquez un Dégradé linéaire pour les Remplissages - utilisez#AEAEAEpour le haut et# 727272pour la couleur du bas. Ajoutez Inner Shadows en utilisant# 000000à50%Alpha pour la Color et réglez Flur sur2et appliquez Ombres en utilisant# 000000à90%Alpha pour la Couleur et définissez Flou à2.
Continuez à travailler sur la tête de boulon. ( Grand aperçu ) Dupliquer la forme hexagonale, entrer vecteur mode d'édition sélectionner tous les points sur le côté gauche et les pousser
1pxvers la droite, puis sélectionnez tous les points supérieurs et poussez-les1pxvers le bas, poussez les points inférieurs1pxvers le haut et les points droits1pxvers la gauche. Effacez les Ombres et modifiez le Dégradé linéaire :# 8F8F8F# 979797# A4A4A4# 636363# 4A4A4A
Maintenant appliquer un effet Ombres intérieures . Pour la Couleur utilisez
# 000000avec50%Alpha et réglez Flou sur2.
Les détails de la tête de boulon, maintenant avec le gradient appliqué. ( Grand aperçu ) Sélectionnez toutes les formes que nous avons utilisées pour créer la tête de boulon et regroupez-les dans un groupe
tête de boulon. Nous pouvons Créer un symbole à partir du groupetête de boulonet nous pouvons l'utiliser autant de fois que nous en avons besoin.Pour créer le nouveau Symbole sélectionnez le groupe
tête de bouloncliquez dessus avec le bouton droit de la souris et choisissez Créer un symbole dans le menu. La boîte de dialogue Créer un nouveau symbole apparaîtra, donnez un nom au symbole (tête de boulon) et cliquez sur OK .Nous devons maintenant distribuer le
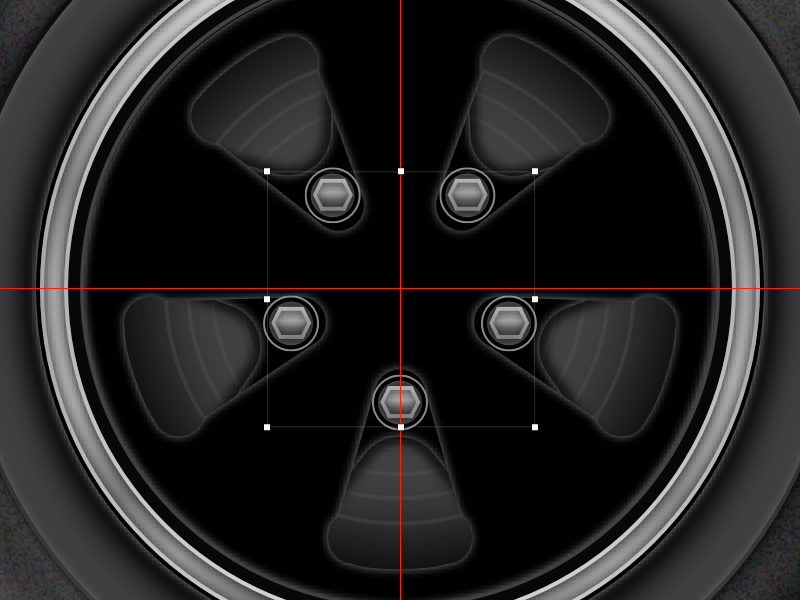
tête de boulonsymboles autour du cercle. Dupliquez le symbole, choisissez Rotation dans la barre d'outils supérieure, faites glisser le marqueur réticule jusqu'à l'intersection des guides et faites-le pivoter72 degrés. Continuez à dupliquer et à faire pivoter le symbole par incréments de 72 degrés, sans abandonner la sélection.
Répartissez les symboles «tête de boulon» autour du cercle. ( Grand aperçu ) Sélectionnez maintenant chaque occurrence de symbole et ajustez l'angle de rotation à
0 degrés.Astuce : Je suggère d'ajuster initialement le angle de
0 degrésafin que vous puissiez mieux voir le processus et à quoi ressembleront les boulons lorsqu'ils seront placés sur la jante. Une fois que les boulons de jante sont en place, cependant, ma recommandation est d'expérimenter un peu plus et d'essayer de définir un angle de rotation différent pour chaque symbole de boulon . Cela rendra les roues plus réalistes - après tout, dans la vraie vie, il est beaucoup plus probable de voir des boulons de jante à des angles aléatoires qu'alignés parfaitement à0degrés!Enfin, sélectionnez toutes les instances du
tête de boulonsymbole, placez-les dans un groupeboulonset effectuez un Reculer une fois.
Le groupe 'boulons' est maintenant terminé. ( Grand aperçu ) Dessinez une forme, définissez Bordure Couleur sur
#CFCFCFréglez Largeur sur1pxet positionner sur Inside et utiliser un Linear Gradient pour les Fills :# 5F5F5F# B5B5B5#CBCBCB
Ensuite, ajoutez l'effet Inner Shadows en utilisant
# 000000à30%Alpha et Blur réglé sur2.
Continuez à travailler sur les détails de la jante. ( Grand aperçu ) Prenez l'outil Vecteur (
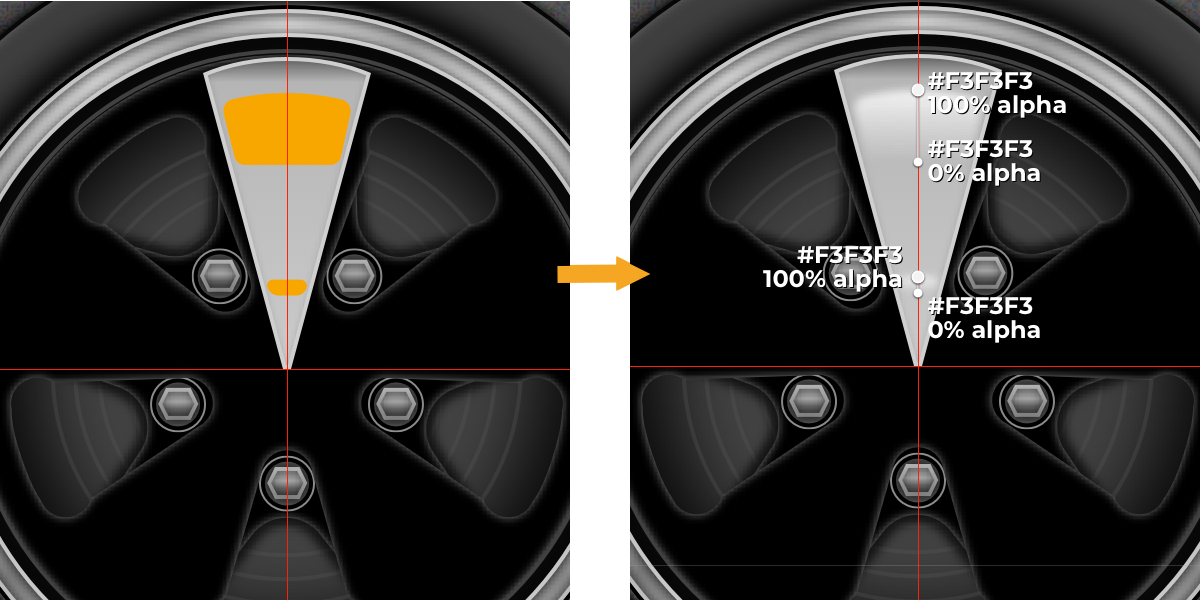
V) et dessinez deux formes que nous utiliserons pour les tons clairs. Utilisez un Dégradé Linéaire pour les Remplissages - utilisez pour le taquet de couleur supérieur# F3F3F3à100%Alpha et la même couleur pour le bas mais à0%Alpha. Utilisez les mêmes paramètres de dégradé pour les deux formes et appliquez également un Flou gaussien avec le Montant de1aux deux formes.
Créez les surbrillances. ( Grand aperçu ) Sélectionnez toutes les formes que nous venons de créer, regroupez-les et répartissez-les uniformément sur le bord. Utilisez la même méthode que nous avons utilisée pour les têtes de boulons.

Répartissez les formes autour de la jante. ( Grand aperçu ) Sélectionnez l'outil Ovale (
O) et tracez un cercle à partir de l'intersection des guides. Désactivez Bordures et utilisez Dégradé linéaire avec les couleurs définies sur# D8D8D8pour la butée supérieure et# 848484pour la butée inférieure. Utilisez Inner Shadows et Shadows pour lui donner un aspect légèrement surélevé.Ajoutons un effet de lumière Inner Shadows avec les propriétés suivantes:
- Couleur :
#FFFFFFà80%Alpha - Flou :
2
Ensuite, ajoutez une ombre sombre Inner Shadows effet:
- Couleur :
# 000000at50%Alpha - Blur :
2
Enfin, appliquer un effet Ombres :
- Couleur :
# 000000à50%Alpha - Flou :
2 - Spread :
1

Créez le cercle au milieu et appliquez tous les styles. ( Grand aperçu ) Dupliquez ce cercle, réduisez-le un peu, désactivez Inner Shadows et Shadows activez Borders ] et ajoutez la première bordure:
- Couleur :
# B5B5B5; - Position : Outside
- Width :
1px
Puis ajoutez-en un deuxième en haut:
- Couleur :
# 656565 - Position : Center
- Largeur :
1px

Travaillez sur les détails au centre de la jante. ( Grand aperçu ) Finissons le dessin de la roue en ajoutant à la jante l'emblème Porsche .
Remarque : Recréation du logo Porsche original pour les jantes, toutes en vecteurs, sort du cadre de ce tutoriel. Il existe quelques options - vous pouvez le créer vous-même en suivant les mêmes principes de base décrits dans ces pages; vous pouvez télécharger le logo de Wikipedia au format SVG et ensuite essayer de le modifier; or you can download a copy of the logo in vector lines from my website (
porsche-line-logo-f.svg). This copy of the Porsche logo was created by me from scratch, all in vectors, and this is the variant that I recommend you to use.After downloading the logo file (
porsche-line-logo-f.svg) bring it into our design.Switch to the Scale tool in the top toolbar, and in the dialog box enter
20pxin the height field, to adjust the size of the logo. Align the logo horizontally with the circle below.
Add the Porsche logo to the center of the rim. (Large preview) 
The Porsche emblem in the center of the rim (detail close-up). (Large preview) Completing the wheels — two possible workflows
Since a copy of the front wheel (once it’s complete) will be used more than once in our illustration, we have two options now:
- A. We can complete the front wheel design, duplicate the wheel, make a couple of tweaks, and use the duplicate as the rear wheel. This is the easiest variant.
- B. Or, for learning purposes, we can use a workflow involving the use of nested symbols. This is the more interesting option which I’ll explore in more detail in a bit. Buckle up!
A. Workflow #1: duplicate the wheel and adjust the copy
Pick up the Vector tool (
V) and draw a shape on top of the wheel. Turn off Borders and Fill the shape with black#000000color. Apply Gaussian Blur with an Amount of10. This way we will recreate the shadow from the car body over the wheel — just an extra bit of realism added.
Add the shadow from the car body over the wheel. (Large preview) Select the
wheelgroup,wheel base copylayer and the shadow shape layer and group these into afront wheelgroup.
Create the ‘front wheel’ group. (Large preview) Now that the wheel is ready, duplicate the
front wheelgroup, rename the group in the Layers panel list torear wheeland drag it to the right to its place.
[Movethe‘rearwheel’grouptoitsplace(Large preview) Select the
wheelgroup inside and push it20pxto the right, then select thewheel base copylayer and push it20pxto the left. The rear wheel is ready.
Move the ‘wheel’ group to the right, and the ‘wheel base copy’ layer to the left. The ‘rear wheel’ group is ready. (Large preview) B. Workflow #2: use nested symbols
Pick up the Vector tool (
V) and draw a shape on top of the wheel. Turn off Borders and Fill the shape with black#000000color. Apply Gaussian Blur with an Amount of10. This way we will recreate the shadow from the car body over the wheel — just an extra bit of realism added.Add the shadow from the car body over the wheel. (Large preview) The wheel is finished. Now we’ll use a symbol and a nested symbol to create the front and rear wheels.
Select the
wheelgroup,wheel base copylayer and the shadow shape layer and group these into afront wheelgroup.Create the ‘front wheel’ group. (Large preview) Here we’re coming to the more interesting bits! Select the
wheelgroup and create awheelsymbol, then select thefront wheeland create afront wheelsymbol. The front wheel symbol is now a nested symbol!Tip: You can learn more about nested symbols in the Sketch help pages dedicated to this topicand in the following article written by Noam Zomerfeld.
Nested symbols are regular symbols that are made from other symbols that already exist in your Sketch file. In this case, the
front wheelsymbol is made from thewheelsymbol, so thewheelsymbol is nested inside thefront wheelsymbol.What could be better than one symbol? Perhaps a symbol with another one inside it — enter Nested Symbols! This feature gives you a lot of possibilities when combining symbols together. Nesting symbols can be especially useful when you need to create variations of one symbol.
— Javier-Simon Cuello, “Unleashing The Full Potential Of Symbols In Sketch”Now, go to the Symbols page in Sketch, duplicate the
front wheelsymbol, select thewheelgroup and push it20pxto the right, then select thewheel base copyand push it20pxto the left. At the end, rename this symbol torear wheel.
Front and rear wheel symbols. (Large preview) Go back to our design, select and duplicate the
front wheelsymbol, then using the Inspector panel change the symbol torear wheelrename the symbol in the Layers panel list torear wheeland drag it to the right. Done!So far it may seem that we’ve spent more time playing with nested symbols, compared to the other workflow. That’s true. But also we have learned how to use this feature — and now if you would like to change the design of the wheels, instead of doing so in two separate groups, you’ll need to do it only once inside the
wheelsymbol and the changes will be automatically applied to both wheels of the car. This is why we used a nested symbol to create the front and rear wheels. (Also, imagine if you’re working on a design of a vehicle that has many more wheels visible from the side, not only two! The time saved will multiply.)Back to the bigger picture — with the wheels complete, we are very close to the final design. Let’s take a look.

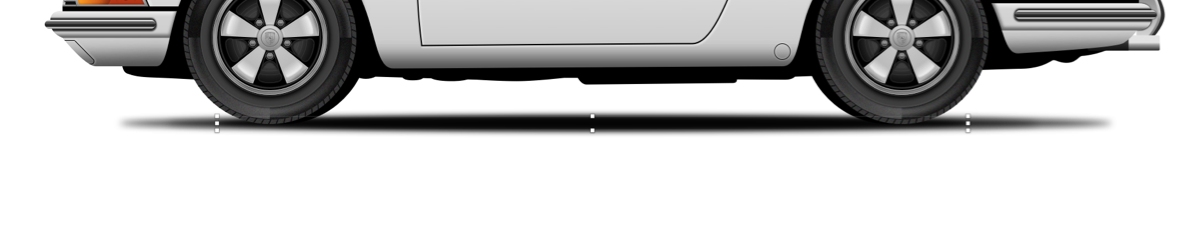
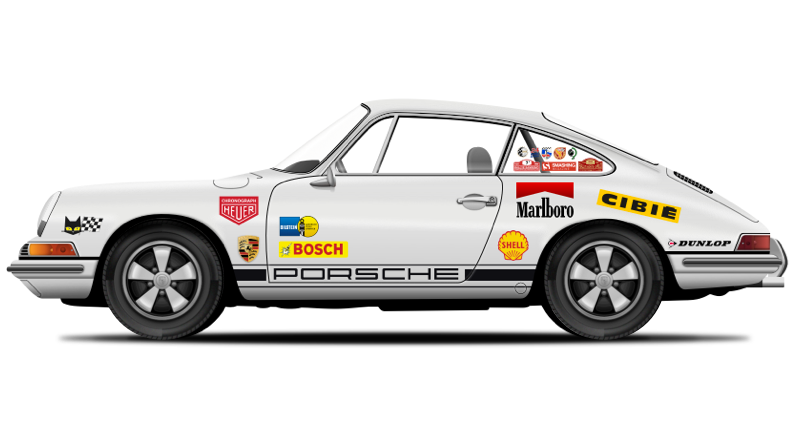
The Porsche 911 should look similar to this now. (Large preview) The Shadow Under the Wheels and the Car Body
Pick the Oval tool and draw an ellipse under the wheels. Set Fills to
#000000with80%Opacityturn off Borders and apply a Gaussian Blur with an Amount of5.
Start making the shadow below the car. (Large preview) Duplicate the oval shape, adjust the width using Resize handles (make it smaller), and set Fills Opacity to
50%.
Add one more oval shape. (Large preview) Duplicate this shape once again, adjust the width, and set Fills Opacity for this layer to
80%.
And one more. (Large preview) Select the shadow ellipses and group them all into a
shadowsgroup. Move this group to the very bottom in the Layers panel list.17. Final Touches — The Racing Decals
We are almost there! It’s time to add some racing decals to the car body and to the windshields.

Try to find some inspiration for the racing decals and stickers. (Large preview) The Porsche sticker
Jump over to the Wikimedia Commons website and download the Porsche Wortmarke in SVG format. Bring it to our design, scale it up and position it like on the image below.

The ‘Porsche Wortmarke’ added to the door. (Large preview) Create some rectangles using the Rectangle tool (
R), set Fills to#0F0F13and turn off Borders. Select all elements and group them into aporsche stickergroup, then drag this group insidebodyworkjust below thedoorlayer.
Add some decoration around the ‘Porsche’ sticker letters. (Large preview) Shell sticker
Next, download the vintage Shell logo in SVG format and open it in Sketch. Delete the white rectangle at the bottom inside the logo group, then copy and paste it into our design. Place it just above the
porsche stickerin the Layers panel list and position it like on the image below.
Add the vintage Shell logo sticker. (Large preview) Dunlop sticker
Download the Dunlop logo in SVG format, open it in Sketch and delete the yellow rectangle. Bring it to our design, scale it down a bit and place in close to the tail light. Make sure that the logo is inside the
bodyworkgroup, right above the Shell logo in the list of layers.
Add the Dunlop logo sticker. (Large preview) Marlboro sticker
Get the SVG version of the Marlboro logo from Wikimedia Commonspaste into our design and scale it down. Use the resize handles to squeeze the red shape, then move the letters up, close to the red shape, and finally change Fills for the red shape to Linear Gradient with the following parameters:
#E60202#BB0101#860000

Add and modify the Marlboro logo sticker. (Large preview) Please make sure that this logo is inside
bodyworkgroup and above “Dunlop” logo.Heuer Chronograph sticker
Download and open in Sketch the Tag Heuer SVG logo. Delete everything except: the rectangle with the black border, the red rectangle, and the word “Heuer”.
Select the rectangle with the black border, turn off Borders and change Fills to
#CC2132. Next, select the inner red rectangle, turn on Bordersset Color to#FFFFFFposition to Outside and Width to12px. Then use the Type tool (T) and type the wordChronograph— for the font use Helvetica Boldwith the size set to72px.Note: If you don’t have Helvetica Bold installed, use a font similar in appearance (for example, Arial Bold), as this scale it would be difficult to spot the differences.
Convert the text block into vector shapes, by right-clicking on it and selecting Convert to Outlines. Finally, select the bigger red rectangle, enter vector editing modeselect the top two points and push them down a bit. Select everything and place all the elements into a
heuer chronograph logogroup.
Create the ‘heuer chronograph logo’ group. (Large preview) Bring this modified logo to our design, scale it down and place it onto the car body. Like before, make sure it’s inside
bodyworkand it’s above theMarloborologo.
Put the Heuer Chronograph sticker on the car, to the left of the driver’s door. (Large preview) Porsche Crest Badge
Jump over to Wikimedia and download the Porsche logo in SVG format. We will need to modify and simplify it a bit because it’s too complex and we don’t need all of these details for the scale at which we’ll be using it in our illustration.
Open the SVG logo file in Sketch, and first delete all the groups (
amw-linkandd-link) inside it. Then, select the shape on top, pressEnterto switch to vector editing modeselect the word “Porsche” and the registered trademark symbol and delete them as well.
Start modifying the Porsche logo. (Large preview) Next, click on the arrow in the front second crest compound shape to reveal its components, select the four paths and drag them outside the compound path, then change their color to
#B12B28. Reveal the contents of the first compound crest shape, select all the paths that form the word “Porsche” and delete them.
The Porsche crest logo is now complete. (Large preview) Bring the modified Porsche crest logo to our design, scale it down, select the path that is the last one inside the
Porsche logogroup and add a Shadows effect — for the Color use#000000at50%Alpha and set Blur to2.
Put the Porsche crest logo in place on the car body. (Large preview) The Porsche crest badge should be placed inside the
bodyworkgroup just like the previous stickers that we added, above theheuer chronograph logogroup.Rallye Monte-Carlo sticker
Draw a rounded rectangle using the Rounded Rectangle tool (
U), enter vector editing mode and add and move the vector points to make the shape like on the image below.Set Color to
#9C010Eand turn off Borders. Duplicate this shape, change Color to, i.e.,#000000so you can see better what you are doing, enter vector editing modeselect the top points and push them down a bit. Push by the same distance the right points to the left, and the left points to the right. Then push up the bottom points a bit more.Turn off Fillsturn on Borders with position set to InsideWidth set to
6pxand Color to#D7CB82. Convert Borders into a shape by going to Layer → Convert to Outlines.
Start working on the Rallye Monte-Carlo sticker. (Large preview) Draw a rectangle without Bordersset Color to
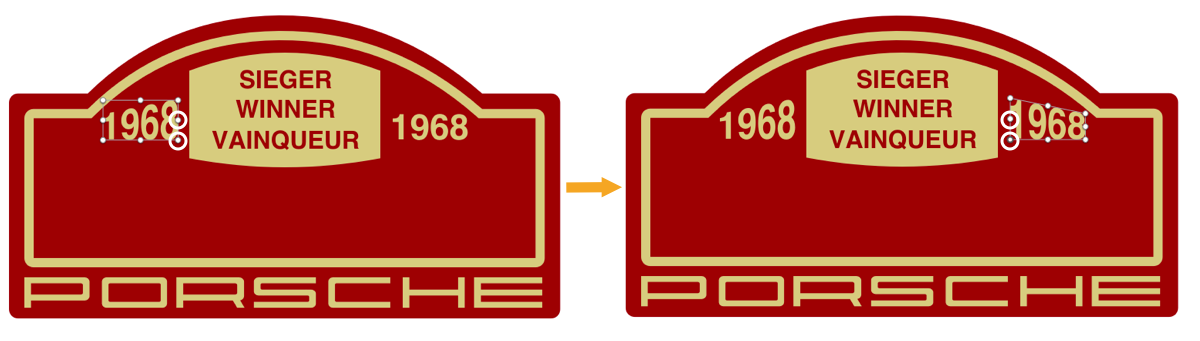
#D7CB82enter vector editing modeadd points in the middle of the top and bottom segment, and push them up and down a bit. Type the words: “SIEGER, WINNER, VAINQUEUR, 1968”. For the font use Helvetica Bold (or alternatively Arial Bold) with the#9C010EColor. Add the Porsche Wortmarke (we’ve used it earlier, remember?) to the bottom, and set Color to#D7CB82.
Add the shape, text, and the ‘Porsche Wortmarke’. (Large preview) Convert text to outlines, select the “1968” shape on the left side of the rectangle, zoom in and use Transform from the top toolbar to modify the shape:
- select the middle point on the right side and push it up a bit;
- select the bottom point on the right side and push it down the same amount of pixels.
Perform a similar action for the “1968” on the right side of the rectangle, but this time use the middle and bottom points on the left side.

Continue adding the details to the Rallye Monte-Carlo sticker. (Large preview) Type “RALLYE” “MONTE” “-CARLO” as a three separate wordsuse the same font and change the Color to
#D7CB82.Again, do a Convert to Outlines action and use Transform from the top toolbar to modify the shapes. I won’t go much into details here, but first modify the words “RALLYE” and “-CARLO” by using the method outlined above. Then, select all three shapes (the words), invoke the Transform tool, select the middle top point and push it up a bit to make the shapes elongated, and finally scale it up a bit by holding Alt + Shift on the keyboard while dragging the top right Resize handle. Use the image below as a reference.

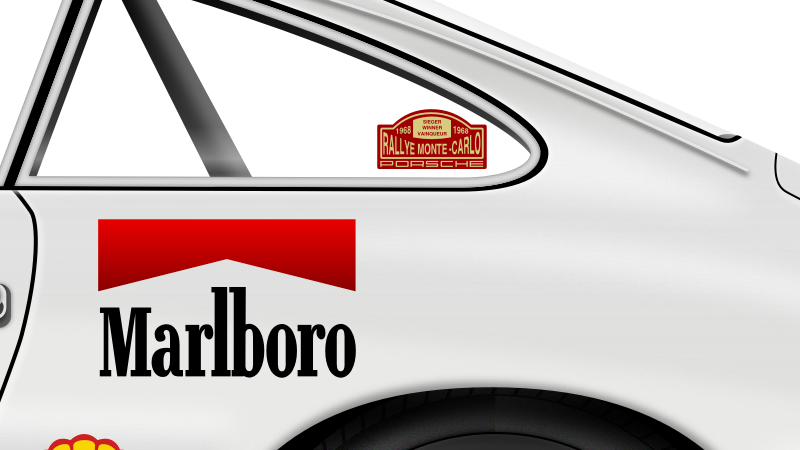
The Rallye Monte-Carlo sticker finished. (Large preview) Select and group all the elements we used to create this sticker into a
rallye monte-carlogroup, bring it into our design, and put it on the side windshield. In the Layers panel list this sticker should be inside thewindshieldsgroup on top.
Put the Monte-Carlo sticker on the side windshield. (Large preview) Smashing Magazine Sticker
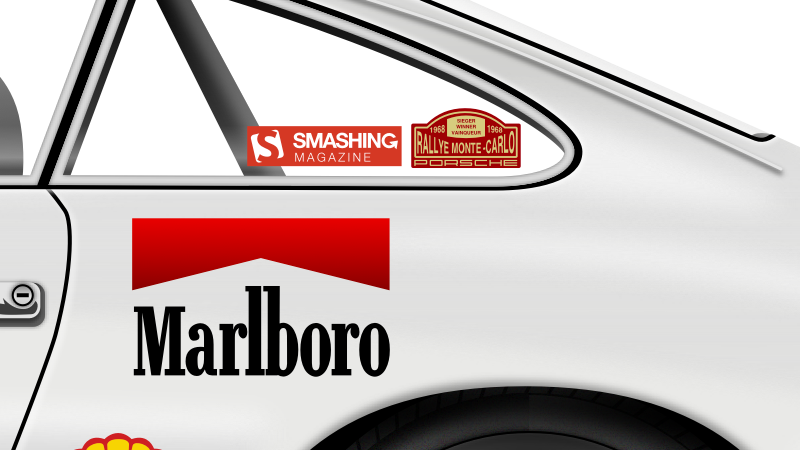
This is the last sticker we are going to put on the car. Download the Smashing Magazine logo in SVG format, open it in Sketch and draw a red (
#D33A2C) rectangle below the logo. Select both, create a groupSmashing Magazine stickercopy and paste into our design. Place it next toRallye Monte Carlosticker and scale it if needed.In the Layers panel list this should be inside the
windshieldsgroup on top.
The Smashing Magazine sticker added. (Large preview) I encourage you to add even more decals to the car body and the side windshield. Use the image below as a source for your inspiration.
Note: These are just examples and recreating all the decals in vectors is outside of the scope of this tutorial. You can apply the principles learned from this tutorial and tweak the decals in vector format in a similar way.

Some side windshield decals examples. (Large preview) 
The Porsche 911 car body decals examples. (Large preview) Racing Number and Drivers Names
One more important detail — since this car is a racing car we need to add a racing number to it.
Download the Montserrat font family (if you don’t have it already), install only the “Montserrat Bold” font variant, and type the racing number. Set the Size to
180pxand the Color to#000000. Then, Convert to Outlines to be able to apply a gradient to the racing number, and change Fills to a Linear Gradient:#22222B#3E3E42#656566#1B1B1E#0F0F13

Add the racing number. (Large preview) Now add the drivers’ last names. I will add shamelessly my last name and the last name of one of my best friends, Ivan Minic. Use the Text tool to add the names, for the font use again “Montserrat Bold”, set Size and Line to
20pxand Color to#2F2F2F.
Add the drivers’ last names. (Large preview) Select the names and the racing number, and move them inside the
bodyworkgroup, just above thedoorlayer.Select and put all elements created so far into one group —
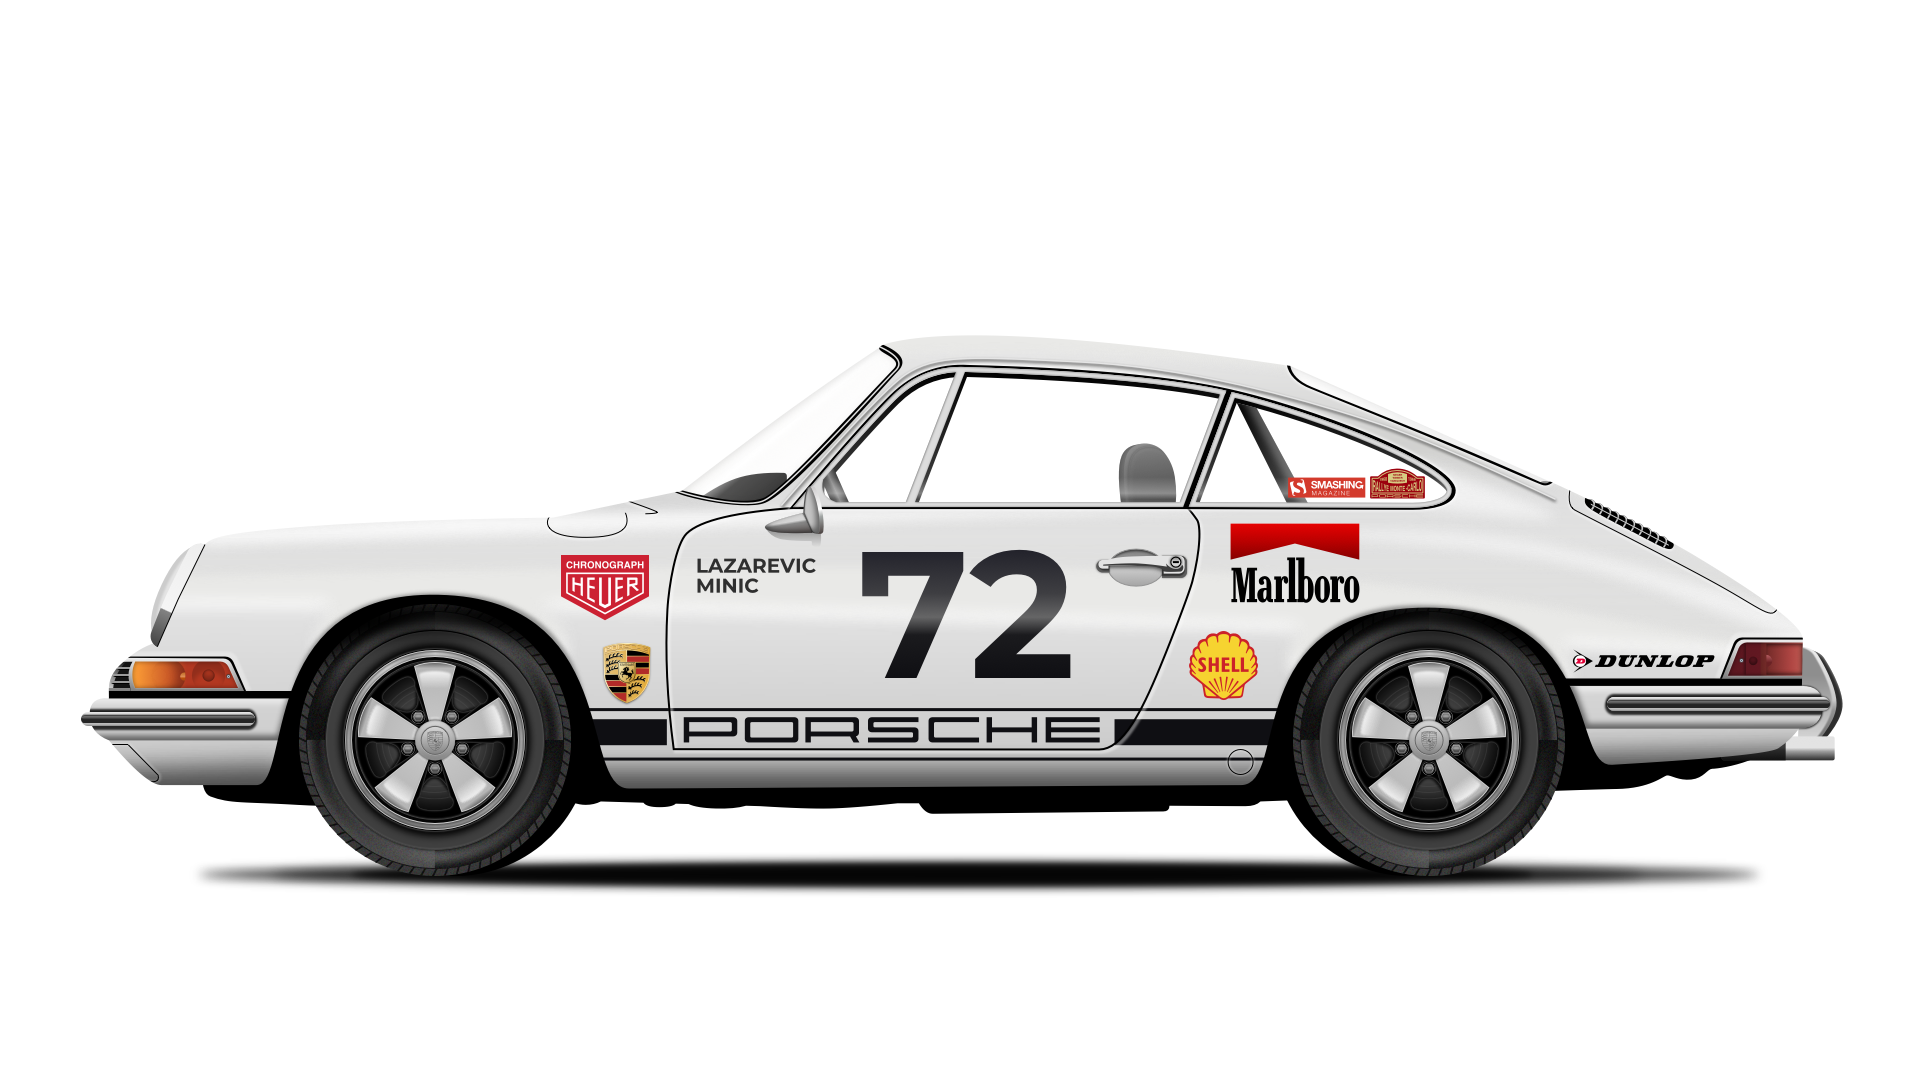
Porsche 911. Our Porsche 911 is now officially finished!
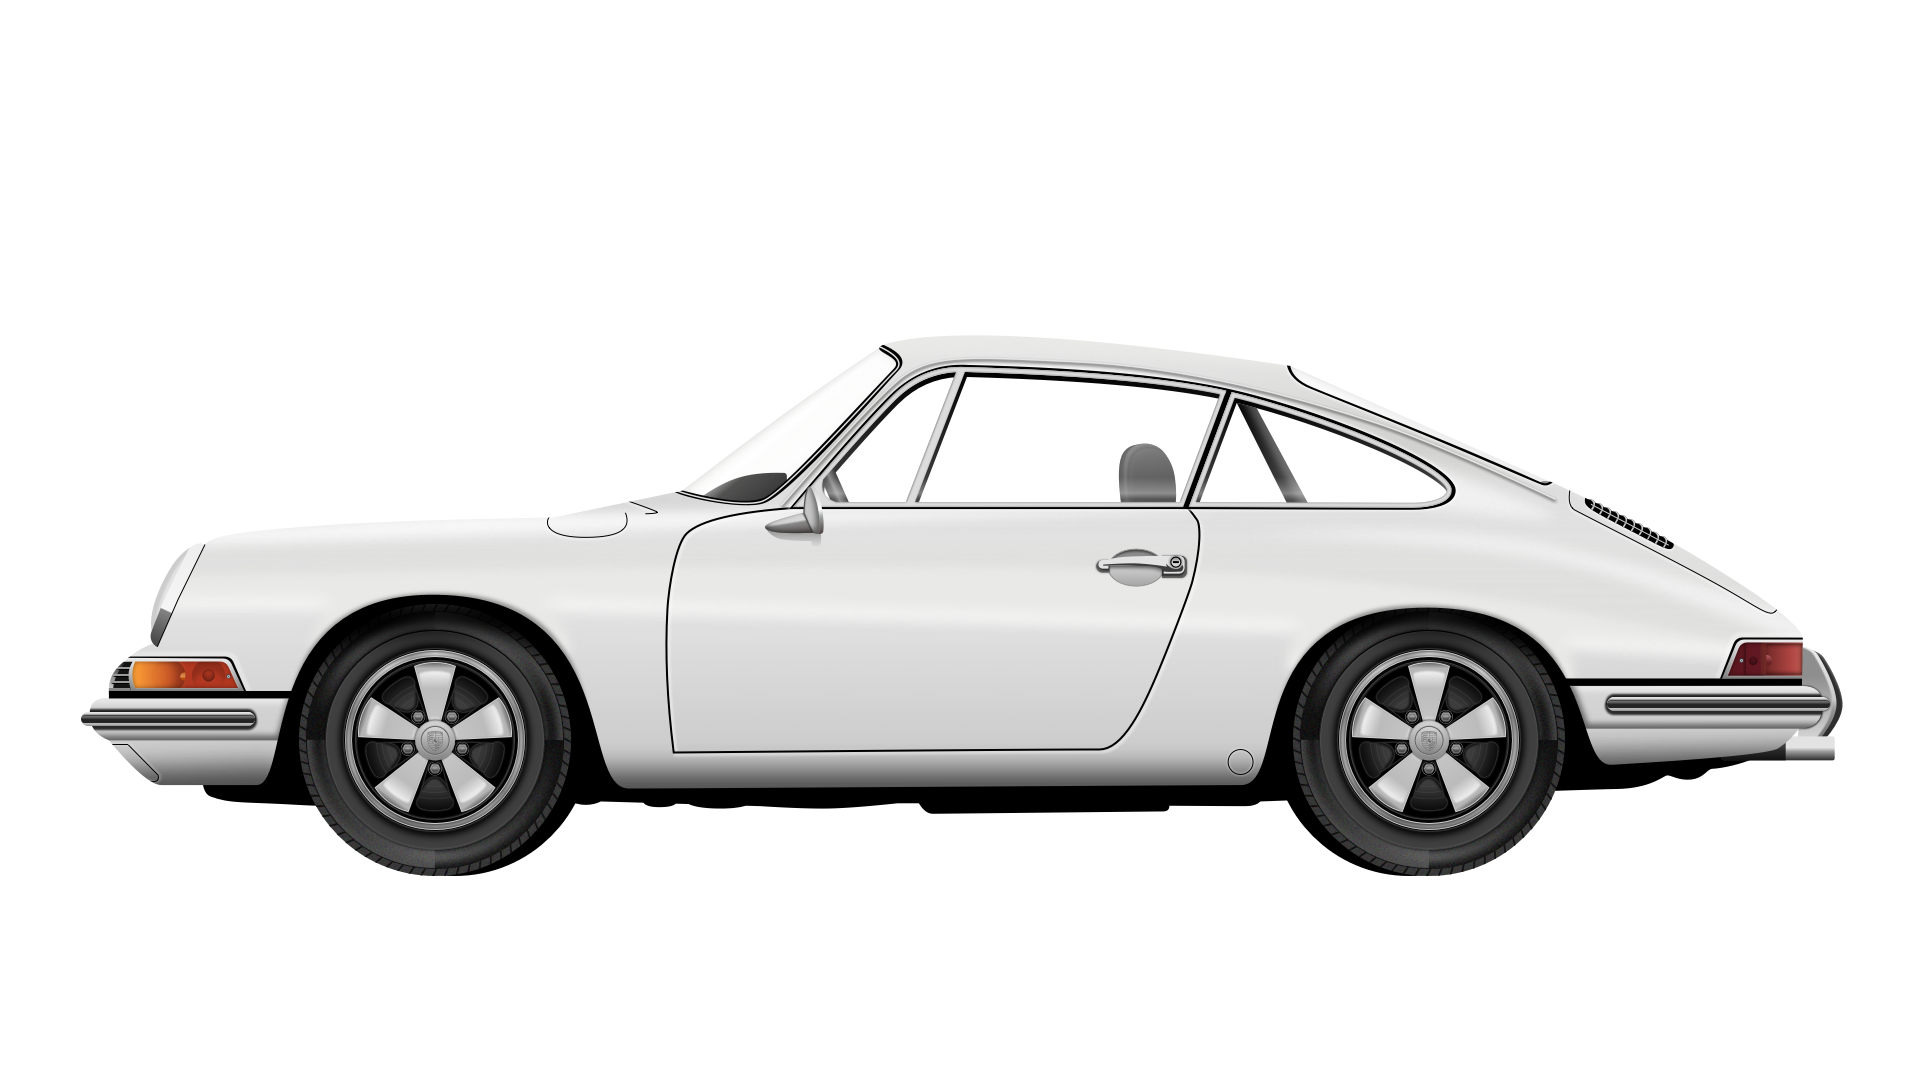
The Porsche 911 in all its glory! Great job! (Large preview) Finally, let’s add a background. Create a rectangle of the same size as the artboard, set the Fills to
#F4F3F2and push it below thePorsche 911group.
Final image 3/3: Add the background and complete the Porsche 911 tutorial illustration! (Large preview) Conclusion
We’ve put a lot of time and effort to reach the final destination and now you know too how to create all in vectors one of my favorite cars, the original Porsche 911 from 1968, in Sketch app. 🙂
The tutorial probably wasn’t too easy, but the end results were well worth it, in my opinion.
The next step, of course, is to design your own favorite car. Select a car (or another object you like) and be sure to find as many photos of it from different angles, so that you can carefully replicate all of the important details.

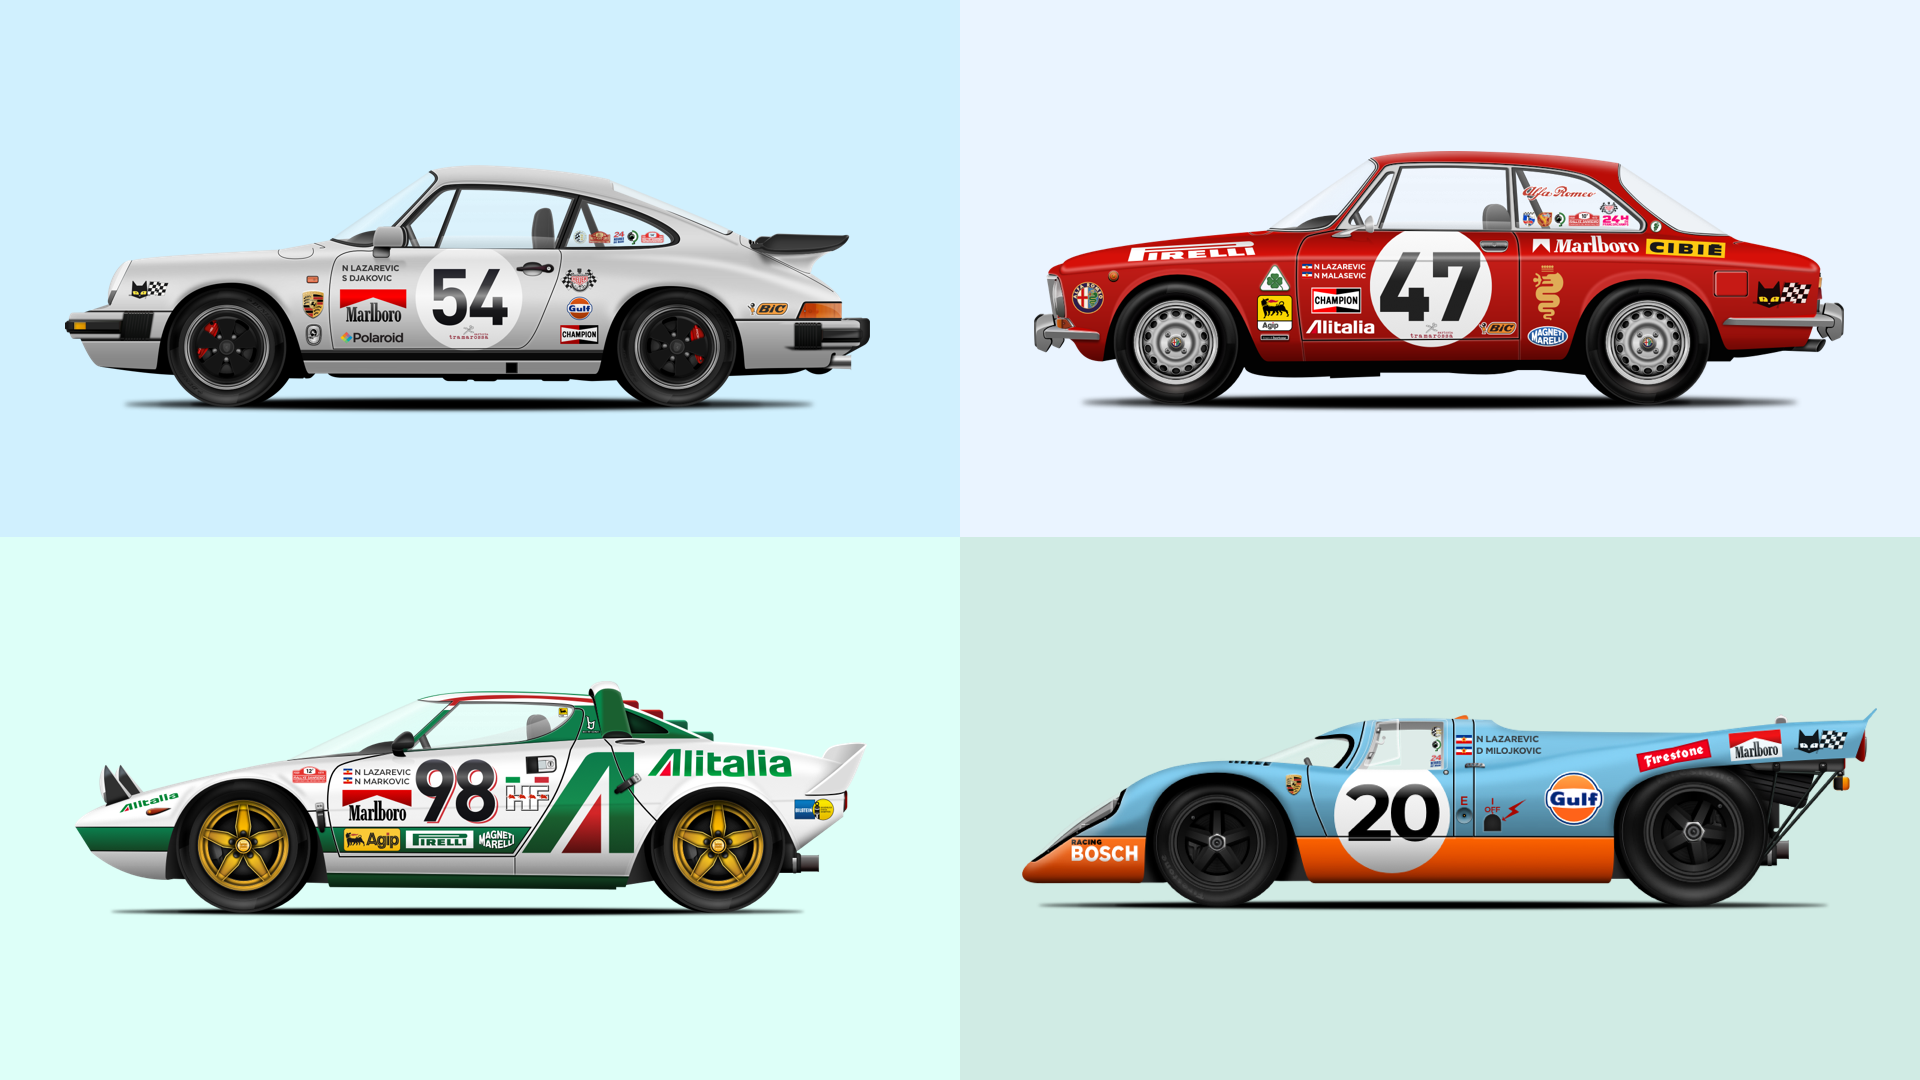
More car illustrations for your inspiration — these are some of other racing cars that I’ve been creating in Sketch recently. (Large preview) As you can see, there are certain tools and features in Sketch that you can master to create similar objects — use them to speed up and simplify the whole process.
I hope you will also remember how important is the proper naming of the layers/shapes (and groups), and stacking them in the right order so that even the most complex of illustrations are easy to organize and to work with.
Finally, if you have any questions, please leave a comment below or ping me on Twitter (@colaja) and I will gladly help you.
Further Reading
- “Mastering the Bézier Curve in Sketch” (a tutorial by Peter Nowell)
- “Designing A Realistic Chronograph Watch In Sketch” (a tutorial by Nikola Lazarević)
- “Styling — Fills” (Sketch help page)
- “Harnessing Vector Awesomeness in Sketch” (a tutorial by Peter Nowell)[19659339]“Vector Editing (and Vector Editing Mode)” (Sketch help page)
- “Shapes” (Sketch help page)
- “Copy styles in Sketch” (a tutorial by Drahomír Posteby-Mach)
- “Getting the pixels right in Sketch” (a tutorial by Nav Pawera)
- “Sketch Symbols, Everything you need to know, and more!” (a tutorial by Brian Laiche)
- “Unleashing The Full Potential Of Symbols In Sketch” (an article by Javier Simon Cuello)
- “How to Edit Shapes with Rotate Copies tool” (Sketch help page)
- “Creating Nested Symbols” (Sketch help page)
- “Nested Symbols in Sketch — I ? you” (a tutorial by Noam Zomerfeld)
- “Unleashing The Full Potential Of Symbols In Sketch: Nested Symbols” (a tutorial by Javier Cuello)
 (mb, ra, yk, il)
- d'abord - Couleur :
Source link