
L’outil secret pour exploser ton chiffre d'affaires en 2025 !
Comment créer un site de commerce électronique avec Angular 11, Commerce Layer et Paypal

Avoir une boutique e-commerce est crucial pour tout propriétaire de magasin car de plus en plus de clients se tournent vers les achats en ligne. Dans ce tutoriel, nous verrons comment créer un site de commerce électronique avec Angular 11. Le site utilisera Commerce Layer comme API de commerce électronique sans tête et utilisera Paypal pour traiter les paiements.
De nos jours, il est essentiel d'avoir une présence en ligne lors de la gestion d'une entreprise. Les achats en ligne sont beaucoup plus nombreux que les années précédentes. Avoir un magasin de commerce électronique permet aux propriétaires de magasins d'ouvrir d'autres sources de revenus dont ils ne pourraient pas profiter avec un simple magasin physique. Cependant, d'autres propriétaires de magasins gèrent leur entreprise entièrement en ligne sans présence physique. Il est donc crucial d'avoir une boutique en ligne.
Des sites tels qu'Etsy, Shopify et Amazon facilitent la configuration d'une boutique assez rapidement sans avoir à se soucier du développement d'un site. Cependant, il peut y avoir des cas où les propriétaires de magasins peuvent souhaiter une expérience personnalisée ou peut-être économiser sur le coût de possession d'un magasin sur certaines de ces plates-formes.
Les plates-formes API de commerce électronique sans tête fournissent des backends avec lesquels les sites de magasins peuvent s'interfacer. Ils gèrent tous les processus et données liés au magasin comme le client, les commandes, les expéditions, les paiements, etc. Tout ce dont vous avez besoin, c'est d'une interface pour interagir avec ces informations. Cela donne aux propriétaires beaucoup de flexibilité lorsqu'il s'agit de décider comment leurs clients expérimenteront leur boutique en ligne et comment ils choisiront de l'exécuter.
Dans cet article, nous verrons comment créer une boutique de commerce électronique à l'aide d'Angular 11. Nous utiliserons Commerce Layer comme API de commerce électronique sans tête. Bien qu'il puisse y avoir des tonnes de façons de traiter les paiements, nous montrerons comment en utiliser un seul, Paypal.
Prérequis
Avant de créer l'application, vous devez avoir installé Angular CLI. Nous allons l'utiliser pour initialiser et échafauder l'application. Si vous ne l'avez pas encore installé, vous pouvez l'obtenir via npm.
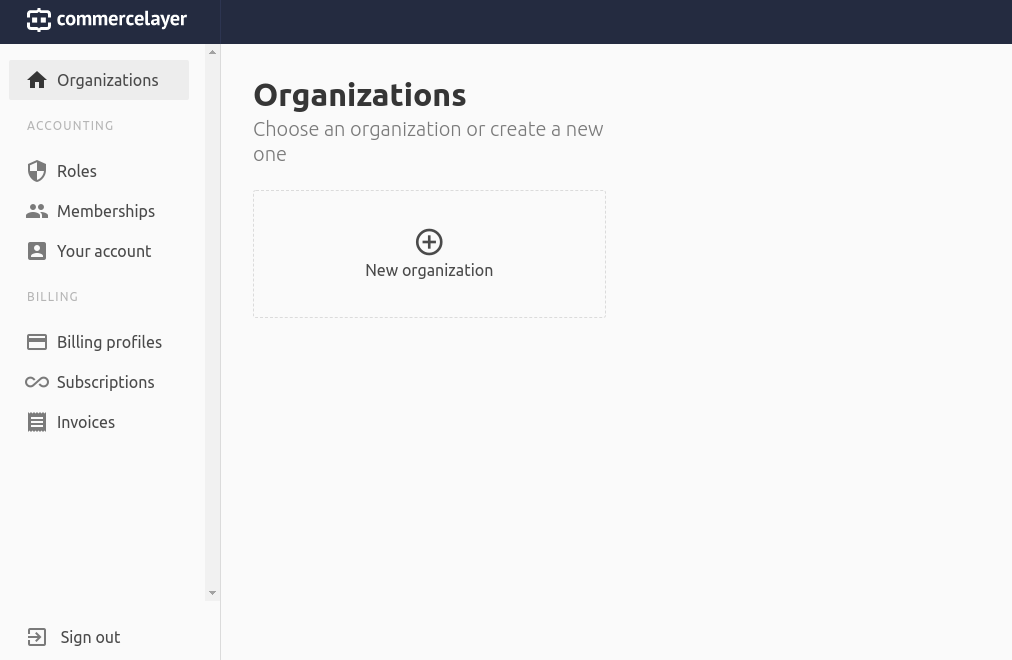
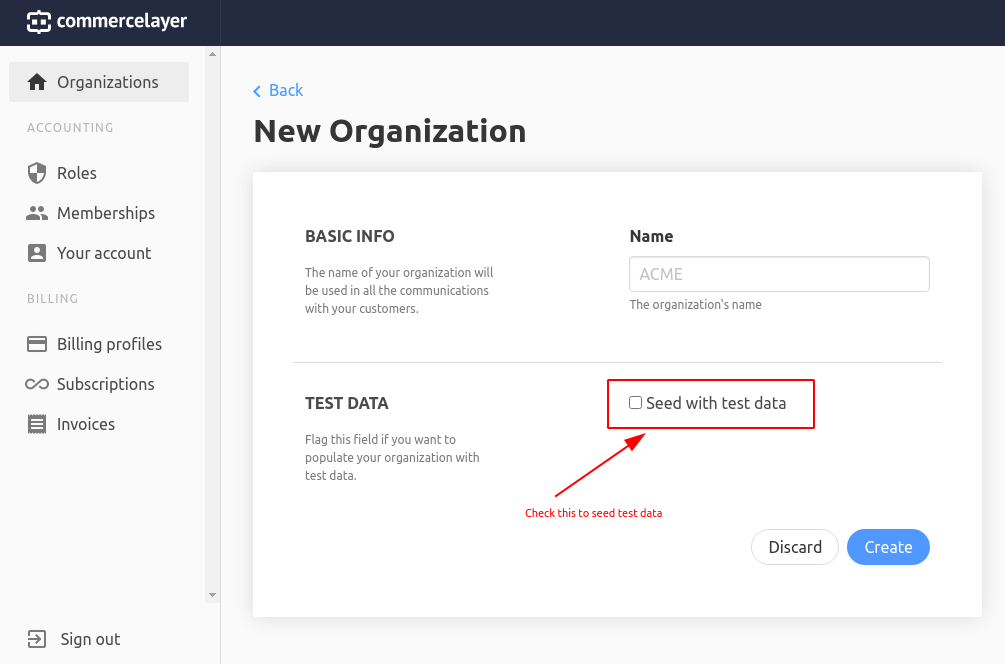
npm install -g @angular/cliVous aurez également besoin d'un compte développeur Commerce Layer. En utilisant le compte développeur, vous devrez créer une organisation de test et la semer avec des données de test. L'ensemencement facilite le développement de l'application en premier sans vous soucier des données que vous devrez utiliser. Vous pouvez créer un compte sur ce lien et une organisation ici.


Enfin, vous aurez besoin d'un compte Paypal Sandbox. Avoir ce type de compte nous permettra de tester les transactions entre les entreprises et les utilisateurs sans risquer de l'argent réel. Vous pouvez en créer un ici. Un compte sandbox possède une entreprise de test et un compte personnel de test déjà créé pour celui-ci.
En savoir plus après le saut ! Continuez à lire ci-dessous ↓
Commerce Layer et Paypal Config
Pour rendre les paiements Paypal Sandbox possibles sur Commerce Layer , vous devrez configurer des clés API. Rendez-vous sur la aperçu des comptes de votre compte développeur Paypal. Sélectionnez un compte professionnel et sous l'onglet Identifiants API des détails du compte, vous trouverez l'Application par défaut sous Applications REST.


Pour associer votre compte professionnel Paypal à votre organisation Commerce Layer, accédez au tableau de bord de votre organisation. Ici, vous allez ajouter une passerelle de paiement Paypal et un mode de paiement Paypal pour vos différents marchés. Sous Paramètres > Paiementssélectionnez Passerelles de paiement > Paypal et ajoutez votre identifiant client Paypal et votre secret.

Après avoir créé la passerelle, vous devrez créer un mode de paiement Paypal pour chaque marché que vous ciblez afin de rendre Paypal disponible en option. Vous le ferez sous Paramètres > Paiements > Modes de paiement > Nouveau mode de paiement.

Une note sur les routes utilisées
Commerce Layer fournit une route pour l'authentification et un autre ensemble de routes différentes pour leur API. Leur route d'authentification /oauth/token échange des informations d'identification contre un jeton. Ce jeton est requis pour accéder à leur API. Le reste des routes API utilise le modèle /api/:resource.
La portée de cet article ne couvre que la partie frontale de cette application. J'ai choisi de stocker les jetons côté serveur, d'utiliser des sessions pour suivre la propriété et de fournir des cookies http uniquement avec un identifiant de session au client. Cela ne sera pas traité ici car il sort du cadre de cet article. Cependant, les routes restent les mêmes et correspondent exactement à l'API Commerce Layer. Cependant, il existe quelques routes personnalisées non disponibles à partir de l'API Commerce Layer que nous utiliserons. Ceux-ci traitent principalement de la gestion des sessions. Je les signalerai au fur et à mesure que nous y parviendrons et décrirai comment vous pouvez obtenir un résultat similaire.
Une autre incohérence que vous remarquerez peut-être est que les corps de la demande diffèrent de ce que requiert l'API Commerce Layer. Étant donné que les requêtes sont transmises à un autre serveur pour être remplies avec un jeton, j'ai structuré les corps différemment. C'était pour faciliter l'envoi des demandes. Chaque fois qu'il y a des incohérences dans les corps de la demande, celles-ci seront signalées dans les services.
Comme cela est hors de portée, vous devrez décider comment stocker les jetons en toute sécurité. Vous devrez également modifier légèrement les corps de requête pour qu'ils correspondent exactement à ce que requiert l'API Commerce Layer. En cas d'incohérence, je créerai un lien vers les référence API et guides détaillant comment structurer correctement le corps.
App Structure
Pour organiser l'application, nous allons le décomposer en quatre parties principales. Une meilleure description de ce que fait chacun des modules est donnée dans les sections correspondantes :
- le module principal,
- le module de données,
- le module partagé,
- les modules de fonctionnalités.
La fonctionnalité. les modules regrouperont les pages et les composants associés. Il y aura quatre modules de fonctionnalités :
- le module d'authentification,
- le module de produit,
- le module de panier,
- le module de paiement.
Au fur et à mesure que nous arrivons à chaque module, j'expliquerai ce que son objectif est de décomposer son contenu.
Vous trouverez ci-dessous une arborescence du dossier src/app et l'emplacement de chaque module.
src
application
├── noyau
├── données
├── fonctionnalités
│ ├── authentifié
│ ├── panier
│ ├── caisse
│ └── produits
└── partagé
Générer l'application et ajouter des dépendances
Nous allons commencer par générer l'application. Notre organisation s'appellera The LIme Brand et disposera de données de test déjà ensemencées par Commerce Layer.
ng new lime-appNous aurons besoin de quelques dépendances. Principalement Matériau angulaire et Until Destroy. Angular Material fournira les composants et le style. Jusqu'à ce que Destroy se désabonne automatiquement des observables lorsque les composants sont détruits. Pour les installer, exécutez :
npm install @ngneat/until-destroy
ng add @angular/material
Assets
Lors de l'ajout d'adresses à Commerce Layer, un code de pays alpha-2 doit être utilisé. Nous ajouterons un fichier json contenant ces codes au dossier assets dans assets/json/country-codes.json. Vous pouvez trouver ce fichier lié ici.
Styles
Les composants que nous allons créer partagent un style global. Nous les placerons dans styles.css qui se trouve sur ce lien.
Environnement
Notre configuration sera constituée de deux champs. L'apiUrl qui doit pointer vers l'API Commerce Layer. apiUrl est utilisé par les services que nous allons créer pour récupérer les données. Le clientUrl doit être le domaine sur lequel l'application s'exécute. Nous l'utilisons lors de la définition des URL de redirection pour Paypal. Vous pouvez trouver ce fichier sur ce lien.
Module partagé
Le module partagé contiendra des services, des tuyaux et des composants partagés entre les autres modules.
ng gm sharedIl se compose de trois composants, d'un tuyau et de deux services. Voici à quoi cela ressemblera.
src/app/shared
composants
│ ├── article-quantité
│ │ ├── item-quantity.component.css
│ │ ├── item-quantity.component.html
│ │ └── item-quantity.component.ts
│ ├── simple-page
│ ├── simple-page.component.css
│ │ ├── simple-page.component.html
│ │ └── simple-page.component.ts
│ └── titre
├── titre.component.css
├── titre.component.html
│ └── titre.composant.ts
tuyaux
└── word-wrap.pipe.ts
services
│ ├── http-error-handler.service.ts
└── local-storage.service.ts
└── shared.module.ts
Nous utiliserons également le module partagé pour exporter certains composants de matériau angulaire couramment utilisés. Cela facilite leur utilisation prête à l'emploi au lieu d'importer chaque composant dans différents modules. Voici ce que shared.module.ts contiendra.
@NgModule({
  déclarations : [SimplePageComponent, TitleComponent, WordWrapPipe, ItemQuantityComponent],
  importations : [CommonModule, MatIconModule, MatButtonModule, MatTooltipModule, MatMenuModule, RouterModule],
  exportations : [
    CommonModule,
    ItemQuantityComponent,
    MatButtonModule,
    MatIconModule,
    MatSnackBarModule,
    MatTooltipModule,
    SimplePageComponent,
    TitleComponent,
    WordWrapPipe
  ]
})
export class SharedModule { }
Components
Item Quantity Component
Ce composant définit la quantité d'articles lors de leur ajout au panier. Il sera utilisé dans les modules panier et produits. Un sélecteur de matériaux aurait été un choix facile à cet effet. Cependant, le style du matériau sélectionné ne correspondait pas aux entrées de matériau utilisées dans toutes les autres formes. Un menu de matériaux ressemblait beaucoup aux entrées de matériaux utilisées. J'ai donc décidé de créer un composant select avec lui à la place.
ng g c shared/components/item-quantityLe composant aura trois propriétés d'entrée et une propriété de sortie. quantity définit la quantité initiale d'articles, maxValue indique le nombre maximum d'articles pouvant être sélectionnés en une seule fois, et disabled indique si le composant doit être désactivé ou pas. Le setQuantityEvent est déclenché lorsqu'une quantité est sélectionnée.
Lorsque le composant est initialisé, nous allons définir les valeurs qui apparaissent dans le menu des matériaux. Il existe également une méthode appelée setQuantity qui émettra des événements setQuantityEvent.
Ceci est le fichier du composant.
@Component({
  sélecteur : 'app-item-quantity',
  templateUrl: './item-quantity.component.html',
  URL de style : ['./item-quantity.component.css']
})
la classe d'exportation ItemQuantityComponent implémente OnInit {
  @Input() quantité : nombre = 0 ;
  @Input() maxValue?: nombre = 0;
  @Input() désactivé ? : booléen = faux ;
  @Output() setQuantityEvent = new EventEmitter();

  valeurs : nombre[] = [] ;

  constructeur() { }

  ngOnInit() {
    if (this.maxValue) {
      for (let i = 1; i <= this.maxValue; i++) {
        this.values.push(i);
      }
    }
  }

  setQuantity(valeur : nombre) {
    this.setQuantityEvent.emit(value);
  }
}
Voici son modèle.
Voici son style.
bouton {
    marge : 3px ;
}
Composant de titre
Ce composant sert également de titre pas à pas ainsi qu'un titre simple sur certaines pages plus simples. Bien qu'Angular Material fournisse un composant pas à pas, il n'était pas le mieux adapté à un processus de paiement assez long, n'était pas aussi réactif sur les écrans plus petits et nécessitait beaucoup plus de temps pour sa mise en œuvre. Un titre plus simple pourrait cependant être réutilisé comme indicateur pas à pas et être utile sur plusieurs pages.
ng gc shared/components/titleLe composant a quatre propriétés d'entrée : un titleun subtitleun nombre (no) et centerTextpour indiquer s'il faut centrer le texte du composant.
@Component({
  sélecteur : 'app-title',
  templateUrl: './title.component.html',
  URL de style : ['./title.component.css']
})
classe d'exportation TitleComponent {
  @Input() titre : string = '';
  @Input() sous-titre : string = '';
  @Input() non ? : chaîne ;
  @Input() centerText?: boolean = false;
}
Vous trouverez ci-dessous son modèle. Vous pouvez trouver son style lié ici.
    {{no}}

        {{title}}
        {{subtitle}}
Composant de page simple
Il existe plusieurs cas où un titre, une icône et un bouton étaient tout ce qui était nécessaire pour une page. Ceux-ci incluent une page 404, une page de panier vide, une page d'erreur, une page de paiement et une page de passation de commande. C'est à cela que servira le composant de page simple. Lorsque vous cliquez sur le bouton de la page, il redirige vers une route ou effectue une action en réponse à un buttonEvent.
Pour le faire :
ng gc shared/components/simple- pageCeci est son fichier de composant.
@Component({
  sélecteur : 'app-simple-page',
  templateUrl: './simple-page.component.html',
  URL de style : ['./simple-page.component.css']
})
classe d'exportation SimplePageComponent {
  @Input() titre : string = '';
  @Input() sous-titre ? : chaîne ;
  @Input() nombre ? : chaîne ;
  icône @Input() ? : chaîne ;
  @Input() buttonText: string = '';
  @Input() centerText?: boolean = false;
  @Input() buttonDisabled?: boolean = false;
  @Input() route ? : chaîne | indéfini;
  @Output() buttonEvent = new EventEmitter();

  constructeur (routeur privé : routeur) { }

  boutonClic() {
    if (this.route) {
      this.router.navigateByUrl(this.route);
    } autre {
      this.buttonEvent.emit();
    }
  }
}
Et son modèle contient :
{{icon}}
Son style peut être trouvé ici.
Pipes
Word Wrap Pipe
Certains noms de produits et autres types d'informations affichés sur le site sont vraiment longs. Dans certains cas, il est difficile de faire envelopper ces longues phrases dans des composants matériels. Nous allons donc utiliser ce tube pour réduire les phrases à une longueur spécifiée et ajouter des ellipses à la fin du résultat.
Pour le créer, exécutez :
ng g pipe shared/pipes/word-wrapIl contiendra :
import { Pipe, PipeTransform } depuis '@angular/core' ;

@Tuyau({
  nom : 'wordWrap'
})
la classe d'exportation WordWrapPipe implémente PipeTransform {
  transform(valeur : chaîne, longueur : nombre) : chaîne {
    return `${value.substring(0, length)}...`;
  }
}
Services
HTTP Error Handler Service
Il existe un certain nombre de services http dans ce projet. La création d'un gestionnaire d'erreurs pour chaque méthode est répétitive. Il est donc logique de créer un seul gestionnaire qui peut être utilisé par toutes les méthodes. Le gestionnaire d'erreurs peut être utilisé pour formater une erreur et également transmettre les erreurs à d'autres plates-formes de journalisation externes.
Générez-le en exécutant :
ng gs shared/services/http-error-handlerCe service ne contiennent qu'une seule méthode. La méthode formatera le message d'erreur à afficher selon qu'il s'agit d'une erreur client ou serveur. Cependant, il est possible de l'améliorer davantage.
@Injectable({
  fourni dans: 'root'
})
classe d'exportation HttpErrorHandler {

  constructeur() { }

  handleError(err: HttpErrorResponse): Observable {
    let displayMessage = '';

    if (err.error instanceof ErrorEvent) {
      displayMessage = `Erreur côté client : ${err.error.message}` ;
    } autre {
      displayMessage = `Erreur côté serveur : ${err.message}` ;
    }

    return throwError(displayMessage);
  }
}
Service de stockage local
Nous utiliserons le stockage local pour suivre le nombre d'articles dans un panier. Il est également utile de stocker l'identifiant d'une commande ici. Une commande correspond à un panier sur Commerce Layer.
Pour générer le service de stockage local, exécutez :
ng gs shared/services/local-storageLe service contiendra quatre méthodes pour ajouter, supprimer et obtenir des articles depuis le stockage local et un autre pour l'effacer.
import { Injectable } depuis '@angular/core';

@Injectable({
  fourni dans: 'root'
})
classe d'exportation LocalStorageService {

  constructeur() { }

  addItem(clé : chaîne, valeur : chaîne) {
    localStorage.setItem(clé, valeur);
  }

  deleteItem(clé : chaîne) {
    localStorage.removeItem(clé);
  }

  getItem(clé : chaîne) : chaîne | nul {
    return localStorage.getItem(clé);
  }

  dégager() {
    localStorage.clear();
  }
}
Module de données
Ce module est responsable de la récupération et de la gestion des données. C'est ce que nous utiliserons pour obtenir les données que notre application consomme. Voici sa structure :
src/app/data
data.module.ts
modèles
└── services
Pour générer le module, exécutez :
ng g m dataModels
Les modèles définissent comment les données que nous consommons à partir de l'API sont structurées. Nous aurons 16 déclarations d'interface. Pour les créer, exécutez :
pour le modèle dans
adresse panier pays adresse-client
commande d'articles avec délai de livraison client
mode de paiement source de paiement paypal-paiement
prix expédition méthode d'expédition sku emplacement de stockage ;
faire l'interface "data/models/${model}" ; done
Le tableau suivant renvoie à chaque fichier et donne une description de ce qu'est chaque interface.
| Interface | Description |
|---|---|
| Adresse | Représente une adresse générale. |
| Cart | Côté client version d'une commande permettant de suivre le nombre de produits qu'un client a l'intention d'acheter. |
| Pays | Code pays Alpha-2. |
| Adresse du client | Une adresse associée à un client. |
| Client | Un utilisateur enregistré. |
| Délai de livraison | Représente le temps qu'il faudra pour livrer un envoi. |
| Article de ligne | Un produit détaillé ajouté au panier. |
| Commande | A panier ou collection d'articles. |
| Mode de paiement | Un type de paiement mis à disposition pour une commande. |
| Source de paiement | Un paiement associé à une commande. |
| Paiement Paypal | Un paiement fait via Paypal |
| Prix | Prix associé à un SKU. |
| Sh ipment | Collection d'articles expédiés ensemble. |
| Méthode d'expédition | Méthode par laquelle un colis est expédié. |
| SKU | Unité de stockage unique. |
| Emplacement de stock | Emplacement qui contient l'inventaire SKU. |
Services
Ce dossier contient les services qui créent, récupèrent et manipulent les données des applications. Nous allons créer 11 services ici.
pour le service dans
adresse panier pays adresse-client
élément de campagne de délai de livraison client
commande paypal-paiement expédition sku;
do ng g s "données/services/${service}" ; done
Address Service
Ce service crée et récupère des adresses. C'est important lors de la création et de l'attribution des adresses d'expédition et de facturation aux commandes. Il a deux méthodes. Une pour créer une adresse et une autre pour en récupérer une.
La route utilisée ici est /api/addresses. Si vous envisagez d'utiliser directement l'API Commerce Layer, assurez-vous de structurer les données comme illustré dans cet exemple.
@Injectable({
  fourni dans: 'root'
})
classe d'exportation AddressService {
  URL privée : string = `${environment.apiUrl}/api/addresses` ;

  constructeur (http privé : HttpClient, hein privé : HttpErrorHandler) { }

  createAddress(adresse : Adresse) : Observable {
    retourner this.http.post(this.url, adresse)
      .pipe(catchError(this.eh.handleError));
  }

  getAddress(id : chaîne) : Observable {
    renvoie this.http.get(`${this.url}/${id}`)
      .pipe(catchError(this.eh.handleError));
  }
}
Service du panier
Le panier est responsable du maintien de la quantité d'articles ajoutés et de l'identifiant de la commande. Faire des appels d'API pour obtenir le nombre d'articles dans une commande chaque fois qu'un nouvel article est créé peut être coûteux. Au lieu de cela, nous pourrions simplement utiliser le stockage local pour maintenir le nombre sur le client. Cela élimine le besoin d'effectuer des récupérations de commande inutiles chaque fois qu'un article est ajouté au panier.
Nous utilisons également ce service pour stocker l'identifiant de la commande. Un panier correspond à une commande sur Commerce Layer. Une fois le premier article ajouté au panier, une commande est créée. Nous devons conserver cet identifiant de commande afin de pouvoir le récupérer pendant le processus de paiement.
De plus, nous avons besoin d'un moyen de communiquer à l'en-tête qu'un article a été ajouté au panier. L'en-tête contient le bouton du panier et affiche la quantité d'articles qu'il contient. Nous utiliserons une observable d'un BehaviorSubject avec la valeur actuelle du panier. L'en-tête peut s'y abonner et suivre les modifications de la valeur du panier.
Enfin, une fois la commande terminée, la valeur du panier doit être effacée. Cela garantit qu'il n'y a pas de confusion lors de la création de nouvelles commandes ultérieures. Les valeurs qui ont été stockées sont effacées une fois que la commande en cours est marquée comme passée.
Nous accomplirons tout cela en utilisant le service de stockage local créé précédemment.
@Injectable({
  fourni dans: 'root'
})
classe d'exportation CartService {
  panier privé = nouveau BehaviourSubject({
    orderId : this.orderId,
    itemCount : this.itemCount
  });

  cartValue$ = this.cart.asObservable();

  constructeur (stockage privé : LocalStorageService) { }

  get orderId() : chaîne {
    const id = this.storage.getItem('order-id');
    retourner l'identifiant ? identifiant : '';
  }

  set orderId(id : chaîne) {
    this.storage.addItem('order-id', id);
    this.cart.next({ orderId: id, itemCount: this.itemCount });
  }

  get itemCount() : nombre {
    const itemCount = this.storage.getItem('item-count');

    retourner itemCount ? parseInt(itemCount) : 0 ;
  }

  set itemCount(montant : nombre) {
    this.storage.addItem('item-count', montant.toString());
    this.cart.next({ orderId : this.orderId, itemCount : montant });
  }

  incrementItemCount(montant : nombre) {
    this.itemCount = this.itemCount + montant ;
  }

  decrementItemCount(montant : nombre) {
    this.itemCount = this.itemCount - montant ;
  }

  vider le panier() {
    this.storage.deleteItem('item-count');
    this.cart.next({ orderId: '', itemCount: 0 });
  }
}
Service de pays
Lors de l'ajout d'adresses sur Commerce Layer, le code de pays doit être un code alpha 2. Ce service lit un fichier json contenant ces codes pour chaque pays et le renvoie dans sa méthode getCountries.
@Injectable({
  fourni dans: 'root'
})
classe d'exportation CountryService {

  constructeur (http privé : HttpClient) { }

  getCountries() : Observable {
    renvoyer this.http.get('./../../../assets/json/country-codes.json');
  }
}
Service d'adresse client
Ce service est utilisé pour associer des adresses aux clients. Il récupère également une adresse spécifique ou toutes les adresses liées à un client. Il est utilisé lorsque le client ajoute ses adresses de livraison et de facturation à sa commande. La méthode createCustomer crée un client, getCustomerAddresses obtient toutes les adresses d'un client et getCustomerAddress en obtient une spécifique.
Lors de la création d'une adresse client, soyez assurez-vous de structurer le corps du poteau selon cet exemple.
@Injectable({
  fourni dans: 'root'
})
classe d'exportation CustomerAddressService {
  URL privée : string = `${environment.apiUrl}/api/customer_addresses` ;

  constructeur (http privé : HttpClient, hein privé : HttpErrorHandler) { }

  createCustomerAddress(addressId: chaîne, customerId: chaîne): Observable {
    retourner this.http.post(this.url, {
      addressId : addressId, customerId : customerId
    })
      .pipe(catchError(this.eh.handleError));
  }

  getCustomerAddresses() : Observable {
    renvoie this.http.get(`${this.url}`)
      .pipe(catchError(this.eh.handleError));
  }

  getCustomerAddress(id : chaîne) : Observable {
    renvoie this.http.get(`${this.url}/${id}`)
      .pipe(catchError(this.eh.handleError));
  }
}
Service client
Les clients sont créés et leurs informations récupérées à l'aide de ce service. Lorsqu'un utilisateur s'inscrit, il devient client et est créé à l'aide de la createCustomerMethod. getCustomer renvoie le client associé à un identifiant spécifique. getCurrentCustomer renvoie le client actuellement connecté.
Lors de la création d'un client, structurez les données comme this. Vous pouvez ajouter leurs prénom et nom aux métadonnées, comme indiqué dans ses attributs.
La route /api/customers/current n'est pas disponible sur Commerce Layer. Vous devrez donc trouver comment obtenir le client actuellement connecté.
@Injectable({
  fourni dans: 'root'
})
classe d'exportation CustomerService {
  URL privée : chaîne = `${environment.apiUrl}/api/customers` ;

  constructeur (http privé : HttpClient, hein privé : HttpErrorHandler) { }

  createCustomer(email : chaîne, mot de passe : chaîne, prénom : chaîne, nom : chaîne) : Observable {
    retourner this.http.post(this.url, {
      e-mail : e-mail,
      mot de passe : mot de passe,
      Prénom,
      Nom de familleNom de famille
    })
      .pipe(catchError(this.eh.handleError));
  }

  getCurrentCustomer() : Observable {
    renvoie this.http.get(`${this.url}/current`)
      .pipe(catchError(this.eh.handleError));
  }

  getCustomer(id : string) : Observable {
    renvoie this.http.get(`${this.url}/${id}`)
      .pipe(catchError(this.eh.handleError));
  }
}
Service de délai de livraison
Ce service renvoie des informations sur les délais d'expédition à partir de divers emplacements de stock.
@Injectable({
  fourni dans: 'root'
})
classe d'exportation DeliveryLeadTimeService {
  URL privée : string = `${environment.apiUrl}/api/delivery_lead_times` ;

  constructeur (http privé : HttpClient, hein privé : HttpErrorHandler) { }

  getDeliveryLeadTimes() : Observable {
    renvoyer this.http.get(this.url)
      .pipe(catchError(this.eh.handleError));
  }
}
Line Item Service
Les éléments ajoutés au panier sont gérés par ce service. Avec lui, vous pouvez créer un article au moment où il est ajouté au panier. Les informations d'un élément peuvent également être récupérées. L'article peut également être mis à jour lorsque sa quantité change ou supprimé lorsqu'il est supprimé du panier.
Lors de la création d'articles ou de leur mise à jour, structurez le corps de la demande comme indiqué dans cet exemple.
@Injectable( {
  fourni dans: 'root'
})
classe d'exportation LineItemService {
  URL privée : string = `${environment.apiUrl}/api/line_items` ;

  constructeur (http privé : HttpClient, hein privé : HttpErrorHandler) { }

  createLineItem(lineItem: LineItem): Observable {
    renvoyer this.http.post(this.url, lineItem)
      .pipe(catchError(this.eh.handleError));
  }

  getLineItem(id : chaîne) : Observable {
    renvoie this.http.get(`${this.url}/${id}`)
      .pipe(catchError(this.eh.handleError));
  }

  updateLineItem(id : chaîne, quantité : nombre) : Observable {
    renvoyer this.http.patch(`${this.url}/${id}`, { quantité : quantité })
      .pipe(catchError(this.eh.handleError));
  }

  deleteLineItem(id : chaîne) : Observable {
    renvoie this.http.delete(`${this.url}/${id}`)
      .pipe(catchError(this.eh.handleError));
  }
}
Service de commande
Semblable au service d'article de ligne, le service de commande vous permet de créer, mettre à jour, supprimer ou obtenir une commande. De plus, vous pouvez choisir d'obtenir les expéditions associées à une commande séparément en utilisant la méthode getOrderShipments. Ce service est largement utilisé tout au long du processus de paiement.
Différents types d'informations sur une commande sont requis tout au long du processus de paiement. Comme il peut être coûteux de récupérer une commande entière et ses relations, nous spécifions ce que nous voulons obtenir d'une commande en utilisant GetOrderParams. L'équivalent de cela sur l'API CL est le paramètre de requête include où vous répertoriez les relations de commande à inclure. Vous pouvez vérifier quels champs doivent être inclus pour le récapitulatif du panier ici et pour les différentes étapes de paiement ici.
De la même manière, lors de la mise à jour d'une commande, nous utilisons UpdateOrderParams pour spécifier les champs de mise à jour. En effet, dans le serveur qui remplit le jeton, certaines opérations supplémentaires sont effectuées en fonction du champ mis à jour. Cependant, si vous faites des demandes directes à l'API CL, vous n'avez pas besoin de le spécifier. Vous pouvez vous en passer car l'API CL ne vous oblige pas à les spécifier. Cependant, le corps de la requête doit ressembler à cet exemple.
@Injectable({
  fourni dans: 'root'
})
classe d'exportation OrderService {
  URL privée : string = `${environment.apiUrl}/api/orders` ;

  constructeur(
    http privé : HttpClient,
    hein privé : HttpErrorHandler) { }

  createOrder() : Observable {
    renvoyer this.http.post(this.url, {})
      .pipe(catchError(this.eh.handleError));
  }

  getOrder(id : chaîne, orderParam : GetOrderParams) : Observable {
    let params = {};
    if (orderParam != GetOrderParams.none) {
      params = { [orderParam]: 'true' } ;
    }

    return this.http.get(`${this.url}/${id}`, { params: params })
      .pipe(catchError(this.eh.handleError));
  }

  updateOrder(order : Order, paramètres : UpdateOrderParams[]): Observable {
    let updateParams = [];
    for (const param of params) {
      updateParams.push(param.toString());
    }

    renvoyer this.http.patch(
      `${this.url}/${order.id}`,
      ordre,
      { params : { 'field' : updateParams } }
    )
      .pipe(catchError(this.eh.handleError));
  }

  getOrderShipments(id: string): Observable {
    return this.http.get(`${this.url}/${id}/shipments`)
      .pipe(catchError(this.eh.handleError));
  }
}
Paypal Payment Service
This service is responsible for creating and updating Paypal payments for orders. Additionally, we can get a Paypal payment given its id. The post body should have a structure similar to this example when creating a Paypal payment.
@Injectable({
  providedIn: 'root'
})
export class PaypalPaymentService {
  private url: string = `${environment.apiUrl}/api/paypal_payments`;

  constructor(private http: HttpClient, private eh: HttpErrorHandler) { }

  createPaypalPayment(payment: PaypalPayment): Observable {
    return this.http.post(this.url, payment)
      .pipe(catchError(this.eh.handleError));
  }

  getPaypalPayment(id: string): Observable {
    return this.http.get(`${this.url}/${id}`)
      .pipe(catchError(this.eh.handleError));
  }

  updatePaypalPayment(id: string, paypalPayerId: string): Observable {
    return this.http.patch(
      `${this.url}/${id}`,
      { paypalPayerId: paypalPayerId }
    )
      .pipe(catchError(this.eh.handleError));
  }
}
Shipment Service
This service gets a shipment or updates it given its id. The request body of a shipment update should look similar to this example.
@Injectable({
  providedIn: 'root'
})
export class ShipmentService {
  private url: string = `${environment.apiUrl}/api/shipments`;

  constructor(private http: HttpClient, private eh: HttpErrorHandler) { }

  getShipment(id: string): Observable {
    return this.http.get(`${this.url}/${id}`)
      .pipe(catchError(this.eh.handleError));
  }

  updateShipment(id: string, shippingMethodId: string): Observable {
    return this.http.patch(
      `${this.url}/${id}`,
      { shippingMethodId: shippingMethodId }
    )
      .pipe(catchError(this.eh.handleError));
  }
}
SKU Service
The SKU service gets products from the store. If multiple products are being retrieved, they can be paginated and have a page size set. Page size and page number should be set as query params like in this example if you’re making direct requests to the API. A single product can also be retrieved given its id.
@Injectable({
  providedIn: 'root'
})
export class SkuService {
  private url: string = `${environment.apiUrl}/api/skus`;

  constructor(private http: HttpClient, private eh: HttpErrorHandler) { }

  getSku(id: string): Observable {
    return this.http.get(`${this.url}/${id}`)
      .pipe(catchError(this.eh.handleError));
  }

  getSkus(page: number, pageSize: number): Observable {
    return this.http.get(
      this.url,
      {
        params: {
          'page': page.toString(),
          'pageSize': pageSize.toString()
        }
      })
      .pipe(catchError(this.eh.handleError));
  }
}
Core Module
The core module contains everything central to and common across the application. These include components like the header and pages like the 404 page. Services responsible for authentication and session management also fall here, as well as app-wide interceptors and guards.
The core module tree will look like this.
src/app/core
├── components
│   ├── error
│   │   ├── error.component.css
│   │   ├── error.component.html
│   │   └── error.component.ts
│   ├── header
│   │   ├── header.component.css
│   │   ├── header.component.html
│   │   └── header.component.ts
│   └── not-found
│       ├── not-found.component.css
│       ├── not-found.component.html
│       └── not-found.component.ts
├── core.module.ts
├── guards
│   └── empty-cart.guard.ts
├── interceptors
│   └── options.interceptor.ts
└── services
    ├── authentication.service.ts
    ├── header.service.ts
    └── session.service.ts
To generate the module and its contents run:
ng g m core
ng g g core/guards/empty-cart
ng g s core/header/header
ng g interceptor core/interceptors/options
for comp in header error not-found; do ng g c "core/${comp}"; terminé
for serv in authentication session; do ng g s "core/authentication/${serv}"; done
The core module file should like this. Note that routes have been registered for the NotFoundComponent and ErrorComponent.
@NgModule({
  declarations: [HeaderComponent, NotFoundComponent, ErrorComponent],
  imports: [
    RouterModule.forChild([
      { path: '404', component: NotFoundComponent },
      { path: 'error', component: ErrorComponent },
      { path: '**', redirectTo: '/404' }
    ]),
    MatBadgeModule,
    SharedModule
  ],
  exports: [HeaderComponent]
})
export class CoreModule { }
Services
The services folder holds the authentication, session, and header services.
Authentication Service
The AuthenticationService allows you to acquire client and customer tokens. These tokens are used to access the rest of the API’s routes. Customer tokens are returned when a user exchanges an email and password for it and have a wider range of permissions. Client tokens are issued without needing credentials and have narrower permissions.
getClientSession gets a client token. login gets a customer token. Both methods also create a session. The body of a client token request should look like this and that of a customer token like this.
@Injectable({
providedIn: 'root'
})
export class AuthenticationService {
private url: string = `${environment.apiUrl}/oauth/token`;
constructor(private http: HttpClient, private eh: HttpErrorHandler) { }
getClientSession(): ObservableSession Service
The SessionService is responsible for session management. The service will contain an observable from a BehaviorSubject called loggedInStatus to communicate whether a user is logged in. setLoggedInStatus sets the value of this subject, true for logged in, and false for not logged in. isCustomerLoggedIn makes a request to the server to check if the user has an existing session. logout destroys the session on the server. The last two methods access routes that are unique to the server that populates the request with a token. They are not available from Commerce Layer. You’ll have to figure out how to implement them.
@Injectable({
  providedIn: 'root'
})
export class SessionService {
  private url: string = `${environment.apiUrl}/session`;
  private isLoggedIn = new BehaviorSubject(false);

  loggedInStatus = this.isLoggedIn.asObservable();

  constructor(private http: HttpClient, private eh: HttpErrorHandler) { }

  setLoggedInStatus(status: boolean) {
    this.isLoggedIn.next(status);
  }

  isCustomerLoggedIn(): Observable {
    return this.http.get(`${this.url}/customer/status`)
      .pipe(catchError(this.eh.handleError));
  }

  logout(): Observable {
    return this.http.get(`${this.url}/destroy`)
      .pipe(catchError(this.eh.handleError));
  }
}
The HeaderService is used to communicate whether the cart, login, and logout buttons should be shown in the header. These buttons are hidden on the login and signup pages but present on all other pages to prevent confusion. We’ll use an observable from a BehaviourSubject called showHeaderButtons that shares this. We’ll also have a setHeaderButtonsVisibility method to set this value.
@Injectable({
  providedIn: 'root'
})
export class HeaderService {
  private headerButtonsVisibility = new BehaviorSubject(true);

  showHeaderButtons = this.headerButtonsVisibility.asObservable();

  constructor() { }

  setHeaderButtonsVisibility(visible: boolean) {
    this.headerButtonsVisibility.next(visible);
  }
}
Components
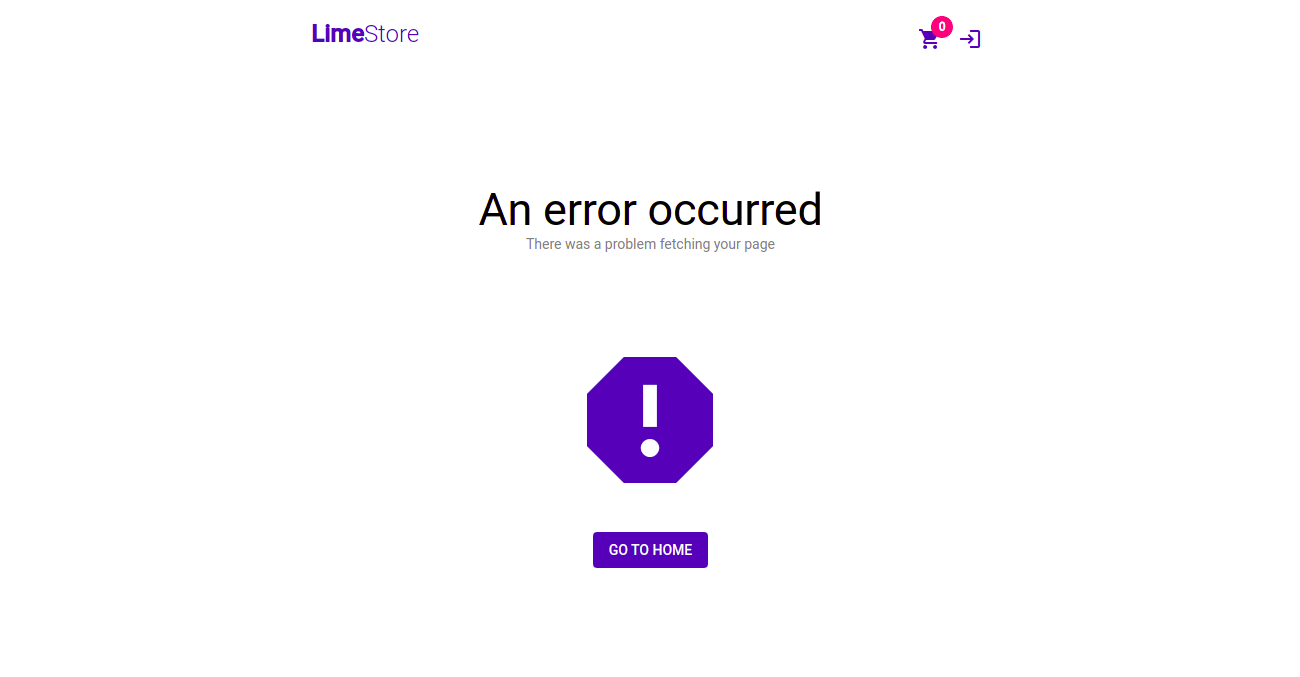
Error Component
This component is used as an error page. It is useful in instances when server requests fail and absolutely no data is displayed on a page. Instead of showing a blank page, we let the user know that a problem occurred. Below is it’s template.
This is what the component will look like.

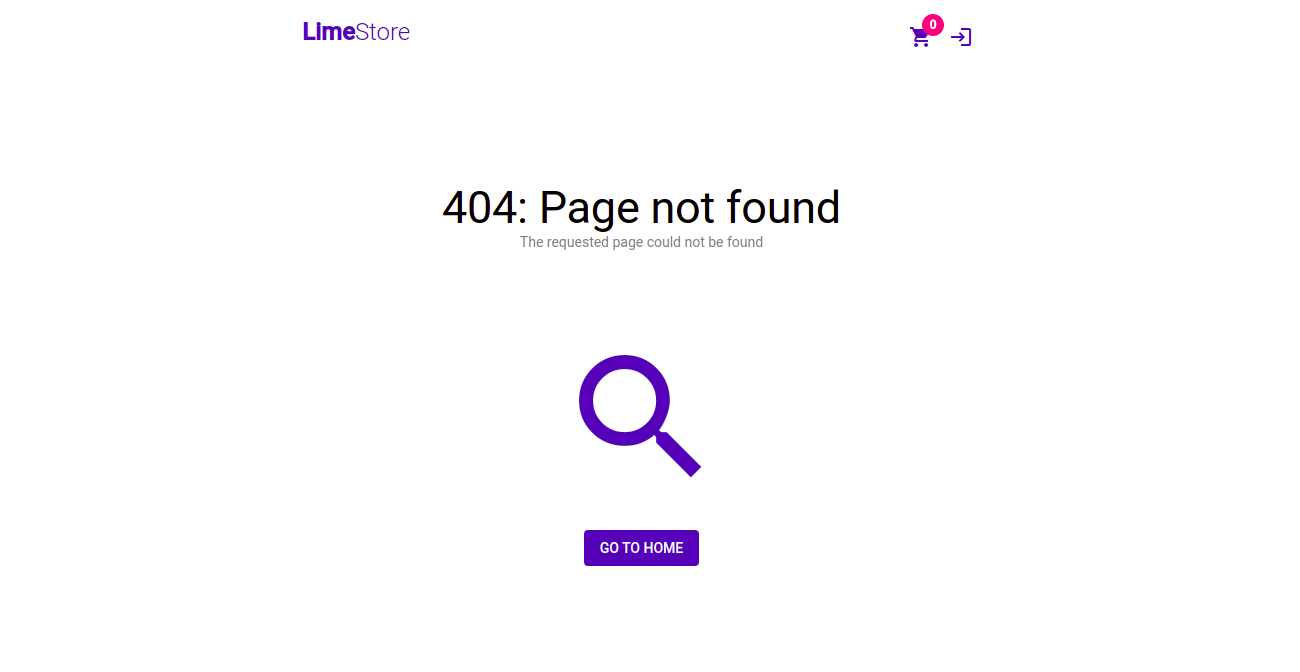
Not Found Component
This is a 404 page that the user gets redirected to when they request a route not available on the router. Only its template is modified.

The HeaderComponent is basically the header displayed at the top of a page. It will contain the app title, the cart, login, and logout buttons.
When this component is initialized, a request is made to check whether the user has a current session. This happens when subscribing to this.session.isCustomerLoggedIn(). We subscribe to this.session.loggedInStatus to check if the user logs out throughout the life of the app. The this.header.showHeaderButtons subscription decides whether to show all the buttons on the header or hide them. this.cart.cartValue$ gets the count of items in the cart.
There exists a logout method that destroys a user’s session and assigns them a client token. A client token is assigned because the session maintaining their customer token is destroyed and a token is still required for each API request. A material snackbar communicates to the user whether their session was successfully destroyed or not.
We use the @UntilDestroy({ checkProperties: true }) decorator to indicate that all subscriptions should be automatically unsubscribed from when the component is destroyed.
@UntilDestroy({ checkProperties: true })
@Component({
  selector: 'app-header',
  templateUrl: './header.component.html',
  styleUrls: ['./header.component.css']
})
export class HeaderComponent implements OnInit {
  cartAmount: number = 0;
  isLoggedIn: boolean = false;
  showButtons: boolean = true;

  constructor(
    private session: SessionService,
    private snackBar: MatSnackBar,
    private cart: CartService,
    private header: HeaderService,
    private auth: AuthenticationService
  ) { }

  ngOnInit() {
    this.session.isCustomerLoggedIn()
      .subscribe(
        () => {
          this.isLoggedIn = true;
          this.session.setLoggedInStatus(true);
        }
      );

    this.session.loggedInStatus.subscribe(status => this.isLoggedIn = status);

    this.header.showHeaderButtons.subscribe(visible => this.showButtons = visible);

    this.cart.cartValue$.subscribe(cart => this.cartAmount = cart.itemCount);
  }

  logout() {
    concat(
      this.session.logout(),
      this.auth.getClientSession()
    ).subscribe(
      () => {
        this.snackBar.open('You have been logged out.', 'Close', { duration: 4000 });
        this.session.setLoggedInStatus(false);
      },
      err => this.snackBar.open('There was a problem logging you out.', 'Close', { duration: 4000 })
    );
  }
}
Below is the header template and linked here is its styling.
LimeStore
Guards
Empty Cart Guard
This guard prevents users from accessing routes relating to checkout and billing if their cart is empty. This is because to proceed with checkout, there needs to be a valid order. An order corresponds to a cart with items in it. If there are items in the cart, the user can proceed to a guarded page. However, if the cart is empty, the user is redirected to an empty-cart page.
@Injectable({
  providedIn: 'root'
})
export class EmptyCartGuard implements CanActivate {
  constructor(private cart: CartService, private router: Router) { }

  canActivate(
    route: ActivatedRouteSnapshot,
    state: RouterStateSnapshot): Observable | Promise | boolean | UrlTree {
    if (this.cart.orderId) {
      if (this.cart.itemCount > 0) {
        return true;
      }
    }

    return this.router.parseUrl('/empty');
  }
}
Interceptors
Options Interceptor
This interceptor intercepts all outgoing HTTP requests and adds two options to the request. These are a Content-Type header and a withCredentials property. withCredentials specifies whether a request should be sent with outgoing credentials like the http-only cookies that we use. We use Content-Type to indicate that we are sending json resources to the server.
@Injectable()
export class OptionsInterceptor implements HttpInterceptor {

  constructor() { }

  intercept(request: HttpRequestnext: HttpHandler): Observable<HttpEvent> {
    request = request.clone({
      headers: request.headers.set('Content-Type', 'application/json'),
      withCredentials: true
    });

    return next.handle(request);
  }
}
Feature Modules
This section contains the main features of the app. As mentioned earlier, the features are grouped in four modules: auth, product, cart, and checkout modules.
Products Module
The products module contains pages that display products on sale. These include the product page and the product list page. It’s structured as shown below.
src/app/features/products
├── pages
│   ├── product
│   │   ├── product.component.css
│   │   ├── product.component.html
│   │   └── product.component.ts
│   └── product-list
│       ├── product-list.component.css
│       ├── product-list.component.html
│       └── product-list.component.ts
└── products.module.ts
To generate it and its components:
ng g m features/products
ng g c features/products/pages/product
ng g c features/products/pages/product-list
This is the module file:
@NgModule({
  declarations: [ProductListComponent, ProductComponent],
  imports: [
    RouterModule.forChild([
      { path: 'product/:id', component: ProductComponent },
      { path: '', component: ProductListComponent }
    ]),
    LayoutModule,
    MatCardModule,
    MatGridListModule,
    MatPaginatorModule,
    SharedModule
  ]
})
export class ProductsModule { }
Product List Component
This component displays a paginated list of available products for sale. It is the first page that is loaded when the app starts.
The products are displayed in a grid. Material grid list is the best component for this. To make the grid responsive, the number of grid columns will change depending on the screen size. The BreakpointObserver service allows us to determine the size of the screen and assign the columns during initialization.
To get the products, we call the getProducts method of the SkuService. It returns the products if successful and assigns them to the grid. If not, we route the user to the error page.
Since the products displayed are paginated, we will have a getNextPage method to get the additional products.
@UntilDestroy({ checkProperties: true })
@Component({
  selector: 'app-product-list',
  templateUrl: './product-list.component.html',
  styleUrls: ['./product-list.component.css']
})
export class ProductListComponent implements OnInit {
  cols = 4;
  length = 0;
  pageIndex = 0;
  pageSize = 20;
  pageSizeOptions: number[] = [5, 10, 20];

  pageEvent!: PageEvent | void;

  products: Sku[] = [];

  constructor(
    private breakpointObserver: BreakpointObserver,
    private skus: SkuService,
    private router: Router,
    private header: HeaderService) { }

  ngOnInit() {
    this.getProducts(1, 20);
    this.header.setHeaderButtonsVisibility(true);

    this.breakpointObserver.observe([
      Breakpoints.Handset,
      Breakpoints.Tablet,
      Breakpoints.Web
    ]).subscribe(result => {
      if (result.matches) {
        if (result.breakpoints['(max-width: 599.98px) and (orientation: portrait)'] || result.breakpoints['(max-width: 599.98px) and (orientation: landscape)']) {
          this.cols = 1;
        }
        else if (result.breakpoints['(min-width: 1280px) and (orientation: portrait)'] || result.breakpoints['(min-width: 1280px) and (orientation: landscape)']) {
          this.cols = 4;
        } else {
          this.cols = 3;
        }
      }
    });
  }

  private getProducts(page: number, pageSize: number) {
    this.skus.getSkus(page, pageSize)
      .subscribe(
        skus => {
          this.products = skus;
          this.length = skus[0].__collectionMeta.recordCount;
        },
        err => this.router.navigateByUrl('/error')
      );
  }

  getNextPage(event: PageEvent) {
    this.getProducts(event.pageIndex + 1, event.pageSize);
  }

  trackSkus(index: number, item: Sku) {
    return `${item.id}-${index}`;
  }
}
The template is shown below and its styling can be found here.

{{product.name |wordWrap:35}}
{{product.prices[0].compareAtAmountFloat | currency:'EUR'}}
The page will look like this.

Product Component
Once a product is selected from the product list page, this component displays its details. These include the product’s full name, price, and description. There’s also a button to add the item to the product cart.
On initialization, we get the id of the product from the route parameters. Using the id, we fetch the product from the SkuService.
When the user adds an item to the cart, the addItemToCart method is called. In it, we check if an order has already been created for the cart. If not, a new one is made using the OrderService. Afterwhich, a line item is created in the order that corresponds to the product. If an order already exists for the cart, just the line item is created. Depending on the status of the requests, a snackbar message is displayed to the user.
@UntilDestroy({ checkProperties: true })
@Component({
  selector: 'app-product',
  templateUrl: './product.component.html',
  styleUrls: ['./product.component.css']
})
export class ProductComponent implements OnInit {
  id: string = '';
  product!: Sku;
  quantity: number = 0;

  constructor(
    private route: ActivatedRoute,
    private skus: SkuService,
    private location: Location,
    private router: Router,
    private header: HeaderService,
    private orders: OrderService,
    private lineItems: LineItemService,
    private cart: CartService,
    private snackBar: MatSnackBar
  ) { }

  ngOnInit() {
    this.route.paramMap
      .pipe(
        mergeMap(params => {
          const id = params.get('id')
          this.id = id ? id : '';

          return this.skus.getSku(this.id);
        }),
        tap((sku) => {
          this.product = sku;
        })
      ).subscribe({
        error: (err) => this.router.navigateByUrl('/error')
      });

    this.header.setHeaderButtonsVisibility(true);
  }

  addItemToCart() {
    if (this.quantity > 0) {
      if (this.cart.orderId == '') {
        this.orders.createOrder()
          .pipe(
            mergeMap((order: Order) => {
              this.cart.orderId = order.id || '';

              return this.lineItems.createLineItem({
                orderId: order.id,
                name: this.product.name,
                imageUrl: this.product.imageUrl,
                quantity: this.quantity,
                skuCode: this.product.code
              });
            })
          )
          .subscribe(
            () => {
              this.cart.incrementItemCount(this.quantity);
              this.showSuccessSnackBar();
            },
            err => this.showErrorSnackBar()
          );
      } else {
        this.lineItems.createLineItem({
          orderId: this.cart.orderId,
          name: this.product.name,
          imageUrl: this.product.imageUrl,
          quantity: this.quantity,
          skuCode: this.product.code
        }).subscribe(
          () => {
            this.cart.incrementItemCount(this.quantity);
            this.showSuccessSnackBar();
          },
          err => this.showErrorSnackBar()
        );
      }
    } else {
      this.snackBar.open('Select a quantity greater than 0.', 'Close', { duration: 8000 });
    }
  }

  setQuantity(no: number) {
    this.quantity = no;
  }

  goBack() {
    this.location.back();
  }

  private showSuccessSnackBar() {
    this.snackBar.open('Item successfully added to cart.', 'Close', { duration: 8000 });
  }

  private showErrorSnackBar() {
    this.snackBar.open('Failed to add your item to the cart.', 'Close', { duration: 8000 });
  }
}
The ProductComponent template is as follows and its styling is linked here.
{{product.name}}
{{product.prices[0].compareAtAmountFloat | currency:'EUR'}}
{{product.description}}
The page will look like this.

Auth Module
The Auth module contains pages responsible for authentication. These include the login and signup pages. It‘s structured as follows.
src/app/features/auth/
├── auth.module.ts
└── pages
    ├── login
    │   ├── login.component.css
    │   ├── login.component.html
    │   └── login.component.ts
    └── signup
        ├── signup.component.css
        ├── signup.component.html
        └── signup.component.ts
To generate it and its components:
ng g m features/auth
ng g c features/auth/pages/signup
ng g c features/auth/pages/login
This is its module file.
@NgModule({
  declarations: [LoginComponent, SignupComponent],
  imports: [
    RouterModule.forChild([
      { path: 'login', component: LoginComponent },
      { path: 'signup', component: SignupComponent }
    ]),
    MatFormFieldModule,
    MatInputModule,
    ReactiveFormsModule,
    SharedModule
  ]
})
export class AuthModule { }
Signup Component
A user signs up for an account using this component. A first name, last name, email, and password are required for the process. The user also needs to confirm their password. The input fields will be created with the FormBuilder service. Validation is added to require that all the inputs have values. Additional validation is added to the password field to ensure a minimum length of eight characters. A custom matchPasswords validator ensures that the confirmed password matches the initial password.
When the component is initialized, the cart, login, and logout buttons in the header are hidden.This is communicated to the header using the HeaderService.
After all the fields are marked as valid, the user can then sign up. In the signup method, the createCustomer method of the CustomerService receives this input. If the signup is successful, the user is informed that their account was successfully created using a snackbar. They are then rerouted to the home page.
@UntilDestroy({ checkProperties: true })
@Component({
  selector: 'app-signup',
  templateUrl: './signup.component.html',
  styleUrls: ['./signup.component.css']
})
export class SignupComponent implements OnInit {
  signupForm = this.fb.group({
    firstName: ['', Validators.required],
    lastName: ['', Validators.required],
    email: ['', [Validators.required, Validators.email]],
    password: ['', [Validators.required, Validators.minLength(8)]],
    confirmedPassword: ['', [Validators.required]]
  }, { validators: this.matchPasswords });

  @ViewChild(FormGroupDirective) sufDirective: FormGroupDirective | undefined;

  constructor(
    private customer: CustomerService,
    private fb: FormBuilder,
    private snackBar: MatSnackBar,
    private router: Router,
    private header: HeaderService
  ) { }

  ngOnInit() {
    this.header.setHeaderButtonsVisibility(false);
  }

  matchPasswords(signupGroup: AbstractControl): ValidationErrors | null {
    const password = signupGroup.get('password')?.value;
    const confirmedPassword = signupGroup.get('confirmedPassword')?.value;

    return password == confirmedPassword ? null : { differentPasswords: true };
  }

  get password() { return this.signupForm.get('password'); }

  get confirmedPassword() { return this.signupForm.get('confirmedPassword'); }

  signup() {
    const customer = this.signupForm.value;

    this.customer.createCustomer(
      customer.email,
      customer.password,
      customer.firstName,
      customer.lastName
    ).subscribe(
      () => {
        this.signupForm.reset();
        this.sufDirective?.resetForm();

        this.snackBar.open('Account successfully created. You will be redirected in 5 seconds.', 'Close', { duration: 5000 });

        setTimeout(() => this.router.navigateByUrl('/'), 6000);
      },
      err => this.snackBar.open('There was a problem creating your account.', 'Close', { duration: 5000 })
    );
  }
}
Below is the template for the SignupComponent.
The component will turn out as follows.

Login Component
A registered user logs into their account with this component. An email and password need to be entered. Their corresponding input fields would have validation that makes them required.
Similar to the SignupComponentthe cart, login, and logout buttons in the header are hidden. Their visibility is set using the HeaderService during component initialization.
To login, the credentials are passed to the AuthenticationService. If successful, the login status of the user is set using the SessionService. The user is then routed back to the page they were on. If unsuccessful, a snackbar is displayed with an error and the password field is reset.
@UntilDestroy({ checkProperties: true })
@Component({
  selector: 'app-login',
  templateUrl: './login.component.html',
  styleUrls: ['./login.component.css']
})
export class LoginComponent implements OnInit {
  loginForm = this.fb.group({
    email: ['', Validators.required],
    password: ['', Validators.required]
  });

  constructor(
    private authService: AuthenticationService,
    private session: SessionService,
    private snackBar: MatSnackBar,
    private fb: FormBuilder,
    private header: HeaderService,
    private location: Location
  ) { }

  ngOnInit() {
    this.header.setHeaderButtonsVisibility(false);
  }

  login() {
    const credentials = this.loginForm.value;

    this.authService.login(
      credentials.email,
      credentials.password
    ).subscribe(
      () => {
        this.session.setLoggedInStatus(true);
        this.location.back();
      },
      err => {
        this.snackBar.open(
          'Login failed. Check your login credentials.',
          'Close',
          { duration: 6000 });

        this.loginForm.patchValue({ password: '' });
      }
    );
  }
}
Below is the LoginComponent template.
Here is a screenshot of the page.

Cart Module
The cart module contains all pages related to the cart. These include the order summary page, a coupon and gift card code page, and an empty cart page. It’s structured as follows.
src/app/features/cart/
├── cart.module.ts
└── pages
    ├── codes
    │   ├── codes.component.css
    │   ├── codes.component.html
    │   └── codes.component.ts
    ├── empty
    │   ├── empty.component.css
    │   ├── empty.component.html
    │   └── empty.component.ts
    └── summary
        ├── summary.component.css
        ├── summary.component.html
        └── summary.component.ts
To generate it, run:
ng g m features/cart
ng g c features/cart/codes
ng g c features/cart/empty
ng g c features/cart/summary
This is the module file.
@NgModule({
  declarations: [SummaryComponent, CodesComponent, EmptyComponent],
  imports: [
    RouterModule.forChild([
      {
        path: '', canActivate: [EmptyCartGuard]children: [
          { path: 'cart', component: SummaryComponent },
          { path: 'codes', component: CodesComponent }
        ]
      },
      { path: 'empty', component: EmptyComponent }
    ]),
    MatDividerModule,
    MatFormFieldModule,
    MatInputModule,
    MatMenuModule,
    ReactiveFormsModule,
    SharedModule
  ]
})
export class CartModule { }
Codes Component
As mentioned earlier, this component is used to add any coupon or gift card codes to an order. This allows the user to apply discounts to the total of their order before proceeding to checkout.
There will be two input fields. One for coupons and another for gift card codes.
The codes are added by updating the order. The updateOrder method of the OrderService updates the order with the codes. Afterwhich, both fields are reset and the user is informed of the success of the operation with a snackbar. A snackbar is also shown when an error occurs. Both the addCoupon and addGiftCard methods call the updateOrder method.
@UntilDestroy({ checkProperties: true })
@Component({
  selector: 'app-codes',
  templateUrl: './codes.component.html',
  styleUrls: ['./codes.component.css']
})
export class CodesComponent {
  couponCode = new FormControl('');
  giftCardCode = new FormControl('');

  @ViewChild(FormControlDirective) codesDirective: FormControlDirective | undefined;

  constructor(
    private cart: CartService,
    private order: OrderService,
    private snackBar: MatSnackBar
  ) { }

  private updateOrder(order: Order, params: UpdateOrderParams[]codeType: string) {
    this.order.updateOrder(order, params)
      .subscribe(
        () => {
          this.snackBar.open(`Successfully added ${codeType} code.`, 'Close', { duration: 8000 });
          this.couponCode.reset();
          this.giftCardCode.reset();
          this.codesDirective?.reset();
        },
        err => this.snackBar.open(`There was a problem adding your ${codeType} code.`, 'Close', { duration: 8000 })
      );
  }

  addCoupon() {
    this.updateOrder({ id: this.cart.orderId, couponCode: this.couponCode.value }, [UpdateOrderParams.couponCode]'coupon');
  }

  addGiftCard() {
    this.updateOrder({ id: this.cart.orderId, giftCardCode: this.giftCardCode.value }, [UpdateOrderParams.giftCardCode]'gift card');
  }

}
The template is shown below and its styling can be found at this link.
Coupon Code
card_giftcard
Gift Card Code
redeem
Here is a screenshot of the page.

Empty Component
It should not be possible to check out with an empty cart. There needs to be a guard that prevents users from accessing checkout module pages with empty carts. This has already been covered as part of the CoreModule. The guard redirects requests to checkout pages with an empty cart to the EmptyCartComponent.
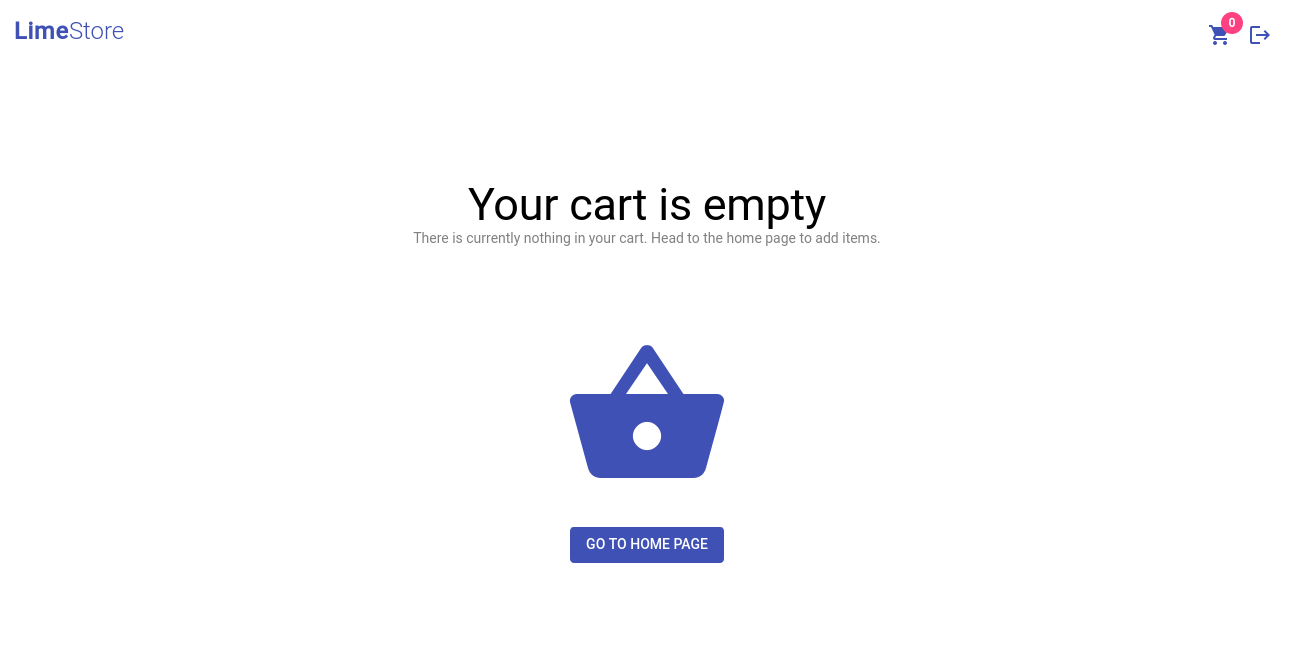
It’s a very simple component that has some text indicating to the user that their cart is empty. It also has a button that the user can click to go to the homepage to add things to their cart. So we’ll use the SimplePageComponent to display it. Here is the template.
Here is a screenshot of the page.

Summary Component
This component summarizes the cart/order. It lists all the items in the cart, their names, quantities, and pictures. It additionally breaks down the cost of the order including taxes, shipping, and discounts. The user should be able to view this and decide whether they are satisfied with the items and cost before proceeding to checkout.
On initialization, the order and its line items are fetched using the OrderService. A user should be able to modify the line items or even remove them from the order. Items are removed when the deleteLineItem method is called. In it the deleteLineItem method of the LineItemService receives the id of the line item to be deleted. If a deletion is successful, we update the item count in the cart using the CartService.
The user is then routed to the customer page where they begin the process of checking out. The checkout method does the routing.
@UntilDestroy({ checkProperties: true })
@Component({
  selector: 'app-summary',
  templateUrl: './summary.component.html',
  styleUrls: ['./summary.component.css']
})
export class SummaryComponent implements OnInit {
  order: Order = {};

  summary: { name: string, amount: string | undefined, id: string }[] = [];

  constructor(
    private orders: OrderService,
    private lineItems: LineItemService,
    private cart: CartService,
    private snackBar: MatSnackBar,
    private router: Router
  ) { }

  ngOnInit() {
    this.orders.getOrder(this.cart.orderId, GetOrderParams.cart)
      .subscribe(
        order => this.processOrder(order),
        err => this.showOrderError('retrieving your cart')
      );
  }

  private processOrder(order: Order) {
    this.order = order;

    this.summary = [
      { name: 'Subtotal', amount: order.formattedSubtotalAmount, id: 'subtotal' },
      { name: 'Discount', amount: order.formattedDiscountAmount, id: 'discount' },
      { name: 'Taxes (included)', amount: order.formattedTotalTaxAmount, id: 'taxes' },
      { name: 'Shipping', amount: order.formattedShippingAmount, id: 'shipping' },
      { name: 'Gift Card', amount: order.formattedGiftCardAmount, id: 'gift-card' }
    ];
  }

  private showOrderError(msg: string) {
    this.snackBar.open(`There was a problem ${msg}.`, 'Close', { duration: 8000 });
  }

  checkout() {
    this.router.navigateByUrl('/customer');
  }

  deleteLineItem(id: string) {
    this.lineItems.deleteLineItem(id)
      .pipe(
        mergeMap(() => this.orders.getOrder(this.cart.orderId, GetOrderParams.cart))
      ).subscribe(
        order => {
          this.processOrder(order);
          this.cart.itemCount = order.skusCount || this.cart.itemCount;
          this.snackBar.open(`Item successfully removed from cart.`, 'Close', { duration: 8000 })
        },
        err => this.showOrderError('deleting your order')
      );
  }
}
Below is the template and its styling is linked here.
Order #{{order.number}} ({{order.skusCount}} items)
 {{item.name}}
{{item.formattedUnitAmount }}
{{item.name}}
{{item.formattedUnitAmount }}
{{item.name}}
{{item.amount }}
Total
{{order.formattedTotalAmountWithTaxes}}
Here is a screenshot of the page.

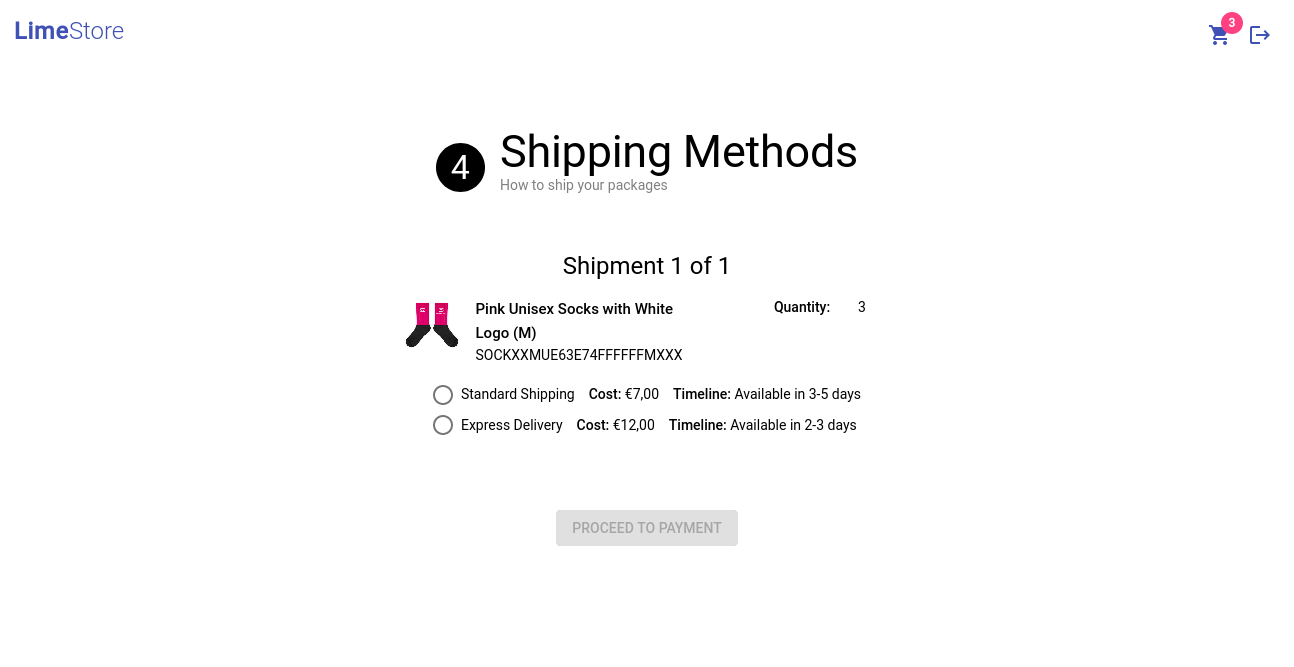
Checkout Module
This module is responsible for the checkout process. Checkout involves providing a billing and shipping address, a customer email, and selecting a shipping and payment method. The last step of this process is placement and confirmation of the order. The structure of the module is as follows.
src/app/features/checkout/
├── components
│   ├── address
│   ├── address-list
│   └── country-select
└── pages
    ├── billing-address
    ├── cancel-payment
    ├── customer
    ├── payment
    ├── place-order
    ├── shipping-address
    └── shipping-methods
This module is the biggest by far and contains 3 components and 7 pages. To generate it and its components run:
ng g m features/checkout
for comp in
address address-list country-select; do
ng g c "features/checkout/components/${comp}"
; terminé
for page in
billing-address cancel-payment customer
payment place-order shipping-address
shipping-methods; do
ng g c "features/checkout/pages/${page}"; done
This is the module file.
@NgModule({
  declarations: [
    CustomerComponent,
    AddressComponent,
    BillingAddressComponent,
    ShippingAddressComponent,
    ShippingMethodsComponent,
    PaymentComponent,
    PlaceOrderComponent,
    AddressListComponent,
    CountrySelectComponent,
    CancelPaymentComponent
  ],
  imports: [
    RouterModule.forChild([
      {
        path: '', canActivate: [EmptyCartGuard]children: [
          { path: 'billing-address', component: BillingAddressComponent },
          { path: 'cancel-payment', component: CancelPaymentComponent },
          { path: 'customer', component: CustomerComponent },
          { path: 'payment', component: PaymentComponent },
          { path: 'place-order', component: PlaceOrderComponent },
          { path: 'shipping-address', component: ShippingAddressComponent },
          { path: 'shipping-methods', component: ShippingMethodsComponent }
        ]
      }
    ]),
    MatCardModule,
    MatCheckboxModule,
    MatDividerModule,
    MatInputModule,
    MatMenuModule,
    MatRadioModule,
    ReactiveFormsModule,
    SharedModule
  ]
})
export class CheckoutModule { }
Components
Country Select Component
This component lets a user select a country as part of an address. The material select component has a pretty different appearance when compared to the input fields in the address form. So for the sake of uniformity, a material menu component is used instead.
When the component is initialized, the country code data is fetched using the CountryService. The countries property holds the values returned by the service. These values will be added to the menu in the template.
The component has one output property, setCountryEvent. When a country is selected, this event emits the alpha-2 code of the country.
@UntilDestroy({ checkProperties: true })
@Component({
  selector: 'app-country-select',
  templateUrl: './country-select.component.html',
  styleUrls: ['./country-select.component.css']
})
export class CountrySelectComponent implements OnInit {
  country: string = 'Country';
  countries: Country[] = [];
  @Output() setCountryEvent = new EventEmitter();

  constructor(private countries: CountryService) { }

  ngOnInit() {
    this.countries.getCountries()
      .subscribe(
        countries => {
          this.countries = countries;
        }
      );
  }

  setCountry(value: Country) {
    this.country = value.name || '';
    this.setCountryEvent.emit(value.code);
  }}
Below is its template and linked here is its styling.
Address Component
This is a form for capturing addresses. It is used by both the shipping and billing address pages. A valid Commerce Layer address should contain a first and last name, an address line, a city, zip code, state code, country code, and phone number.
The FormBuilder service will create the form group. Since this component is used by multiple pages, it has a number of input and output properties. The input properties include the button text, title displayed, and text for a checkbox. The output properties will be event emitters for when the button is clicked to create the address and another for when the checkbox value changes.
When the button is clicked, the addAddress method is called and the createAddress event emits the complete address. Similarly, when the checkbox is checked, the isCheckboxChecked event emits the checkbox value.
@Component({
  selector: 'app-address',
  templateUrl: './address.component.html',
  styleUrls: ['./address.component.css']
})
export class AddressComponent {
  @Input() buttonText: string = '';
  @Input() showTitle?: boolean = false;

  @Output() createAddress = new EventEmitter();

  @Input() checkboxText: string = '';
  @Output() isCheckboxChecked = new EventEmitter();

  countryCode: string = '';

  addressForm = this.fb.group({
    firstName: [''],
    lastName: [''],
    line1: [''],
    city: [''],
    zipCode: [''],
    stateCode: [''],
    phone: ['']
  });

  @ViewChild(FormGroupDirective) afDirective: FormGroupDirective | undefined;

  constructor(private fb: FormBuilder) { }

  setCountryCode(code: string) {
    this.countryCode = code;
  }

  addAddress() {
    this.createAddress.emit({
      firstName: this.addressForm.get('firstName')?.value,
      lastName: this.addressForm.get('lastName')?.value,
      line1: this.addressForm.get('line1')?.value,
      city: this.addressForm.get('city')?.value,
      zipCode: this.addressForm.get('zipCode')?.value,
      stateCode: this.addressForm.get('stateCode')?.value || 'N/A',
      countryCode: this.countryCode,
      phone: this.addressForm.get('phone')?.value
    });
  }

  setCheckboxValue(change: MatCheckboxChange) {
    if (this.isCheckboxChecked) {
      this.isCheckboxChecked.emit(change.checked);
    }
  }
}
This is its template and its styling is linked here.
Address List Component
When a customer logs in, they can access their existing addresses. Instead of having them re-enter an address, they can pick from an address list. This is the purpose of this component. On initialization, all the customer’s addresses are fetched using the CustomerAddressService if they are logged in. We will check their login status using the SessionService.
This component has a setAddressEvent output property. When an address is selected, setAddressEvent emits its id to the parent component.
@Component({
  selector: 'app-address-list',
  templateUrl: './address-list.component.html',
  styleUrls: ['./address-list.component.css']
})
export class AddressListComponent implements OnInit {
  addresses: CustomerAddress[] = [];

  @Output() setAddressEvent = new EventEmitter();

  constructor(
    private session: SessionService,
    private customerAddresses: CustomerAddressService,
    private snackBar: MatSnackBar
  ) { }

  ngOnInit() {
    this.session.loggedInStatus
      .pipe(
        mergeMap(
          status => iif(() => status, this.customerAddresses.getCustomerAddresses())
        ))
      .subscribe(
        addresses => {
          if (addresses.length) {
            this.addresses = addresses
          }
        },
        err => this.snackBar.open('There was a problem getting your existing addresses.', 'Close', { duration: 8000 })
      );
  }

  setAddress(change: MatRadioChange) {
    this.setAddressEvent.emit(change.value);
  }
}
Here is its template. You can find its styling here.
    Pick an existing address
    You have no existing addresses


                {{address.address?.firstName}} {{address.address?.lastName}},
                {{address.address?.line1}},
                {{address.address?.city}},
                {{address.address?.zipCode}},
                {{address.address?.stateCode}}, {{address.address?.countryCode}}
                {{address.address?.phone}}
Pages
Customer Component
An order needs to be associated with an email address. This component is a form that captures the customer email address. When the component is initialized, the current customer’s email address is fetched if they are logged in. We get the customer from the CustomerService. If they do not wish to change their email address, this email will be the default value.
If the email is changed or a customer is not logged in, the order is updated with the inputted email. We use the OrderService to update the order with the new email address. If successful, we route the customer to the billing address page.
@UntilDestroy({ checkProperties: true })
@Component({
  selector: 'app-customer',
  templateUrl: './customer.component.html',
  styleUrls: ['./customer.component.css']
})
export class CustomerComponent implements OnInit {
  email = new FormControl('', [Validators.required, Validators.email]);

  constructor(
    private orders: OrderService,
    private customers: CustomerService,
    private cart: CartService,
    private router: Router,
    private snackBar: MatSnackBar
  ) { }

  ngOnInit() {
    this.customers.getCurrentCustomer()
      .subscribe(
        customer => this.email.setValue(customer.email)
      );
  }

  addCustomerEmail() {
    this.orders.updateOrder(
      { id: this.cart.orderId, customerEmail: this.email.value },
      [UpdateOrderParams.customerEmail])
      .subscribe(
        () => this.router.navigateByUrl('/billing-address'),
        err => this.snackBar.open('There was a problem adding your email to the order.', 'Close', { duration: 8000 })
      );
  }
}
Here is the component template and linked here is its styling.
Email
alternate_email
Here is a screenshot of the customer page.

Billing Address Component
The billing address component lets a customer either add a new billing address or pick from their existing addresses. Users who are not logged in have to input a new address. Those who have logged in get an option to pick between new or existing addresses.
The showAddress property indicates whether existing addresses should be shown on the component. sameShippingAddressAsBilling indicates whether the shipping address should be the same as what the billing address is set. When a customer selects an existing address, then its id is assigned to selectedCustomerAddressId.
When the component is initialized, we use the SessionService to check if the current user is logged in. If they are logged in, we will display their existing addresses if they have any.
As mentioned earlier, if a user is logged in, they can pick an existing address as their billing address. In the updateBillingAddress method, if they are logged in, the address they select is cloned and set as the order’s billing address. We do this by updating the order using the updateOrder method of the OrderService and supplying the address Id.
If they are not logged in, the user has to provide an address. Once provided, the address is created using the createAddress method. In it, the AddressService takes the input and makes the new address. After which, the order is updated using the id of the newly created address. If there is an error or either operation is successful, we show a snackbar.
If the same address is selected as a shipping address, the user is routed to the shipping methods page. If they’d like to provide an alternate shipping address, they are directed to the shipping address page.
@UntilDestroy({ checkProperties: true })
@Component({
  selector: 'app-billing-address',
  templateUrl: './billing-address.component.html',
  styleUrls: ['./billing-address.component.css']
})
export class BillingAddressComponent implements OnInit {
  showAddresses: boolean = false;
  sameShippingAddressAsBilling: boolean = false;
  selectedCustomerAddressId: string = '';

  constructor(
    private addresses: AddressService,
    private snackBar: MatSnackBar,
    private session: SessionService,
    private orders: OrderService,
    private cart: CartService,
    private router: Router,
    private customerAddresses: CustomerAddressService) { }

  ngOnInit() {
    this.session.loggedInStatus
      .subscribe(
        status => this.showAddresses = status
      );
  }

  updateBillingAddress(address: Address) {
    if (this.showAddresses && this.selectedCustomerAddressId) {
      this.cloneAddress();
    } else if (address.firstName && address.lastName && address.line1 && address.city && address.zipCode && address.stateCode && address.countryCode && address.phone) {
      this.createAddress(address);
    }
    else {
      this.snackBar.open('Check your address. Some fields are missing.', 'Close');
    }
  }

  setCustomerAddress(customerAddressId: string) {
    this.selectedCustomerAddressId = customerAddressId;
  }

  setSameShippingAddressAsBilling(change: boolean) {
    this.sameShippingAddressAsBilling = change;
  }

  private createAddress(address: Address) {
    this.addresses.createAddress(address)
      .pipe(
        concatMap(
          address => {
            const update = this.updateOrderObservable({
              id: this.cart.orderId,
              billingAddressId: address.id
            }, [UpdateOrderParams.billingAddress]);

            if (this.showAddresses) {
              return combineLatest([update, this.customerAddresses.createCustomerAddress(address.id || '', '')]);
            } else {
              return update;
            }
          }))
      .subscribe(
        () => this.showSuccessSnackBar(),
        err => this.showErrorSnackBar()
      );
  }

  private cloneAddress() {
    this.updateOrderObservable({
      id: this.cart.orderId,
      billingAddressCloneId: this.selectedCustomerAddressId
    }, [UpdateOrderParams.billingAddressClone])
      .subscribe(
        () => this.showSuccessSnackBar(),
        err => this.showErrorSnackBar()
      );
  }

  private updateOrderObservable(order: Order, updateParams: UpdateOrderParams[]): Observable {
    return iif(() => this.sameShippingAddressAsBilling,
      concat([
        this.orders.updateOrder(order, updateParams),
        this.orders.updateOrder(order, [UpdateOrderParams.shippingAddressSameAsBilling])
      ]),
      this.orders.updateOrder(order, updateParams)
    );
  }

  private showErrorSnackBar() {
    this.snackBar.open('There was a problem creating your address.', 'Close', { duration: 8000 });
  }

  private navigateTo(path: string) {
    setTimeout(() => this.router.navigateByUrl(path), 4000);
  }

  private showSuccessSnackBar() {
    this.snackBar.open('Billing address successfully added. Redirecting...', 'Close', { duration: 3000 });
    if (this.sameShippingAddressAsBilling) {
      this.navigateTo('/shipping-methods');
    } else {
      this.navigateTo('/shipping-address');
    }
  }
}
Here is the template. This link points to its styling.
This is what the billing address page will look like.

Shipping Address Component
The shipping address component behaves a lot like the billing address component. However, there are a couple of differences. For one, the text displayed on the template is different. The other key differences are in how the order is updated using the OrderService once an address is created or selected. The fields that the order updates are shippingAddressCloneId for selected addresses and shippingAddress for new addresses. If a user chooses to change the billing address, to be the same as the shipping address, the billingAddressSameAsShipping field is updated.
After a shipping address is selected and the order is updated, the user is routed to the shipping methods page.
@UntilDestroy({ checkProperties: true })
@Component({
  selector: 'app-shipping-address',
  templateUrl: './shipping-address.component.html',
  styleUrls: ['./shipping-address.component.css']
})
export class ShippingAddressComponent implements OnInit {
  showAddresses: boolean = false;
  sameBillingAddressAsShipping: boolean = false;
  selectedCustomerAddressId: string = '';

  constructor(
    private addresses: AddressService,
    private snackBar: MatSnackBar,
    private session: SessionService,
    private orders: OrderService,
    private cart: CartService,
    private router: Router,
    private customerAddresses: CustomerAddressService) { }

  ngOnInit() {
    this.session.loggedInStatus
      .subscribe(
        status => this.showAddresses = status
      );
  }

  updateShippingAddress(address: Address) {
    if (this.showAddresses && this.selectedCustomerAddressId) {
      this.cloneAddress();
    } else if (address.firstName && address.lastName && address.line1 && address.city && address.zipCode && address.stateCode && address.countryCode && address.phone) {
      this.createAddress(address);
    }
    else {
      this.snackBar.open('Check your address. Some fields are missing.', 'Close');
    }
  }

  setCustomerAddress(customerAddressId: string) {
    this.selectedCustomerAddressId = customerAddressId;
  }

  setSameBillingAddressAsShipping(change: boolean) {
    this.sameBillingAddressAsShipping = change;
  }

  private createAddress(address: Address) {
    this.addresses.createAddress(address)
      .pipe(
        concatMap(
          address => {
            const update = this.updateOrderObservable({
              id: this.cart.orderId,
              shippingAddressId: address.id
            }, [UpdateOrderParams.shippingAddress]);

            if (this.showAddresses) {
              return combineLatest([update, this.customerAddresses.createCustomerAddress(address.id || '', '')]);
            } else {
              return update;
            }
          }))
      .subscribe(
        () => this.showSuccessSnackBar(),
        err => this.showErrorSnackBar()
      );
  }

  private cloneAddress() {
    this.updateOrderObservable({
      id: this.cart.orderId,
      shippingAddressCloneId: this.selectedCustomerAddressId
    }, [UpdateOrderParams.shippingAddressClone])
      .subscribe(
        () => this.showSuccessSnackBar(),
        err => this.showErrorSnackBar()
      );
  }

  private updateOrderObservable(order: Order, updateParams: UpdateOrderParams[]): Observable {
    return iif(() => this.sameBillingAddressAsShipping,
      concat([
        this.orders.updateOrder(order, updateParams),
        this.orders.updateOrder(order, [UpdateOrderParams.billingAddressSameAsShipping])
      ]),
      this.orders.updateOrder(order, updateParams)
    );
  }

  private showErrorSnackBar() {
    this.snackBar.open('There was a problem creating your address.', 'Close', { duration: 8000 });
  }

  private showSuccessSnackBar() {
    this.snackBar.open('Shipping address successfully added. Redirecting...', 'Close', { duration: 3000 });

    setTimeout(() => this.router.navigateByUrl('/shipping-methods'), 4000);
  }
}
Here is the template and its styling can be found here.
The shipping address page will look like this.

Shipping Methods Component
This component displays the number of shipments required for an order to be fulfilled, the available shipping methods, and their associated costs. The customer can then select a shipping method they prefer for each shipment.
The shipments property contains all the shipments of the order. The shipmentsForm is the form within which the shipping method selections will be made.
When the component is initialized, the order is fetched and will contain both its line items and shipments. At the same time, we get the delivery lead times for the various shipping methods. We use the OrderService to get the order and the DeliveryLeadTimeService for the lead times. Once both sets of information are returned, they are combined into an array of shipments and assigned to the shipments property. Each shipment will contain its items, the shipping methods available, and the corresponding cost.
After the user has selected a shipping method for each shipment, the selected shipping method is updated for each in setShipmentMethods. If successful, the user is routed to the payments page.
@UntilDestroy({ checkProperties: true })
@Component({
  selector: 'app-shipping-methods',
  templateUrl: './shipping-methods.component.html',
  styleUrls: ['./shipping-methods.component.css']
})
export class ShippingMethodsComponent implements OnInit {
  shipments: Shipment[] | undefined = [];
  shipmentsForm: FormGroup = this.fb.group({});

  constructor(
    private orders: OrderService,
    private dlts: DeliveryLeadTimeService,
    private cart: CartService,
    private router: Router,
    private fb: FormBuilder,
    private shipments: ShipmentService,
    private snackBar: MatSnackBar
  ) { }

  ngOnInit() {
    combineLatest([
      this.orders.getOrder(this.cart.orderId, GetOrderParams.shipments),
      this.dlts.getDeliveryLeadTimes()
    ]).subscribe(
      ([lineItems, deliveryLeadTimes]) => {
        let li: LineItem;
        let lt: DeliveryLeadTime[];

        this.shipments = lineItems.shipments?.map((shipment) => {
          if (shipment.id) {
            this.shipmentsForm.addControl(shipment.id, new FormControl('', Validators.required));
          }

          if (shipment.lineItems) {
            shipment.lineItems = shipment.lineItems.map(item => {
              li = this.findItem(lineItems, item.skuCode || '');
              item.imageUrl = li.imageUrl;
              item.name = li.name;
              return item;
            });
          }

          if (shipment.availableShippingMethods) {
            lt = this.findLocationLeadTime(deliveryLeadTimes, shipment);
            shipment.availableShippingMethods = shipment.availableShippingMethods?.map(
              method => {
                method.deliveryLeadTime = this.findMethodLeadTime(lt, method);
                return method;
              });
          }

          return shipment;
        });
      },
      err => this.router.navigateByUrl('/error')
    );
  }

  setShipmentMethods() {
    const shipmentsFormValue = this.shipmentsForm.value;

    combineLatest(Object.keys(shipmentsFormValue).map(
      key => this.shipments.updateShipment(key, shipmentsFormValue[key])
    )).subscribe(
      () => {
        this.snackBar.open('Your shipments have been updated with a shipping method.', 'Close', { duration: 3000 });
        setTimeout(() => this.router.navigateByUrl('/payment'), 4000);
      },
      err => this.snackBar.open('There was a problem adding shipping methods to your shipments.', 'Close', { duration: 5000 })
    );
  }


  private findItem(lineItems: LineItem[]skuCode: string): LineItem {
    return lineItems.filter((item) => item.skuCode == skuCode)[0];
  }

  private findLocationLeadTime(times: DeliveryLeadTime[]shipment: Shipment): DeliveryLeadTime[] {
    return times.filter((dlTime) => dlTime?.stockLocation?.id == shipment?.stockLocation?.id);
  }

  private findMethodLeadTime(times: DeliveryLeadTime[]method: ShippingMethod): DeliveryLeadTime {
    return times.filter((dlTime) => dlTime?.shippingMethod?.id == method?.id)[0];
  }
}
Here is the template and you can find the styling at this link.
This is a screenshot of the shipping methods page.

Payments Component
In this component, the user clicks the payment button if they wish to proceed to pay for their order with Paypal. The approvalUrl is the Paypal link that the user is directed to when they click the button.
During initialization, we get the order with the payment source included using the OrderService. If a payment source is set, we get its id and retrieve the corresponding Paypal payment from the PaypalPaymentService. The Paypal payment will contain the approval url. If no payment source has been set, we update the order with Paypal as the preferred payment method. We then proceed to create a new Paypal payment for the order using the PaypalPaymentService. From here, we can get the approval url from the newly created order.
Lastly, when the user clicks the button, they are redirected to Paypal where they can approve the purchase.
@UntilDestroy({ checkProperties: true })
@Component({
  selector: 'app-payment',
  templateUrl: './payment.component.html',
  styleUrls: ['./payment.component.css']
})
export class PaymentComponent implements OnInit {
  approvalUrl: string = '';

  constructor(
    private orders: OrderService,
    private cart: CartService,
    private router: Router,
    private payments: PaypalPaymentService
  ) { }

  ngOnInit() {
    const orderId = this.cart.orderId;

    this.orders.getOrder(orderId, GetOrderParams.paymentSource)
      .pipe(
        concatMap((order: Order) => {
          const paymentSourceId = order.paymentSource?.id;

          const paymentMethod = order.availablePaymentMethods?.filter(
            (method) => method.paymentSourceType == 'paypal_payments'
          )[0];

          return iif(
            () => paymentSourceId ? true : false,
            this.payments.getPaypalPayment(paymentSourceId || ''),
            this.orders.updateOrder({
              id: orderId,
              paymentMethodId: paymentMethod?.id
            }, [UpdateOrderParams.paymentMethod])
              .pipe(concatMap(
                order => this.payments.createPaypalPayment({
                  orderId: orderId,
                  cancelUrl: `${environment.clientUrl}/cancel-payment`,
                  returnUrl: `${environment.clientUrl}/place-order`
                })
              ))
          );
        }))
      .subscribe(
        paypalPayment => this.approvalUrl = paypalPayment?.approvalUrl || '',
        err => this.router.navigateByUrl('/error')
      );
  }

  navigateToPaypal() {
    window.location.href = this.approvalUrl;
  }
}
Here is its template.
Here’s what the payments page will look like.

Cancel Payment Component
Paypal requires a cancel payment page. This component serves this purpose. This is its template.
Here’s a screenshot of the page.

Place Order Component
This is the last step in the checkout process. Here the user confirms that they indeed want to place the order and begin its processing. When the user approves the Paypal payment, this is the page they are redirected to. Paypal adds a payer id query parameter to the url. This is the user’s Paypal Id.
When the component is initialized, we get the payerId query parameter from the url. The order is then retrieved using the OrderService with the payment source included. The id of the included payment source is used to update the Paypal payment with the payer id, using the PaypalPayment service. If any of these fail, the user is redirected to the error page. We use the disableButton property to prevent the user from placing the order until the payer Id is set.
When they click the place-order button, the order is updated with a placed status. Afterwhich the cart is cleared, a successful snack bar is displayed, and the user is redirected to the home page.
@UntilDestroy({ checkProperties: true })
@Component({
  selector: 'app-place-order',
  templateUrl: './place-order.component.html',
  styleUrls: ['./place-order.component.css']
})
export class PlaceOrderComponent implements OnInit {
  disableButton = true;

  constructor(
    private route: ActivatedRoute,
    private router: Router,
    private payments: PaypalPaymentService,
    private orders: OrderService,
    private cart: CartService,
    private snackBar: MatSnackBar
  ) { }

  ngOnInit() {
    this.route.queryParams
      .pipe(
        concatMap(params => {
          const payerId = params['PayerID'];
          const orderId = this.cart.orderId;

          return iif(
            () => payerId.length > 0,
            this.orders.getOrder(orderId, GetOrderParams.paymentSource)
              .pipe(
                concatMap(order => {
                  const paymentSourceId = order.paymentSource?.id || '';

                  return iif(
                    () => paymentSourceId ? paymentSourceId.length > 0 : false,
                    this.payments.updatePaypalPayment(paymentSourceId, payerId)
                  );
                })
              )
          );
        }))
      .subscribe(
        () => this.disableButton = false,
        () => this.router.navigateByUrl('/error')
      );
  }

  placeOrder() {
    this.disableButton = true;

    this.orders.updateOrder({
      id: this.cart.orderId,
      place: true
    }, [UpdateOrderParams.place])
      .subscribe(
        () => {
          this.snackBar.open('Your order has been successfully placed.', 'Close', { duration: 3000 });
          this.cart.clearCart();
          setTimeout(() => this.router.navigateByUrl('/'), 4000);
        },
        () => {
          this.snackBar.open('There was a problem placing your order.', 'Close', { duration: 8000 });
          this.disableButton = false;
        }
      );
  }
}
Here is the template and its associated styling.
Here is a screenshot of the page.

App Module
All requests made to Commerce Layer, other than for authentication, need to contain a token. So the moment the app is initialized, a token is fetched from the /oauth/token route on the server and a session is initialized. We’ll use the APP_INITIALIZER token to provide an initialization function in which the token is retrieved. Additionally, we’ll use the HTTP_INTERCEPTORS token to provide the OptionsInterceptor we created earlier. Once all the modules are added the app module file should look something like this.
@NgModule({
declarations: [
AppComponent
],
imports: [
BrowserModule,
AppRoutingModule,
HttpClientModule,
BrowserAnimationsModule,
AuthModule,
ProductsModule,
CartModule,
CheckoutModule,
CoreModule
],
providers: [
{
provide: HTTP_INTERCEPTORS,
useClass: OptionsInterceptor,
multi: true
},
{
provide: APP_INITIALIZER,
useFactory: (http: HttpClient) => () => http.postApp Component
We’ll modify the app component template and its styling which you can find here.
Conclusion
In this article, we’ve covered how you could create an e-commerce Angular 11 app with Commerce Layer and Paypal. We’ve also touched on how to structure the app and how you could interface with an e-commerce API.
Although this app allows a customer to make a complete order, it is not by any means finished. There is so much you could add to improve it. For one, you may choose to enable item quantity changes in the cart, link cart items to their product pages, optimize the address components, add additional guards for checkout pages like the place-order page, and so on. This is just the starting point.
If you’d like to understand more about the process of making an order from start to finish, you could check out the Commerce Layer guides and API. You can view the code for this project at this repository.
Source link