


L’outil secret pour exploser ton chiffre d'affaires en 2025 !
Une introduction aux API, HTTP et ES6 + JavaScript
À propos de l'auteur
Jamie est un développeur Full Stack de 16 ans situé au Texas. Il s'intéresse particulièrement à l'enseignement, à l'apprentissage automatique et à la vision par ordinateur, et…
Pour en savoir plus sur Jamie …
Introduction au processus de développement d'applications Web d'arrière-plan – discussion sur les fonctionnalités JavaScript à la pointe de ES6 +, le protocole de transfert HyperText, l'utilisation des API et JSON et l'utilisation de Node.js construire des backends rapides et évolutifs.
Vous avez probablement entendu parler de Node.js en tant que "runtime JavaScript asynchrone basé sur le moteur JavaScript V8 de Chrome" et qu'il "utilise un modèle d'E / S piloté par événement et non bloquant qui le rend léger et efficace ” Mais pour certains, ce n'est pas la plus grande des explications.
Qu'est-ce que Node en premier lieu? Qu'est-ce que cela signifie exactement pour un nœud d'être «asynchrone» et en quoi est-ce différent de «synchrone»? Quelle est la signification des mots «événementielle» et «non bloquante», et comment Node s'intègre-t-il dans le tableau plus général des applications, des réseaux Internet et des serveurs?
Nous tenterons de répondre à toutes ces questions et plus encore. Tout au long de cette série, nous examinons en profondeur le fonctionnement interne de Node, découvrons le protocole de transfert HyperText, les API et JSON, et construisons notre propre API Bookshelf à l'aide de MongoDB, Express, Lodash, Mocha et Handlebars. [19659007] Qu'est-ce que Node.js
Un nœud n'est qu'un environnement, ou un environnement d'exécution, dans lequel exécuter du JavaScript normal (avec des différences mineures) en dehors du navigateur. Nous pouvons l’utiliser pour créer des applications de bureau (avec des frameworks comme Electron), écrire des serveurs Web ou d’apps, etc.
Blocage / blocage et synchrone / asynchrone
Supposons que nous passions à un appel de base de données pour extraire les propriétés d'un utilisateur. Cet appel va prendre du temps, et si la demande est «bloquante», cela signifie que cela bloquera l'exécution de notre programme jusqu'à la fin de l'appel. Dans ce cas, nous avons fait une requête «synchrone» car elle finissait par bloquer le thread.
Ainsi, une opération synchrone bloque un processus ou un thread jusqu'à la fin de l'opération, laissant le fil dans un "état d'attente". Une opération asynchrone en revanche, est non bloquante . Cela permet l'exécution du thread quel que soit le temps nécessaire pour que l'opération soit terminée ou le résultat obtenu, et aucune partie du thread ne tombe dans un état d'attente à aucun moment.
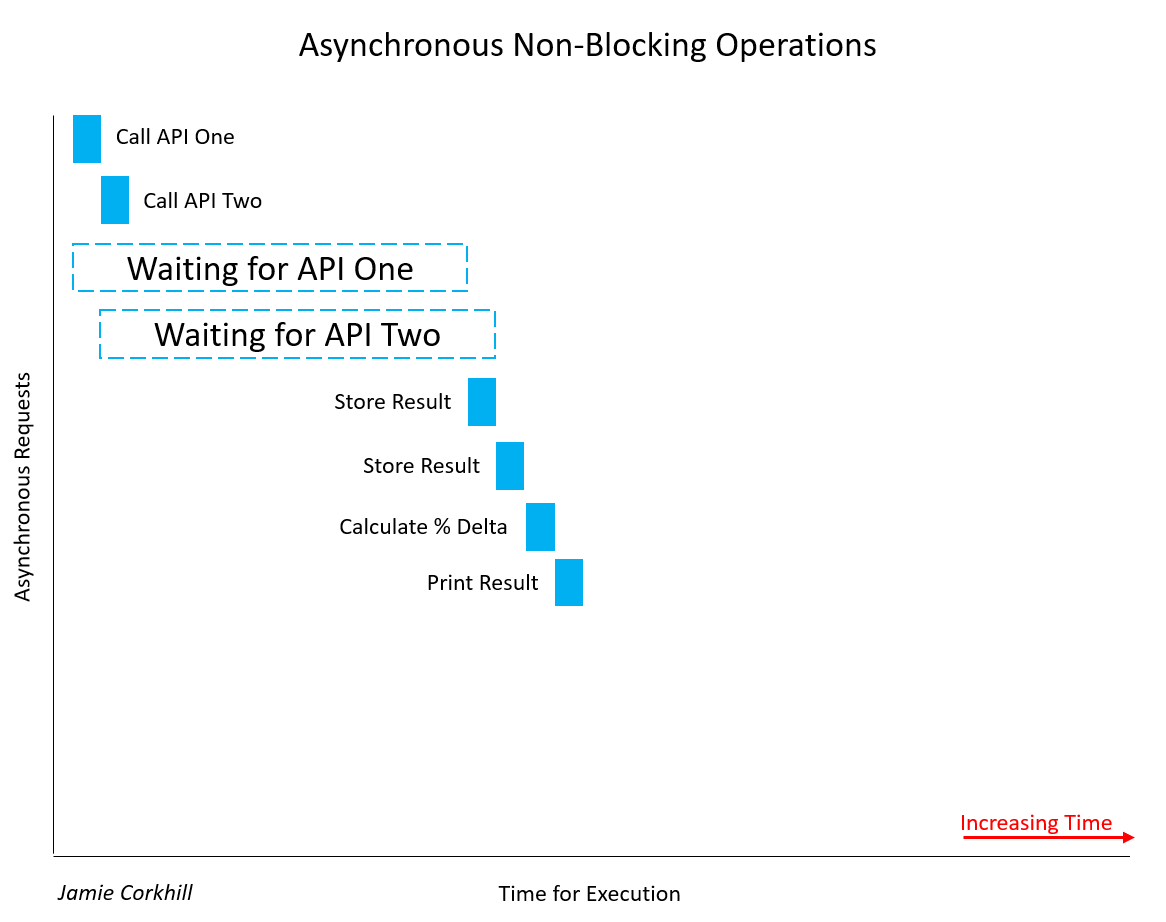
Voyons un autre exemple de processus. un appel synchrone qui bloque un thread. Supposons que nous construisions une application qui compare les résultats de deux API météo pour déterminer leur pourcentage de différence de température. De manière bloquante, nous appelons Weather API One et attendons le résultat. Une fois le résultat obtenu, nous appelons Weather API Two et attendons le résultat. Ne vous inquiétez pas à ce stade si vous n'êtes pas familier avec les API. Nous les couvrirons dans une prochaine section. Pour l'instant, imaginez une API comme moyen par lequel deux ordinateurs peuvent communiquer l'un avec l'autre.

Permettez-moi de noter qu’il est important de reconnaître que tous les appels synchrones ne bloquent pas nécessairement. Si une opération synchrone parvient à se terminer sans bloquer le thread ni provoquer un état d'attente, l'opération n'a pas été bloquante. La plupart du temps, les appels synchrones seront bloquants et leur temps de traitement dépendra de nombreux facteurs, tels que la vitesse des serveurs de l'API, la vitesse de téléchargement de la connexion Internet de l'utilisateur final, etc.
Dans le cas de l’image ci-dessus, nous avons dû attendre assez longtemps pour récupérer les premiers résultats de API One. Par la suite, nous avons dû attendre tout aussi longtemps pour obtenir une réponse de API Two. En attendant les deux réponses, l'utilisateur aurait remarqué que notre application était bloquée – l'interface utilisateur se verrouillait littéralement – ce qui serait mauvais pour l'expérience utilisateur.
Dans le cas d'un appel non bloquant, nous aurions quelque chose comme ceci. :

Vous pouvez clairement voir à quel point nous avons conclu l'exécution plus rapidement. Plutôt que d’attendre l’API 1 et ensuite l’API 2, nous pourrions attendre que les deux s’achèvent en même temps et obtenir nos résultats presque 50% plus rapidement. Remarquez, une fois que nous avons appelé API One et commencé à attendre sa réponse, nous avons également appelé API Two et commencé à attendre sa réponse en même temps que One.
À ce stade, avant de passer à des exemples plus concrets et tangibles, il est Il est important de mentionner que, pour faciliter, le terme «Synchrone» est généralement abrégé en «Sync» et le terme «Asynchrone» est généralement abrégé en «Async». Vous verrez cette notation utilisée dans les noms de méthodes / fonctions.
Fonctions de rappel
Vous vous demandez peut-être «si nous pouvons traiter un appel de manière asynchrone, comment savoir quand cet appel est terminé et que nous avons une réponse? En général, nous transmettons en tant qu'argument à notre méthode asynchrone une fonction de rappel, et cette méthode “rappellera” cette fonction ultérieurement, avec une réponse. J'utilise les fonctions ES5 ici, mais nous mettrons à jour les normes ES6 ultérieurement.
 function asyncAddFunction (a, b, callback) {
  rappel (a + b); // Ce rappel est celui transmis à l'appel de fonction ci-dessous.
}

asyncAddFunction (2, 4, fonction (somme) {
  // Ici nous avons la somme, 2 + 4 = 6.
});
Une telle fonction est appelée «fonction d'ordre supérieur» car elle prend une fonction (notre rappel) en tant qu'argument. Alternativement, une fonction de rappel peut prendre un objet d'erreur et un objet de réponse sous forme d'arguments et les présenter lorsque la fonction asynchrone est terminée. Nous verrons cela plus tard avec Express. Lorsque nous avons appelé asyncAddFunction (...) vous remarquerez que nous avons fourni une fonction de rappel pour le paramètre de rappel à partir de la définition de la méthode. Cette fonction est une fonction anonyme (elle n'a pas de nom) et est écrite à l'aide de la syntaxe Expression . La définition de la méthode, en revanche, est une instruction de fonction. Ce n’est pas anonyme parce qu’il a un nom (c’est-à-dire «asyncAddFunction»).
Certains peuvent noter une confusion puisque, dans la définition de la méthode, nous fournissons un nom, c’est le “rappel”. Cependant, la fonction anonyme passée en tant que troisième paramètre à asyncAddFunction (...) ne connaît pas le nom et reste donc anonyme. Nous ne pouvons pas non plus exécuter cette fonction plus tard par son nom, il nous faudrait alors relancer la fonction d’appel asynchrone pour la lancer.
Comme exemple d’appel synchrone, nous pouvons utiliser le Node.js Méthode readFileSync (...) . De nouveau, nous allons passer à ES6 + plus tard.
 var fs = require ('fs');
var data = fs.readFileSync ('/ example.txt'); // Le thread sera bloqué ici jusqu'à la fin.
Si nous procédions de manière asynchrone, nous transmettrions une fonction de rappel qui se déclencherait une fois l’opération asynchrone terminée.
 var fs = require ('fs');
var data = fs.readFile ('/ example.txt', fonction (err, data) {// Déplacement, cela se déclenchera une fois prêt.
  if (err) renvoie console.log ('Error:', err);
  console.log ('Données:', données); // Suppose que les données var sont définies ci-dessus.
});
// Continuez à vous exécuter ci-dessous, n'attendez pas les données.
Si vous n’avez jamais vu le retour utilisé de cette manière auparavant, nous vous demandons simplement d’arrêter l’exécution de la fonction afin de ne pas imprimer l’objet de données si celui-ci est défini. Nous aurions aussi pu simplement résumer la déclaration du journal dans une clause else .
Comme notre asyncAddFunction (...) le code derrière le fs.readFile (. ..) serait quelque chose comme:
 function readFile (path, callback) {
 // Code en coulisse pour lire un flux de fichiers.
 // La variable de données est définie ici.
 rappel (indéfini, données); // Ou callback (err, indéfini);
}
Permettez-nous de regarder une dernière implémentation d'un appel de fonction asynchrone. Cela contribuera à renforcer l'idée que les fonctions de rappel sont activées ultérieurement et à comprendre l'exécution d'un programme typique de Node.js.
 setTimeout (function {
  // ...
}, 1000);
La méthode setTimeout (...) utilise une fonction de rappel pour le premier paramètre qui sera déclenchée après que le nombre de millisecondes spécifié comme deuxième argument s'est produit.
Examinons davantage exemple complexe:
 console.log ('Programme lancé.');

setTimeout (fonction {
  console.log ('3000 ms (3 sec) ont passé.');
}, 3000);

setTimeout (fonction {
  console.log ('0 ms (0 sec) ont passé.');
}, 0);

setTimeout (fonction {
  console.log ('1000 ms (1 sec) est passé.');
}, 1000);

console.log ('Programme terminé');
Le résultat obtenu est le suivant:
 Programme initial.
Programme terminé.
0 ms (0 sec) ont passé.
1000 ms (1 sec) s'est écoulé.
3000 ms (3 sec) ont passé.
Vous pouvez voir que la première instruction de journal fonctionne comme prévu. Instantanément, la dernière instruction de journal s'imprime à l'écran, car cela se produit avant que 0 seconde ne soit dépassée après la deuxième setTimeout (...) . Immédiatement après, les deuxième, troisième et première méthodes setTimeout (...) sont exécutées.
Si Node.js n'était pas non bloquant, nous verrions la première instruction de journal, attendez 3 secondes. pour voir la suivante, voyez instantanément la troisième (la 0 seconde de setTimeout (...) puis attendez une seconde de plus pour voir les deux dernières instructions du journal. La nature non bloquante de Node fait en sorte que tous les minuteurs commencent à décompter à partir du moment où le programme est exécuté, plutôt que dans l'ordre dans lequel ils ont été tapés. Vous voudrez peut-être examiner les API de nœud, la pile d'appels et la boucle d'événements pour plus d'informations sur le fonctionnement du nœud sous le capot. .
Il est important de noter que le fait que vous voyiez une fonction de rappel ne signifie pas nécessairement qu'il y a un appel asynchrone dans le code. Nous avons appelé la méthode asyncAddFunction (…) au-dessus de “async” parce que nous supposons que l'opération prend du temps – par exemple, faire un appel à un serveur. Le processus d'ajout de deux nombres n'est pas asynchrone, ce qui constituerait un exemple d'utilisation d'une fonction de rappel de manière à ne pas bloquer le fil.
Promises Over Callbacks
Les rappels peuvent rapidement devenir désordonnés en JavaScript. , en particulier plusieurs rappels imbriqués. Nous sommes habitués à passer un rappel en tant qu'argument à une fonction, mais les promesses nous permettent d'attacher ou d'attacher un rappel à un objet renvoyé d'une fonction. Cela nous permettrait de gérer plusieurs appels asynchrones de manière plus élégante.
Supposons, par exemple, que nous passons un appel API et que notre fonction, pas aussi nommée ' makeAPICall (...) ', prend une URL et un rappel.
Notre fonction, makeAPICall (...) serait définie comme la fonction
 makeAPICall (chemin d'accès, rappel) {
  // Tentative d'appel de l'API à l'argument chemin.
  // ...
  rappel (indéfini, res); // Ou callback (err, indéfini); en fonction de la réponse de l’API.
}
et nous l'appellerions avec:
 makeAPICall ('/ example', function (err1, res1) {
  if (err1) renvoie console.log ('Error:', err1);
  // ...
});
Si nous voulions faire un autre appel d'API en utilisant la réponse du premier, nous devions imbriquer les deux rappels. Supposons que je doive injecter la propriété userName de l'objet res1 dans le chemin du deuxième appel d'API. Nous aurions:
 makeAPICall ('/ exemple', fonction (err1, res1) {
  if (err1) renvoie console.log ('Error:', err1);
  makeAPICall ('/ newExample /' + res1.userName, function (err2, res2) {
    if (err2) renvoie console.log ('Error:', err2);
    console.log (res2);
  });
});
Note : La méthode ES6 + pour injecter la propriété res1.userName plutôt que la concaténation de chaînes consisterait à utiliser des «modèles de chaînes». Ainsi, plutôt que d’encapsuler notre chaîne entre guillemets (‘, ou“), nous utiliserions des guillemets ( ) situés sous la touche Échap de votre clavier. Ensuite, nous utiliserions la notation $ {} pour intégrer une expression JS entre crochets. En fin de compte, notre chemin précédent serait: / newExample / $ {res.UserName} encerclé de backticks.
Il est clair que cette méthode d'imbrication de rappels peut rapidement devenir assez inélégante, la soi-disant «pyramide JavaScript de Doom». Si nous utilisions des promesses plutôt que des rappels, nous pourrions refactoriser notre code à partir du premier exemple en tant que tel:
 makeAPICall ('/ exemple'). Then (function (res) {// Rappel de succès.
  // ...
}, function (err) {// Rappel d'échec.
  console.log ('Error:', err);
});
Le premier argument de la fonction then () est notre rappel de succès, et le deuxième argument est notre rappel d'échec. Alternativement, nous pourrions perdre le deuxième argument au profit de .then () et appeler .catch () à la place. Les arguments pour .then () sont facultatifs, et appeler .catch () équivaudrait à .then (successCallback, null) .
Utilisation de .catch () nous avons:
 makeAPICall ('/ exemple'). Then (function (res) {// Rappel du succès.
  // ...
}). catch (function (err) {// Rappel d'échec
  console.log ('Error:', err);
});
Nous pouvons aussi restructurer ceci pour plus de lisibilité:
 makeAPICall ('/ exemple')
  .then (fonction (res) {
    // ...
  })
  .catch (function (err) {
    console.log ('Error:', err);
  });
Il est important de noter que nous ne pouvons pas nous contenter d’un appel .then () à une fonction quelconque et s’attendre à ce qu’il fonctionne. La fonction que nous appelons doit en réalité renvoyer une promesse, une promesse qui déclenchera .then () à la fin de l'opération asynchrone. Dans ce cas, makeAPICall (...) fera l'affaire, en tirant soit le bloc puis () soit le [catch] capture () une fois terminé. 19659005] Pour que makeAPICall (...) renvoie une promesse, nous affectons une fonction à une variable, cette fonction étant le constructeur de Promise. Les promesses peuvent être soit remplies soit rejetées ce qui signifie que l'action relative à la promesse a été menée à bien et a été rejeté, au contraire. Une fois que la promesse est soit remplie ou rejetée, nous disons qu'elle a réglée et en l'attendant, peut-être pendant un appel asynchrone, nous disons que la promesse est en attente . [19659005] Le constructeur Promise prend comme argument une fonction de rappel, qui reçoit deux paramètres – resol et rejeter que nous appellerons ultérieurement pour déclencher le succès. callback dans .then () ou le .then () callback en cas d'échec, ou .catch () si prévu.
Voici un exemple
 var examplePromise = new Promise (fonction (résoudre, rejeter) {
  // Faites ce que nous allons faire, puis passez l'appel ci-dessous:
  résoudre ('heureux!'); // - Tout a fonctionné.
  rejeter ('Sad!'); // - Nous avons remarqué que quelque chose s'est mal passé.
}):
Ensuite, nous pouvons utiliser:
 examplePromise.then (/ * Les deux fonctions de rappel ici * /);
// Ou le rappel de réussite dans .then () et le rappel d'échec dans .catch ().
Notez, toutefois, que examplePromise ne peut accepter aucun argument. Ce genre de défaites le but, ainsi nous pouvons retourner une promesse à la place.
 function makeAPICall (path) {
  retourne une nouvelle promesse (fonction (résoudre, rejeter) {
    // Appelle notre API asynchrone ici.
    si (/ * tout va bien * /) renvoyer résoudre (res); // res est la réponse, serait défini ci-dessus.
    sinon, retourne rejeter (err); // err est une erreur, serait défini ci-dessus.
  });
}
Les promesses brillent vraiment pour améliorer la structure et, par la suite, l'élégance de notre code avec le concept de «chaînage des promesses». Cela nous permettrait de renvoyer une nouvelle promesse à l'intérieur d'une clause .then () afin que nous puissions attacher une seconde .then () par la suite, ce qui déclencherait le rappel approprié de la seconde promise.
En refacturant notre appel d'URL multi-API ci-dessus avec Promises, nous obtenons:
 makeAPICall ('/ exemple'). then (function (res) {// Rappel de la première réponse. Déclenche le succès de '/ exemple' appel.
  return makeAPICall (`/ newExample / $ {res.UserName}`); // Le retour d'un nouvel appel permet le chaînage des promesses.
}, function (err) {// Premier rappel d'échec. Se déclenche en cas d'échec lors de l'appel avec '/ exemple'.
  console.log ('Error:', err);
}). then (function (res) {// Seconde réponse. Se déclenche en cas de succès de l'appel '/ newExample / ...' retourné.
  console.log (res);
}, function (err) {// Deuxième rappel d'échec. Se déclencher en cas d'échec lors de l'appel avec '/ newExample / ...'
  console.log ('Error:', err);
});
Notez que nous avons d'abord appelé makeAPICall ('/ exemple') . Cela retourne une promesse et nous attachons donc un .then () . Dans ce then () nous renvoyons un nouvel appel à makeAPICall (...) qui, en soi, renvoie une promesse nous permettant de nous enchaîner un nouveau .then () après le premier.
Comme ci-dessus, nous pouvons le restructurer pour en améliorer la lisibilité et supprimer les rappels d'échec pour une clause générique () all. Ensuite, nous pouvons suivre le principe DRY (Ne vous répétez pas) et n’implémenter la gestion des erreurs qu’une seule fois.
 makeAPICall ('/ exemple')
  .then (function (res) {// Comme précédemment, déclenche avec succès et réponse de '/ exemple'.
    return makeAPICall (`/ newExample / $ {res.UserName}`); // Revenir ici nous permet de chaîner un nouveau .then ().
   })
  .then (function (res) {// Comme précédemment, déclenche avec succès et réponse de '/ newExample'.
    console.log (res);
   })
  .catch (function (err) {// Méthode générique d'interception de tous. Se déclenche s'il y a une erreur avec l'un des appels précédents.
    console.log ('Error:', err);
   });
Notez que les rappels de succès et d’échec dans .then () ne valent que pour le statut de la promesse individuelle correspondant à .then () . Le bloc catch cependant, détectera les erreurs qui se produisent dans l'un des .then () [1945[]
ES6 Const vs. Let
dans tous nos exemples. , nous utilisons les fonctions ES5 et le vieux mot clé var . Bien que des millions de lignes de code fonctionnent encore de nos jours en utilisant ces méthodes ES5, il est utile de mettre à jour les normes ES6 + actuelles et nous allons reformuler une partie de notre code ci-dessus. Commençons par const et let .
Vous pourriez être habitué à déclarer une variable avec le mot clé var :
var pi = 3.14;
Avec les normes ES6 +, nous pourrions faire cela soit
soit pi = 3,14;
ou
const pi = 3,14;
où const signifie «constante» – une valeur qui ne peut être réaffectée à une date ultérieure. (À l'exception des propriétés de l'objet, nous allons bientôt l'expliquer. De plus, les variables déclarées const ne sont pas immuables, seule la référence à la variable est.)
Dans l'ancien code JavaScript, les portées de bloc, telles que celles de si tandis que {} . pour etc. n'affectent en aucune façon var ce qui est très différent des langages plus typés de manière statique comme Java ou C ++. C'est-à-dire que la portée de var est toute la fonction englobante – et peut être globale (si placée en dehors d'une fonction) ou locale (si placée dans une fonction). Pour illustrer cela, voir l'exemple suivant:
 function myFunction () {
  var num = 5;
  console.log (num); // 5
  console.log ('-');
  pour (var i = 0; i
Sortie:
 5
---
0
1 2 3 ... 7 8 9
---
9
dix
La chose importante à noter ici est que la définition d'un nouveau var num à l'intérieur du pour affecte directement le var num à l'extérieur et au-dessus du pour . En effet, la portée de var est toujours celle de la fonction englobante et non d'un bloc.
De nouveau, par défaut, var i à l'intérieur de pour () prend la valeur par défaut de myFunction . Nous pouvons donc accéder à i en dehors de la boucle et obtenir 10.
Pour attribuer des valeurs à des variables, laissons est équivalent à var c'est juste que laissez a une portée de bloc, et ainsi les anomalies survenues avec var ci-dessus ne se produiront pas.
 maFonction () {
  Soit num = 5;
  console.log (num); // 5
  for (let i = 0; i
En regardant le mot clé const vous pouvez voir que nous parvenons à une erreur en essayant de la réaffecter:
 const c = 299792458; // Fait : La constante "c" est la vitesse de la lumière dans le vide en mètres par seconde.
c = 10; // TypeError: affectation à une variable constante.
Les choses deviennent intéressantes lorsque nous affectons une variable const à un objet:
 const myObject = {
  nom: 'Jane Doe'
};

// C'est illégal: TypeError: Assignation à une variable constante.
monObjet = {
  nom: 'John Doe'
};

// Ceci est légal. console.log (myObject.name) -> John Doe
myObject.name = 'John Doe';
Comme vous pouvez le constater, seule la référence en mémoire à l'objet affecté à un objet const est immuable, et non à la valeur qui lui est propre.
ES6 Fonctions sur les flèches
Vous pourriez être habitué à créer une fonction comme celle-ci:
 function printHelloWorld () {
  console.log ('Hello, World!');
}
Avec les fonctions de flèche, cela deviendrait:
 const printHelloWorld = () => {
  console.log ('Hello, World!');
};
Supposons que nous ayons une fonction simple qui retourne le carré d'un nombre:
 const squareNumber = (x) => {
  renvoyer x * x;
}

squareNumber (5); // On peut appeler une fonction de flèche comme une fonction ES5. Retourne 25.
Vous pouvez voir que, tout comme avec les fonctions ES5, nous pouvons prendre des arguments avec des parenthèses, nous pouvons utiliser des instructions de retour normales, et nous pouvons appeler la fonction comme toute autre.
Il est important de noter que, bien que les parenthèses sont obligatoires si notre fonction ne prend pas d'arguments (comme avec printHelloWorld () ci-dessus), nous pouvons supprimer les parenthèses si elle n'en prend qu'un, la définition précédente de notre méthode squareNumber () peut être réécrit comme:
 const squareNumber = x => {// Notez que nous avons supprimé les parenthèses car nous ne prenons qu'un argument.
  renvoyer x * x;
}
Que vous choisissiez d'encapsuler un seul argument entre parenthèses ou non est une question de goût personnel et vous verrez probablement les développeurs utiliser les deux méthodes.
Enfin, si nous souhaitons ne renvoyer implicitement qu'une seule expression, comme avec squareNumber (...) ci-dessus, nous pouvons mettre l'instruction return en ligne avec la signature de la méthode:
const squareNumber = x => x * x;
C'est-à-dire
test de const = (a, b, c) => expression
est identique à
const test = (a, b, c) => {expression de retour}
Notez que lorsque vous utilisez le raccourci ci-dessus pour renvoyer implicitement un objet, les choses deviennent obscures. Qu'est-ce qui empêche JavaScript de croire que les crochets dans lesquels nous devons encapsuler notre objet ne sont pas notre corps de fonction? Pour résoudre ce problème, nous entourons les parenthèses de l’objet. Cela permet explicitement à JavaScript de savoir que nous retournons effectivement un objet et que nous ne définissons pas simplement un corps.
const test = () => ({pi: 3.14}); // Les espaces entre crochets sont une formalité pour rendre le code plus propre.
Pour aider à consolider le concept de fonctions ES6, nous allons reformuler certains de nos codes précédents, ce qui nous permettra de comparer les différences entre les deux notations.
asyncAddFunction (...) vue de dessus, pourrait être refactorisé à partir de:
 function asyncAddFunction (a, b, callback) {
  rappel (a + b);
}
à:
 const aysncAddFunction = (a, b, rappel) => {
  rappel (a + b);
};
ou même:
const aysncAddFunction = (a, b, rappel) => rappel (a + b); // Ceci retournera le rappel (a + b).
Lors de l'appel de la fonction, nous pourrions passer une fonction de flèche pour le rappel:
 asyncAddFunction (10, 12, sum => {// Pas de parenthèses car nous ne prenons qu'un seul argument.
  console.log (somme);
}
Il est clair de voir comment cette méthode améliore la lisibilité du code. Pour ne vous montrer qu'un cas, nous pouvons prendre notre ancien exemple basé sur ES5 Promise ci-dessus et le reformuler pour qu'il utilise des fonctions de flèche.
 makeAPICall ('/ example')
  .then (res => makeAPICall (`/ newExample / $ {res.UserName}`))
  .then (res => console.log (res))
  .catch (err => console.log ('Erreur:', err));
Il y a quelques mises en garde concernant les fonctions de flèche. D'une part, ils ne lient pas un ce mot clé . Supposons que j'ai l'objet suivant:
 const Person = {
  nom: 'John Doe',
  message d'accueil: () => {
    console.log (`Bonjour. Mon nom est $ {this.name} .`);
  }
}
Vous pouvez vous attendre à un appel de Person.greeting () renverra “Bonjour. Je m'appelle John Doe. »Au lieu de cela, nous obtenons:« Bonjour. Mon nom n’est pas défini. »C’est parce que les fonctions fléchées n’ont pas un ce et qu’elles tentent donc d’utiliser ce à l’intérieur d’une fonction flèche par défaut du ce de l'étendue englobante et l'objet englobant de l'objet Person est la fenêtre dans le navigateur, ou module.exports dans Node.
Pour le prouver , si nous utilisons à nouveau le même objet, mais définissons la propriété du nom de la propriété globale ce à quelque chose comme "Jane Doe", puis this.name dans le champ La fonction flèche renvoie 'Jane Doe', car l'objet global this se trouve dans la portée englobante ou est le parent de l'objet Person .
 this.name = 'Jane Doe' ;

Const Personne = {
  nom: 'John Doe',
  message d'accueil: () => {
    console.log (`Bonjour. Mon nom est $ {this.name} .`);
  }
}

Person.greeting (); // Salut. Je m'appelle Jane Doe
C'est ce qu'on appelle le 'cadrage lexical', et nous pouvons le contourner en utilisant la 'syntaxe courte', qui est l'endroit où nous perdons le côlon et la flèche pour reformuler notre objet en tant que tel:
 Const Personne = {
  nom: 'John Doe',
  salutation() {
    console.log (`Bonjour. Mon nom est $ {this.name} .`);
  }
}

Person.greeting () // Bonjour. Je m'appelle John Doe.
Classes ES6
Bien que JavaScript ne prenne jamais en charge les classes, vous pouvez toujours les imiter avec des objets tels que ceux décrits ci-dessus. EcmaScript 6 prend en charge les classes utilisant les classes et nouvelles :
 classe Person {
   constructeur (nom) {
      this.name = name;
   }
   salutation() {
      console.log (`Bonjour. Mon nom est $ {this.name} .`);
   }
}

const personne = nouvelle personne («Jean»);
person.greeting (); // Salut. Mon nom est John.
La fonction constructeur est appelée automatiquement lors de l'utilisation du mot clé new dans lequel nous pouvons passer des arguments pour configurer initialement l'objet. Ceci devrait être familier à tout lecteur ayant l'expérience de langages de programmation orientés objet plus typés de manière statique, tels que Java, C ++ et C #.
Sans entrer dans les détails des concepts de POO, un autre paradigme de ce type est "l'héritage", qui est pour permettre à une classe d'hériter d'une autre. Une classe appelée Car par exemple, sera très générale – elle contiendra des méthodes telles que “arrêter”, “démarrer”, etc., dont toutes les voitures ont besoin. Un sous-ensemble de la classe appelé SportsCar pourrait donc hériter des opérations fondamentales de Car et outrepasser tout ce dont il a besoin. On pourrait désigner une telle classe comme suit:
 class Car {
   constructeur (licensePlateNumber) {
      this.licensePlateNumber = licensePlateNumber;
   }
   début() {}
   Arrêtez() {}
   getLicensePlate () {
      return this.licensePlateNumber;
   }
   //…
}


classe SportsCar étend la voiture {
   constructeur (engineRevCount, licensePlateNumber) {
      super (licensePlateNumber); // Transmettez licensePlateNumber jusqu'à la classe parente.
      this.engineRevCount = engineRevCount;
   }
   début() {
      super départ();
   }
   Arrêtez() {
      super.stop ();
   }
   getLicensePlate () {
      renvoie super.getLicensePlate ();
   }
   getEngineRevCount () {
      renvoyer this.engineRevCount;
   }
}
Vous pouvez voir clairement que le mot clé super nous permet d'accéder aux propriétés et aux méthodes de la classe parente ou super,
Evénements JavaScript
Un événement est une action à laquelle vous avez la capacité de répondre. Supposons que vous construisiez un formulaire de connexion pour votre application. Lorsque l'utilisateur appuie sur le bouton «submit», vous pouvez réagir à cet événement via un «gestionnaire d'événements» dans votre code, généralement une fonction. Lorsque cette fonction est définie en tant que gestionnaire d'événements, nous disons que nous «enregistrons un gestionnaire d'événements». Le gestionnaire d'événements associé au clic sur le bouton d'envoi vérifiera probablement le formatage de l'entrée fournie par l'utilisateur et le désinfectera pour empêcher des attaques telles que les injections SQL ou les scripts intersites (sachez qu'aucun code côté client ne peut être pris en compte). Nettoyez toujours les données sur le serveur – ne faites jamais confiance au navigateur), puis vérifiez si la combinaison nom d'utilisateur / mot de passe existe dans une base de données pour authentifier un utilisateur et lui servir un jeton.
Comme il s'agit d'un article. à propos de Node, nous allons nous concentrer sur le Node Event Model .
Nous pouvons utiliser le module Events de Node pour émettre et réagir à des événements spécifiques. Any object that emits an event is an instance of the EventEmitter class.
We can emit an event by calling the emit() method and we listen for that event via the on() method, both of which are exposed through the EventEmitter class.
const EventEmitter = require('events');

const myEmitter = new EventEmitter();
With myEmitter now an instance of the EventEmitter class, we can access emit() and on():
const EventEmitter = require('events');

const myEmitter = new EventEmitter();

myEmitter.on('someEvent', () => {
  console.log('The "someEvent" event was fired (emitted)');
});

myEmitter.emit('someEvent'); // This will call the callback function above.
The second parameter to myEmitter.on() is the callback function that will fire when the event is emitted — this is the event handler. The first parameter is the name of the event, which can be anything we like, although the camelCase naming convention is recommended.
Additionally, the event handler can take any number of arguments, which are passed down when the event is emitted:
const EventEmitter = require('events');

const myEmitter = new EventEmitter();

myEmitter.on('someEvent', (data) => {
  console.log(`The "someEvent" event was fired (emitted) with data: ${data}`);
});

myEmitter.emit('someEvent', 'This is the data payload');
By using inheritance, we can expose the emit() and on() methods from ‘EventEmitter’ to any class. This is done by creating a Node.js class, and using the extends reserved keyword to inherit the properties available on EventEmitter:
const EventEmitter = require('events');

class MyEmitter extends EventEmitter {
  // This is my class. I can emit events from a MyEmitter object.
}
Suppose we are building a vehicle collision notification program that receives data from gyroscopes, accelerometers, and pressure gauges on the car’s hull. When a vehicle collides with an object, those external sensors will detect the crash, executing the collide(...) function and passing to it the aggregated sensor data as a nice JavaScript Object. This function will emit a collision event, notifying the vendor of the crash.
const EventEmitter = require('events');

class Vehicle extends EventEmitter {
  collide(collisionStatistics) {
    this.emit('collision', collisionStatistics)
  }
}

const myVehicle = new Vehicle();
myVehicle.on('collision', collisionStatistics => {
  console.log('WARNING! Vehicle Impact Detected: ', collisionStatistics);
  notifyVendor(collisionStatistics);
});

myVehicle.collide({ ... });
This is a convoluted example for we could just put the code within the event handler inside the collide function of the class, but it demonstrates how the Node Event Model functions nonetheless. Note that some tutorials will show the util.inherits() method of permitting an object to emit events. That has been deprecated in favor of ES6 Classes and extends.
The Node Package Manager
When programming with Node and JavaScript, it’ll be quite common to hear about npm. Npm is a package manager which does just that — permits the downloading of third-party packages that solve common problems in JavaScript. Other solutions, such as Yarn, Npx, Grunt, and Bower exist as well, but in this section, we’ll focus only on npm and how you can install dependencies for your application through a simple Command Line Interface (CLI) using it.
Let’s start simple, with just npm. Visit the NpmJS homepage to view all of the packages available from NPM. When you start a new project that will depend on NPM Packages, you’ll have to run npm init through the terminal in your project’s root directory. You will be asked a series of questions which will be used to create a package.json file. This file stores all of your dependencies — modules that your application depends on to function, scripts — pre-defined terminal commands to run tests, build the project, start the development server, etc., and more.
To install a package, simply run npm install [package-name] --save. The save flag will ensure the package and its version is logged in the package.json file. Since npm version 5, dependencies are saved by default, so --save may be omitted. You will also notice a new node_modules folder, containing the code for that package you just installed. This can also be shortened to just npm i [package-name]. As a helpful note, the node_modules folder should never be included in a GitHub repository due to its size. Whenever you clone a repo from GitHub (or any other version management system), be sure to run the command npm install to go out and fetch all the packages defined in the package.json file, creating the node_modules directory automatically. You can also install a package at a specific version: npm i [package-name]@1.10.1 --savefor example.
Removing a package is similar to installing one: npm remove [package-name].
You can also install a package globally. This package will be available across all projects, not just the one your working on. You do this with the -g flag after npm i [package-name]. This is commonly used for CLIs, such as Google Firebase and Heroku. Despite the ease this method presents, it is generally considered bad practice to install packages globally, for they are not saved in the package.json file, and if another developer attempts to use your project, they won’t attain all the required dependencies from npm install.
APIs & JSON
APIs are a very common paradigm in programming, and even if you are just starting out in your career as a developer, APIs and their usage, especially in web and mobile development, will likely come up more often than not.
An API is an Application Programming Interfaceand it is basically a method by which two decoupled systems may communicate with each other. In more technical terms, an API permits a system or computer program (usually a server) to receive requests and send appropriate responses (to a client, also known as a host).
Suppose you are building a weather application. You need a way to geocode a user’s address into a latitude and longitude, and then a way to attain the current or forecasted weather at that particular location.
As a developer, you want to focus on building your app and monetizing it, not putting the infrastructure in place to geocode addresses or placing weather stations in every city.
Luckily for you, companies like Google and OpenWeatherMap have already put that infrastructure in place, you just need a way to talk to it — that is where the API comes in. While, as of now, we have developed a very abstract and ambiguous definition of the API, bear with me. We’ll be getting to tangible examples soon.
Now, it costs money for companies to develop, maintain, and secure that aforementioned infrastructure, and so it is common for corporations to sell you access to their API. This is done with that is known as an API key, a unique alphanumeric identifier associating you, the developer, with the API. Every time you ask the API to send you data, you pass along your API key. The server can then authenticate you and keep track of how many API calls you are making, and you will be charged appropriately. The API key also permits Rate-Limiting or API Call Throttling (a method of throttling the number of API calls in a certain timeframe as to not overwhelm the server, preventing DOS attacks — Denial of Service). Most companies, however, will provide a free quota, giving you, as an example, 25,000 free API calls a day before charging you.
Up to this point, we have established that an API is a method by which two computer programs can communicate with each other. If a server is storing data, such as a website, and your browser makes a request to download the code for that site, that was the API in action.
Let us look at a more tangible example, and then we’ll look at a more real-world, technical one. Suppose you are eating out at a restaurant for dinner. You are equivalent to the client, sitting at the table, and the chef in the back is equivalent to the server.
Since you will never directly talk to the chef, there is no way for him/her to receive your request (for what order you would like to make) or for him/her to provide you with your meal once you order it. We need someone in the middle. In this case, it’s the waiter, analogous to the API. The API provides a medium with which you (the client) may talk to the server (the chef), as well as a set of rules for how that communication should be made (the menu — one meal is allowed two sides, etc.)
Now, how do you actually talk to the API (the waiter)? You might speak English, but the chef might speak Spanish. Is the waiter expected to know both languages to translate? What if a third person comes in who only speaks Mandarin? What then? Well, all clients and servers have to agree to speak a common language, and in computer programming, that language is JSON, pronounced JAY-sun, and it stands for JavaScript Object Notation.
At this point, we don’t quite know what JSON looks like. It’s not a computer programming language, it’s just, well, a language, like English or Spanish, that everyone (everyone being computers) understands on a guaranteed basis. It’s guaranteed because it’s a standard, notably RFC 8259the JavaScript Object Notation (JSON) Data Interchange Format by the Internet Engineering Task Force (IETF).
Even without formal knowledge of what JSON actually is and what it looks like (we’ll see in an upcoming article in this series), we can go ahead introduce a technical example operating on the Internet today that employs APIs and JSON. APIs and JSON are not just something you can choose to use, it’s not equivalent to one out of a thousand JavaScript frameworks you can pick to do the same thing. It is THE standard for data exchange on the web.
Suppose you are building a travel website that compares prices for aircraft, rental car, and hotel ticket prices. Let us walk through, step-by-step, on a high level, how we would build such an application. Of course, we need our User Interface, the front-end, but that is out of scope for this article.
We want to provide our users with the lowest price booking method. Well, that means we need to somehow attain all possible booking prices, and then compare all of the elements in that set (perhaps we store them in an array) to find the smallest element (known as the infimum in mathematics.)
How will we get this data? Well, suppose all of the booking sites have a database full of prices. Those sites will provide an API, which exposes the data in those databases for use by you. You will call each API for each site to attain all possible booking prices, store them in your own array, find the lowest or minimum element of that array, and then provide the price and booking link to your user. We’ll ask the API to query its database for the price in JSON, and it will respond with said price in JSON to us. We can then use, or parse, that accordingly. We have to parse it because APIs will return JSON as a string, not the actual JavaScript data type of JSON. This might not make sense now, and that’s okay. We’ll be covering it more in a future article.
Also, note that just because something is called an API does not necessarily mean it operates on the web and sends and receives JSON. The Java API, for example, is just the list of classes, packages, and interfaces that are part of the Java Development Kit (JDK), providing programming functionality to the programmer.
Okay. We know we can talk to a program running on a server by way of an Application Programming Interface, and we know that the common language with which we do this is known as JSON. But in the web development and networking world, everything has a protocol. What do we actually do to make an API call, and what does that look like code-wise? That’s where HTTP Requests enter the picture, the HyperText Transfer Protocol, defining how messages are formatted and transmitted across the Internet. Once we have an understanding of HTTP (and HTTP verbs, you’ll see that in the next section), we can look into actual JavaScript frameworks and methods (like fetch()) offered by the JavaScript API (similar to the Java API), that actually allow us to make API calls.
HTTP And HTTP Requests
HTTP is the HyperText Transfer Protocol. It is the underlying protocol that determines how messages are formatted as they are transmitted and received across the web. Let’s think about what happens when, for example, you attempt to load the home page of Smashing Magazine in your web browser.
You type the website URL (Uniform Resource Locator) in the URL bar, where the DNS server (Domain Name Server, out of scope for this article) resolves the URL into the appropriate IP Address. The browser makes a request, called a GET Request, to the Web Server to, well, GET the underlying HTML behind the site. The Web Server will respond with a message such as “OK”, and then will go ahead and send the HTML down to the browser where it will be parsed and rendered accordingly.
There are a few things to note here. First, the GET Request, and then the “OK” response. Suppose you have a specific database, and you want to write an API to expose that database to your users. Suppose the database contains books the user wants to read (as it will in a future article in this series). Then there are four fundamental operations your user may want to perform on this database, that is, Create a record, Read a record, Update a record, or Delete a record, known collectively as CRUD operations.
Let’s look at the Read operation for a moment. Without incorrectly assimilating or conflating the notion of a web server and a database, that Read operation is very similar to your web browser attempting to get the site from the server, just as to read a record is to get the record from the database.
This is known as an HTTP Request. You are making a request to some server somewhere to get some data, and, as such, the request is appropriately named “GET”, capitalization being a standard way to denote such requests.
What about the Create portion of CRUD? Well, when talking about HTTP Requests, that is known as a POST request. Just as you might post a message on a social media platform, you might also post a new record to a database.
CRUD’s Update allows us to use either a PUT or PATCH Request in order to update a resource. HTTP’s PUT will either create a new record or will update/replace the old one.
Let’s look at this a bit more in detail, and then we’ll get to PATCH.
An API generally works by making HTTP requests to specific routes in a URL. Suppose we are making an API to talk to a DB containing a user’s booklist. Then we might be able to view those books at the URL .../books. A POST requests to .../books will create a new book with whatever properties you define (think id, title, ISBN, author, publishing data, etc.) at the .../books route. It doesn’t matter what the underlying data structure is that stores all the books at .../books right now. We just care that the API exposes that endpoint (accessed through the route) to manipulate data. The prior sentence was key: A POST request creates a new book at the ...books/ route. The difference between PUT and POST, then, is that PUT will create a new book (as with POST) if no such book exists, or, it will replace an existing book if the book already exists within that aforementioned data structure.
Suppose each book has the following properties: id, title, ISBN, author, hasRead (boolean).
Then to add a new book, as seen earlier, we would make a POST request to .../books. If we wanted to completely update or replace a book, we would make a PUT request to .../books/id where id is the ID of the book we want to replace.
While PUT completely replaces an existing book, PATCH updates something having to do with a specific book, perhaps modifying the hasRead boolean property we defined above — so we’d make a PATCH request to …/books/id sending along the new data.
It can be difficult to see the meaning of this right now, for thus far, we’ve established everything in theory but haven’t seen any tangible code that actually makes an HTTP request. We shall, however, get to that soon, covering GET in this article, ad the rest in a future article.
There is one last fundamental CRUD operation and it’s called Delete. As you would expect, the name of such an HTTP Request is “DELETE”, and it works much the same as PATCH, requiring the book’s ID be provided in a route.
We have learned thus far, then, that routes are specific URLs to which you make an HTTP Request, and that endpoints are functions the API provides, doing something to the data it exposes. That is, the endpoint is a programming language function located on the other end of the route, and it performs whatever HTTP Request you specified. We also learned that there exist such terms as POST, GET, PUT, PATCH, DELETE, and more (known as HTTP verbs) that actually specify what requests you are making to the API. Like JSON, these HTTP Request Methods are Internet standards as defined by the Internet Engineering Task Force (IETF), most notably, RFC 7231, Section Four: Request Methodsand RFC 5789, Section Two: Patch Methodwhere RFC is an acronym for Request for Comments.
So, we might make a GET request to the URL .../books/id where the ID passed in is known as a parameter. We could make a POST, PUT, or PATCH request to .../books to create a resource or to .../books/id to modify/replace/update a resource. And we can also make a DELETE request to .../books/id to delete a specific book.
A full list of HTTP Request Methods can be found here.
It is also important to note that after making an HTTP Request, we’ll receive a response. The specific response is determined by how we build the API, but you should always receive a status code. Earlier, we said that when your web browser requests the HTML from the web server, it’ll respond with “OK”. That is known as an HTTP Status Code, more specifically, HTTP 200 OK. The status code just specifies how the operation or action specified in the endpoint (remember, that’s our function that does all the work) completed. HTTP Status Codes are sent back by the server, and there are probably many you are familiar with, such as 404 Not Found (the resource or file could not be found, this would be like making a GET request to .../books/id where no such ID exists.)
A complete list of HTTP Status Codes can be found here.
MongoDB
MongoDB is a non-relational, NoSQL database similar to the Firebase Real-time Database. You will talk to the database via a Node package such as the MongoDB Native Driver or Mongoose.
In MongoDB, data is stored in JSON, which is quite different from relational databases such as MySQL, PostgreSQL, or SQLite. Both are called databases, with SQL Tables called Collections, SQL Table Rows called Documents, and SQL Table Columns called Fields.
We will use the MongoDB Database in an upcoming article in this series when we create our very first Bookshelf API. The fundamental CRUD Operations listed above can be performed on a MongoDB Database.
It’s recommended that you read through the MongoDB Docs to learn how to create a live database on an Atlas Cluster and make CRUD Operations to it with the MongoDB Native Driver. In the next article of this series, we will learn how to set up a local database and a cloud production database.
Building A Command Line Node Application
When building out an application, you will see many authors dump their entire code base at the beginning of the article, and then attempt to explain each line thereafter. In this text, I’ll take a different approach. I’ll explain my code line-by-line, building the app as we go. I won’t worry about modularity or performance, I won’t split the codebase into separate files, and I won’t follow the DRY Principle or attempt to make the code reusable. When just learning, it is useful to make things as simple as possible, and so that is the approach I will take here.
Let us be clear about what we are building. We won’t be concerned with user input, and so we won’t make use of packages like Yargs. We also won’t be building our own API. That will come in a later article in this series when we make use of the Express Web Application Framework. I take this approach as to not conflate Node.js with the power of Express and APIs since most tutorials do. Rather, I’ll provide one method (of many) by which to call and receive data from an external API which utilizes a third-party JavaScript library. The API we’ll be calling is a Weather API, which we’ll access from Node and dump its output to the terminal, perhaps with some formatting, known as “pretty-printing”. I’ll cover the entire process, including how to set up the API and attain API Key, the steps of which provide the correct results as of January 2019.
We’ll be using the OpenWeatherMap API for this project, so to get started, navigate to the OpenWeatherMap sign-up page and create an account with the form. Once logged in, find the API Keys menu item on the dashboard page (located over here). If you just created an account, you’ll have to pick a name for your API Key and hit “Generate”. It could take at least 2 hours for your new API Key to be functional and associated with your account.
Before we start building out the application, we’ll visit the API Documentation to learn how to format our API Key. In this project, we’ll be specifying a zip code and a country code to attain the weather information at that location.
From the docs, we can see that the method by which we do this is to provide the following URL:
api.openweathermap.org/data/2.5/weather?zip={zip code},{country code}
Into which we could input data:
api.openweathermap.org/data/2.5/weather?zip=94040,us
Now, before we can actually attain relevant data from this API, we’ll need to provide our new API Key as a query parameter:
api.openweathermap.org/data/2.5/weather?zip=94040,us&appid={YOUR_API_KEY}
For now, copy that URL into a new tab in your web browser, replacing the {YOUR_API_KEY} placeholder with the API Key you obtained earlier when you registered for an account.
The text you can see is actually JSON — the agreed upon language of the web as discussed earlier.
To inspect this further, hit Ctrl + Shift + I in Google Chrome to open the Chrome Developer tools, and then navigate to the Network tab. At present, there should be no data here.

To actually monitor network data, reload the page, and watch the tab be populated with useful information. Click the first link as depicted in the image below.

Once you click on that link, we can actually view HTTP specific information, such as the headers. Headers are sent in the response from the API (you can also, in some cases, send your own headers to the API, or you can even create your own custom headers (often prefixed with x-) to send back when building your own API), and just contain extra information that either the client or server may need.
In this case, you can see that we made an HTTP GET Request to the API, and it responded with an HTTP Status 200 OK. You can also see that the data sent back was in JSON, as listed under the “Response Headers” section.

If you hit the preview tab, you can actually view the JSON as a JavaScript Object. The text version you can see in your browser is a string, for JSON is always transmitted and received across the web as a string. That’s why we have to parse the JSON in our code, to get it into a more readable format — in this case (and in pretty much every case) — a JavaScript Object.
You can also use the Google Chrome Extension “JSON View” to do this automatically.
To start building out our application, I’ll open a terminal and make a new root directory and then cd into it. Once inside, I’ll create a new app.js file, run npm init to generate a package.json file with the default settings, and then open Visual Studio Code.
mkdir command-line-weather-app && cd command-line-weather-app
touch app.js
npm init
code .
Thereafter, I’ll download Axios, verify it has been added to my package.json file, and note that the node_modules folder has been created successfully.
In the browser, you can see that we made a GET Request by hand by manually typing the proper URL into the URL Bar. Axios is what will allow me to do that inside of Node.
Starting now, all of the following code will be located inside of the app.js file, each snippet placed one after the other.
The first thing I’ll do is require the Axios package we installed earlier with
const axios = require('axios');
We now have access to Axios, and can make relevant HTTP Requests, via the axios constant.
Generally, our API calls will be dynamic — in this case, we might want to inject different zip codes and country codes into our URL. So, I’ll be creating constant variables for each part of the URL, and then put them together with ES6 Template Strings. First, we have the part of our URL that will never change as well as our API Key:
const API_URL = 'https://api.openweathermap.org/data/2.5/weather?zip=';
const API_KEY = 'Your API Key Here';
I’ll also assign our zip code and country code. Since we are not expecting user input and are rather hard coding the data, I’ll make these constant as well, although, in many cases, it will be more useful to use let.
const LOCATION_ZIP_CODE = '90001';
const COUNTRY_CODE = 'us';
We now need to put these variables together into one URL to which we can use Axios to make GET Requests to:
const ENTIRE_API_URL = `${API_URL}${LOCATION_ZIP_CODE},${COUNTRY_CODE}&appid=${API_KEY}`;
Here is the contents of our app.js file up to this point:
const axios = require('axios');

// API specific settings.
const API_URL = 'https://api.openweathermap.org/data/2.5/weather?zip=';
const API_KEY = 'Your API Key Here';

const LOCATION_ZIP_CODE = '90001';
const COUNTRY_CODE = 'us';

const ENTIRE_API_URL = `${API_URL}${LOCATION_ZIP_CODE},${COUNTRY_CODE}&appid=${API_KEY}`;
All that is left to do is to actually use axios to make a GET Request to that URL. For that, we’ll use the get(url) method provided by axios.
axios.get(ENTIRE_API_URL)
axios.get(...) actually returns a Promise, and the success callback function will take in a response argument which will allow us to access the response from the API — the same thing you saw in the browser. I’ll also add a .catch() clause to catch any errors.
axios.get(ENTIRE_API_URL)
    .then (response => console.log (response))
    .catch(error => console.log('Error', error));
If we now run this code with node app.js in the terminal, you will be able to see the full response we get back. However, suppose you just want to see the temperature for that zip code — then most of that data in the response is not useful to you. Axios actually returns the response from the API in the data object, which is a property of the response. That means the response from the server is actually located at response.dataso let’s print that instead in the callback function: console.log(response.data).
Now, we said that web servers always deal with JSON as a string, and that is true. You might notice, however, that response.data is already an object (evident by running console.log(typeof response.data)) — we didn’t have to parse it with JSON.parse(). That is because Axios already takes care of this for us behind the scenes.
The output in the terminal from running console.log(response.data) can be formatted — “pretty-printed” — by running console.log(JSON.stringify(response.data, undefined, 2)). JSON.stringify() converts a JSON object into a string, and take in the object, a filter, and the number of characters by which to indent by when printing. You can see the response this provides:
{
  "coord": {
    "lon": -118.24,
    "lat": 33.97
  },
  "weather": [
    {
      "id": 800,
      "main": "Clear",
      "description": "clear sky",
      "icon": "01d"
    }
  ],
  "base": "stations",
  "main": {
    "temp": 288.21,
    "pressure": 1022,
    "humidity": 15,
    "temp_min": 286.15,
    "temp_max": 289.75
  },
  "visibility": 16093,
  "wind": {
    "speed": 2.1,
    "deg": 110
  },
  "clouds": {
    "all": 1
  },
  "dt": 1546459080,
  "sys": {
    "type": 1,
    "id": 4361,
    "message": 0.0072,
    "country": "US",
    "sunrise": 1546441120,
    "sunset": 1546476978
  },
  "id": 420003677,
  "name": "Lynwood",
  "cod": 200
}
Now, it is clear to see that the temperature we are looking for is located on the main property of the response.data object, so we can access it by calling response.data.main.temp. Let’s look at out application’s code up to now:
const axios = require('axios');

// API specific settings.
const API_URL = 'https://api.openweathermap.org/data/2.5/weather?zip=';
const API_KEY = 'Your API Key Here';

const LOCATION_ZIP_CODE = '90001';
const COUNTRY_CODE = 'us';

const ENTIRE_API_URL = `${API_URL}${LOCATION_ZIP_CODE},${COUNTRY_CODE}&appid=${API_KEY}`;

axios.get(ENTIRE_API_URL)
    .then(response => console.log(response.data.main.temp))
    .catch(error => console.log('Error', error));
The temperature we get back is actually in Kelvin, which is a temperature scale generally used in Physics, Chemistry, and Thermodynamics due to the fact that it provides an “absolute zero” point, which is the temperature at which all thermal motion of all inner particles cease. We just need to convert this to Fahrenheit or Celcius with the formulas below:
F = K * 9/5 — 459.67
C = K — 273.15
Let’s update our success callback to print the new data with this conversion. We’ll also add in a proper sentence for the purposes of User Experience:
axios.get(ENTIRE_API_URL)
    .then(response => {
        // Getting the current temperature and the city from the response object.
        const kelvinTemperature = response.data.main.temp;
        const cityName = response.data.name;
        const countryName = response.data.sys.country;

        // Making K to F and K to C conversions.
        const fahrenheitTemperature = (kelvinTemperature * 9/5) — 459.67;
        const celciusTemperature = kelvinTemperature — 273.15;

        // Building the final message.
        const message = (
            `Right now, in
            ${cityName}, ${countryName} the current temperature is
            ${fahrenheitTemperature.toFixed(2)} deg F or
            ${celciusTemperature.toFixed(2)} deg C.`.replace(/s+/g, ' ')
        )

        console.log(message);
    })
    .catch(error => console.log('Error', error));
The parentheses around the message variable are not required, they just look nice — similar to when working with JSX in React. The backslashes stop the template string from formatting a new line, and the replace() String prototype method gets rid of white space using Regular Expressions (RegEx). The toFixed() Number prototype methods rounds a float to a specific number of decimal places — in this case, two.
With that, our final app.js looks as follows:
const axios = require('axios');

// API specific settings.
const API_URL = 'https://api.openweathermap.org/data/2.5/weather?zip=';
const API_KEY = 'Your API Key Here';

const LOCATION_ZIP_CODE = '90001';
const COUNTRY_CODE = 'us';

const ENTIRE_API_URL = `${API_URL}${LOCATION_ZIP_CODE},${COUNTRY_CODE}&appid=${API_KEY}`;

axios.get(ENTIRE_API_URL)
    .then(response => {
        // Getting the current temperature and the city from the response object.
        const kelvinTemperature = response.data.main.temp;
        const cityName = response.data.name;
        const countryName = response.data.sys.country;

        // Making K to F and K to C conversions.
        const fahrenheitTemperature = (kelvinTemperature * 9/5) — 459.67;
        const celciusTemperature = kelvinTemperature — 273.15;

        // Building the final message.
        const message = (
            `Right now, in
            ${cityName}, ${countryName} the current temperature is
            ${fahrenheitTemperature.toFixed(2)} deg F or
            ${celciusTemperature.toFixed(2)} deg C.`.replace(/s+/g, ' ')
        )

        console.log(message);
    })
    .catch(error => console.log('Error', error));
Conclusion
We have learned a lot about how Node works in this article, from the differences between synchronous and asynchronous requests, to callback functions, to new ES6 features, events, package managers, APIs, JSON, and the HyperText Transfer Protocol, Non-Relational Databases, and we even built our own command line application utilizing most of that new found knowledge.
In future articles in this series, we’ll take an in-depth look at the Call Stack, the Event Loop, and Node APIs, we’ll talk about Cross-Origin Resource Sharing (CORS), and we’ll build a Full Stack Bookshelf API utilizing databases, endpoints, user authentication, tokens, server-side template rendering, and more.
From here, start building your own Node applications, read the Node documentation, go out and find interesting APIs or Node Modules and implement them yourself. The world is your oyster and you have at your fingertips access to the largest network of knowledge on the planet — the Internet. Use it to your advantage.
Further Reading on SmashingMag:
 (dm, ra, il)
Source link