


L’outil secret pour exploser ton chiffre d'affaires en 2025 !
Comment configurer un projet backend d'API Express avec PostgreSQL
Nous adopterons une approche de développement piloté par les tests (TDD) et la configuration de l'intégration continue (CI) ) pour exécuter automatiquement nos tests sur Travis CI et AppVeyor, avec des rapports sur la qualité du code et la couverture. Nous découvrirons les contrôleurs, les modèles (avec PostgreSQL), la gestion des erreurs et le middleware Express asynchrone. Enfin, nous compléterons le pipeline CI / CD en configurant le déploiement automatique sur Heroku.
Cela semble beaucoup, mais ce tutoriel est destiné aux débutants qui sont prêts à essayer un projet backend avec un certain niveau de complexité. , et qui peut encore être confus quant à la façon dont toutes les pièces s'emboîtent dans un projet réel.
Il est robuste sans être écrasant et est divisé en sections que vous pouvez compléter dans un laps de temps raisonnable.
Démarré
La première étape consiste à créer un nouveau répertoire pour le projet et à démarrer un nouveau projet de noeud. Node est requis pour continuer ce didacticiel. Si vous ne l'avez pas installé, rendez-vous sur le site Web officiel téléchargez-le et installez-le avant de continuer.
J'utiliserai yarn comme gestionnaire de packages pour ce projet. Il existe des instructions d'installation pour votre système d'exploitation spécifique ici . N'hésitez pas à utiliser npm si vous le souhaitez.
Ouvrez votre terminal, créez un nouveau répertoire et démarrez un projet Node.js.
 # créez un nouveau répertoire
mkdir express-api-template

# passer au répertoire nouvellement créé
cd express-api-template

# initialiser un nouveau projet Node.js
npm init
Répondez aux questions suivantes pour générer un fichier package.json . Ce fichier contient des informations sur votre projet. Un exemple de ces informations comprend les dépendances qu'il utilise, la commande pour démarrer le projet, etc.
Vous pouvez maintenant ouvrir le dossier du projet dans l'éditeur de votre choix. J'utilise du code Visual Studio. C'est un IDE gratuit avec des tonnes de plugins pour vous faciliter la vie, et il est disponible pour toutes les principales plates-formes. Vous pouvez le télécharger à partir du site Web officiel .
Créez les fichiers suivants dans le dossier du projet:
Voici une description de ce que fait .editorconfig à partir du site Web EditorConfig . (Vous n'en avez probablement pas besoin si vous travaillez en solo, mais cela ne fait pas de mal, donc je vais le laisser ici.)
«EditorConfig aide à maintenir des styles de codage cohérents pour plusieurs développeurs travaillant sur le même projet à travers divers éditeurs et IDE. »
Ouvrez .editorconfig et collez le code suivant:
 root = true
[*]
indent_style = espace
indent_size = 2
charset = utf-8
trim_trailing_whitespace = false
insert_final_newline = true
Le [*] signifie que nous voulons appliquer les règles qui en découlent à chaque fichier du projet. Nous voulons une taille de retrait de deux espaces et un jeu de caractères UTF-8 . Nous souhaitons également supprimer les espaces blancs à la fin et insérer une dernière ligne vide dans notre fichier.
Ouvrez README.md et ajoutez le nom du projet comme élément de premier niveau.
# Modèle d'API Express Ajoutons immédiatement le contrôle de version.
 # initialise le dossier du projet en tant que référentiel git
git init
Créez un fichier .gitignore et entrez les lignes suivantes:
 node_modules /
yarn-error.log
.env
.nyc_output
couverture
build /
Ce sont tous les fichiers et dossiers que nous ne voulons pas suivre. Nous ne les avons pas encore dans notre projet, mais nous les verrons au fur et à mesure.
À ce stade, vous devriez avoir la structure de dossiers suivante.
 EXPRESS-API-TEMPLATE
├── .editorconfig
├── .gitignore
├── package.json
└── README.md
Je considère que c'est un bon point pour valider mes modifications et les pousser vers GitHub.
Démarrage d'un nouveau projet Express
Express est un framework Node.js pour la construction d'applications Web. Selon le site Web officiel il s'agit d'un
cadre Web minimal, rapide et sans opinion pour Node.js .
Il existe d'autres grands sites Web cadres d'application pour Node.js, mais Express est très populaire, avec plus de 47k étoiles GitHub au moment de la rédaction de cet article.
Dans cet article, nous n'aurons pas beaucoup de discussions sur toutes les parties qui composent Express. Pour cette discussion, je vous recommande de consulter la série de Jamie. La première partie est ici et la seconde partie ici .
Installez Express et démarrez un nouveau projet Express. Il est possible de configurer manuellement un serveur Express à partir de zéro, mais pour nous faciliter la vie, nous utiliserons le express-generator pour configurer le squelette de l'application.
 # installer le générateur express à l'échelle mondiale
fil global add express-générateur

# install express
fil ajouter express

# générer le projet express dans le dossier courant
express -f
Le drapeau -f force Express à créer le projet dans le répertoire courant.
Nous allons maintenant effectuer quelques opérations de nettoyage.
- Supprimer le fichier index / users.js .
- Supprimez les dossiers
public /etvues /. - Renommez le fichier bin / www en bin / www.js .
- Désinstaller
jadeavec la commandeyarn remove jade. - Créer un nouveau dossier nommé
src /et déplacez ce qui suit à l'intérieur:
1. fichier app.js
2. Dossierbin /
3.routes / dossierà l'intérieur. - Ouvrez package.json et mettez à jour le script
startpour qu'il ressemble à ce qui suit.
"start": "node ./src/bin/www"[19659012[Àcestadelastructuredevotredossierdeprojetressembleàci-dessousVouspouvezvoircommentVSCodemetenévidencelesmodificationsdefichierquionteulieuEXPRESS-API-TEMPLATE ├── node_modules ├── src | ├── bin │ │ ├── www.js │ ├── itinéraires │ | ├── index.js │ └── app.js ├── .editorconfig ├── .gitignore ├── package.json ├── README.md └── yarn.lockOuvrez src / app.js et remplacez le contenu par le code ci-dessous.
var logger = require ('morgan'); var express = require ('express'); var cookieParser = require ('cookie-parser'); var indexRouter = require ('./ routes / index'); var app = express (); app.use (logger ('dev')); app.use (express.json ()); app.use (express.urlencoded ({extended: true})); app.use (cookieParser ()); app.use ('/ v1', indexRouter); module.exports = app;Après avoir requis certaines bibliothèques, nous demandons à Express de traiter toutes les demandes provenant de
/ v1avecindexRouter.Remplacer le contenu de routes / index.js avec le code ci-dessous:
var express = require ('express'); var router = express.Router (); router.get ('/', fonction (req, res, next) { return res.status (200) .json ({message: 'Bienvenue dans le modèle d'API Express'}); }); module.exports = router;Nous prenons Express, créons un routeur à partir de celui-ci et servons la route
/qui renvoie un code d'état de200et un message JSON. [19659005] Démarrez l'application avec la commande ci-dessous:# démarrez l'application début du filSi vous avez tout configuré correctement, vous ne devriez voir que
$ node ./src/bin/wwwdans votre terminal.Visitez
http: // localhost: 3000 / v1dans votre navigateur. Vous devriez voir le message suivant:{ "message": "Bienvenue dans le modèle d'API Express" }C'est un bon point pour valider nos modifications.
Conversion de notre code en
ES6Le code généré par
générateur expressest dansES5mais dans cet article, nous allons écrire tout notre code dans la syntaxeES6. Convertissons donc notre code existant enES6.Remplacez le contenu de routes / index.js par le code ci-dessous:
import express from 'express'; const indexRouter = express.Router (); indexRouter.get ('/', (req, res) => res.status (200) .json ({message: 'Bienvenue dans le modèle d'API Express'}) ); export default indexRouter;Il s'agit du même code que celui que nous avons vu ci-dessus, mais avec l'instruction import et une fonction de flèche dans le gestionnaire d'itinéraire
/.Remplacez le contenu de src / app.js avec le code ci-dessous:
import logger from 'morgan'; import express de «express»; importer cookieParser à partir de 'cookie-parser'; importez indexRouter depuis './routes/index'; const app = express (); app.use (logger ('dev')); app.use (express.json ()); app.use (express.urlencoded ({extended: true})); app.use (cookieParser ()); app.use ('/ v1', indexRouter); exporter l'application par défaut;Voyons maintenant le contenu de src / bin / www.js . Nous allons le construire progressivement. Supprimez le contenu de
src / bin / www.jset collez-le dans le bloc de code ci-dessous.#! / Usr / bin / env node / ** * Dépendances des modules. * / importer le débogage de 'debug'; importer http depuis 'http'; importer l'application depuis '../app'; / ** * Normaliser un port en nombre, chaîne ou faux. * / const normalizePort = val => { port const = parseInt (val, 10); if (Number.isNaN (port)) { // pipe nommée return val; } if (port> = 0) { // numéro de port port de retour; } retour faux; }; / ** * Obtenez le port de l'environnement et stockez dans Express. * / port const = normalizePort (process.env.PORT || '3000'); app.set ('port', port); / ** * Créer un serveur HTTP. * / serveur const = http.createServer (app); // le bloc de code suivant va iciCe code vérifie si un port personnalisé est spécifié dans les variables d'environnement. Si aucun n'est défini, la valeur de port par défaut de
3000est définie sur l'instance d'application, après avoir été normalisée en une chaîne ou un nombre parnormalizePort. Le serveur est ensuite créé à partir du modulehttpavec l'applicationcomme fonction de rappel.La ligne
#! / Usr / bin / env nodeest facultatif car nous spécifierions le noeud lorsque nous voulons exécuter ce fichier. Mais assurez-vous qu'il se trouve sur la ligne 1 du fichier src / bin / www.js ou supprimez-le complètement.Voyons la fonction de gestion des erreurs. Copiez et collez ce bloc de code après la ligne où le serveur est créé.
/ ** * Écouteur d'événements pour l'événement "erreur" du serveur HTTP. * / const onError = error => { if (error.syscall! == 'écouter') { erreur de lancer; } const bind = typeof port === 'chaîne'? `Pipe $ {port}`: `Port $ {port}`; // gérer des erreurs d'écoute spécifiques avec des messages conviviaux commutateur (error.code) { cas «EACCES»: alert (`$ {bind} nécessite des privilèges élevés`); process.exit (1); Pause; cas «EADDRINUSE»: alert (`$ {bind} est déjà utilisé`); process.exit (1); Pause; défaut: erreur de lancer; } }; / ** * Écouteur d'événements pour l'événement "d'écoute" du serveur HTTP. * / const onListening = () => { const addr = server.address (); const bind = typeof addr === 'chaîne'? `pipe $ {addr}`: `port $ {addr.port}`; debug (`Écoute sur $ {bind}`); }; / ** * Écoutez sur le port fourni, sur toutes les interfaces réseau. * / server.listen (port); server.on ('erreur', onError); server.on ('écoute', onListening);La fonction
onErrorécoute les erreurs sur le serveur http et affiche les messages d'erreur appropriés. La fonctiononListeningaffiche simplement le port que le serveur écoute sur la console. Enfin, le serveur écoute les demandes entrantes à l'adresse et au port spécifiés.À ce stade, tout notre code existant est dans la syntaxe
ES6. Arrêtez votre serveur (utilisez Ctrl + C ) et exécutezdébut de fil. Vous obtiendrez une erreurSyntaxError: jeton non valide ou inattendu. Cela se produit car Node (au moment de la rédaction) ne prend pas en charge une partie de la syntaxe que nous avons utilisée dans notre code.Nous allons maintenant corriger cela dans la section suivante.
Configuration des dépendances de développement:
babelnodemoneslintEtplus joliIl est temps de configurer la plupart des scripts dont nous allons avoir besoin à ce stade
Installez les bibliothèques requises avec les commandes ci-dessous. Vous pouvez simplement tout copier et le coller dans votre terminal. Les lignes de commentaires seront ignorées.
# install babel scripts yarn add @ babel / cli @ babel / core @ babel / plugin-transform-runtime @ babel / preset-env @ babel / register @ babel / runtime @ babel / node --devCeci installe tous les scripts babel répertoriés comme dépendances de développement. Vérifiez votre fichier package.json et vous devriez voir une section
devDependencies. Tous les scripts installés y seront répertoriés.Les scripts babel que nous utilisons sont expliqués ci-dessous:
@ babel / cliUne installation requise pour utiliser babel. Il permet l'utilisation de Babel depuis le terminal et est disponible en tant que./ node_modules / .bin / babel.@ babel / coreFonctionnalité Core Babel. Il s'agit d'une installation requise. @ babel / nodeCela fonctionne exactement comme la CLI Node.js, avec l'avantage supplémentaire de compiler avec babelles préréglages et les plugins. Ceci est requis pour une utilisation avecnodemon.@ babel / plugin-transform-runtimeCela permet d'éviter la duplication dans la sortie compilée. @ babel / preset-envUne collection de plugins chargés de réaliser les transformations de code. @ babel / registerCeci compile les fichiers à la volée et est spécifié comme une exigence lors des tests. @ babel / runtimeCela fonctionne en conjonction avec @ babel / plugin-transform-runtime.Créez un fichier nommé .babelrc à la racine de votre projet et ajoutez le code suivant:
{ "préréglages": ["@babel/preset-env"], "plugins": ["@babel/transform-runtime"] }Installons
nodemon# install nodemon yarn add nodemon --dev
nodemonest une bibliothèque qui surveille le code source de notre projet et redémarre automatiquement notre serveur chaque fois qu'il observe des modifications.Créez un fichier nommé nodemon.json à la racine de votre projet et ajoutez le code ci-dessous:
{ "montre": [ "package.json", "nodemon.json", ".eslintrc.json", ".babelrc", ".prettierrc", "src/" ], "verbose": vrai, "ignorer": ["*.test.js", "*.spec.js"] }La touche
de la montreindique ànodemonquels fichiers et dossiers surveiller les modifications. Ainsi, chaque fois que l'un de ces fichiers change, nodemon redémarre le serveur. La cléignorelui indique que les fichiers ne doivent pas surveiller les modifications.Maintenant, mettez à jour la section
scriptsde votre fichier package.json pour qu'elle ressemble à la suivante :# construire le contenu du dossier src "prestart": "babel ./src --out-dir build" # démarrer le serveur à partir du dossier de construction "start": "node ./build/bin/www" # démarrer le serveur en mode développement "startdev": "nodemon --exec babel-node ./src/bin/www"[19659107diplomprestartscripts crée le contenu du dossiersrc /et le place dans le dossierdossier build /. Lorsque vous exécutez la commandeyarn startce script s'exécute avant le scriptstart. Le scriptstartsert désormais le contenu de la génération. /au lieu du dossiersrc /que nous servions précédemment. Il s'agit du script que vous utiliserez lors de la diffusion du fichier en production. En fait, des services comme Heroku exécutent automatiquement ce script lors du déploiement.yarn startdevest utilisé pour démarrer le serveur pendant le développement. À partir de maintenant, nous utiliserons ce script lors du développement de l'application. Notez que nous utilisons maintenantbabel-nodepour exécuter l'application au lieu du nœud normal. Le drapeau- execforcele nœud babelà servir le dossiersrc /. Pour le scriptstartnous utilisons le nœudcar les fichiers du dossierbuild /ont été compilés en ES5.Exécutez
yarn startdevet visitez http: // localhost: 3000 / v1 .La dernière étape de cette section consiste à configurer
ESLintetplus joli. ESLint aide à appliquer les règles de syntaxe tandis que la plus jolie aide à formater correctement notre code pour plus de lisibilité.Ajoutez les deux avec la commande ci-dessous. Vous devez l'exécuter sur un terminal séparé tout en observant le terminal sur lequel notre serveur fonctionne. Vous devriez voir le serveur redémarrer. En effet, nous surveillons les modifications du fichier package.json .
# install elsint and prettier yarn add eslint eslint-config-airbnb-base eslint-plugin-import prettier --devMaintenant, créez le fichier .eslintrc.json dans le projet
rootet ajoutez ce qui suit code:{ "env": { "navigateur": vrai, "es6": vrai, "nœud": vrai, "mocha": vrai }, "étend": ["airbnb-base"], "globaux": { "Atomics": "readonly", "SharedArrayBuffer": "en lecture seule" }, "parserOptions": { "ecmaVersion": 2018, "sourceType": "module" }, "règles": { "tiret": ["warn", 2], "style saut de ligne": ["error", "unix"], "citations": ["error", "single"], "semi": ["error", "always"], "sans console": 1, "virgule pendante": [0], "arrow-parens": [0], "object-curly-spacing": ["warn", "always"], "array-bracket-spacing": ["warn", "always"], "import / prefer-default-export": [0] } }Ce fichier définit principalement certaines règles par rapport auxquelles
eslintvérifiera notre code. Vous pouvez voir que nous étendons les règles de style utilisées par Airbnb.Dans la section
"règles"nous définissons sieslintdoit afficher un avertissement ou une erreur lorsqu'il rencontre certaines violations. Par exemple, il affiche un message d'avertissement sur notre terminal pour toute indentation qui n'utilise pas 2 espaces. Une valeur de[0]désactive une règle, ce qui signifie que nous n'obtiendrons pas d'avertissement ou d'erreur si nous enfreignons cette règle.Créez un fichier nommé .prettierrc et ajoutez le code ci-dessous :
{ "trailingComma": "es5", "tabWidth": 2, "semi": vrai, "singleQuote": vrai }Nous définissons une largeur de tabulation de
2et imposons l'utilisation de guillemets simples dans notre application. Consultez le guide plus joli pour plus d'options de style.Ajoutez maintenant les scripts suivants à votre package.json :
# ajoutez-les les uns après les autres. "lint": "./node_modules/.bin/eslint ./src" "jolie": "plus jolie --écrire '** / *. {js, json}' '! node_modules / **'" "postpretty": "peluche de fil - fixer"Run
peluche de fil. Vous devriez voir un certain nombre d'erreurs et d'avertissements dans la console.La commande
prettyembellit notre code. La commandepostprettyest exécutée immédiatement après. Il exécute la commandelintavec le drapeau- fixen annexe. Ce drapeau indique àESLintde corriger automatiquement les problèmes courants de peluchage. De cette façon, je lance principalement la commandeyarn prettysans me soucier de la commandelint.Run
yarn pretty. Vous devez voir que nous n'avons que deux avertissements concernant la présence de l'alertedans le fichier bin / www.js .Voici à quoi ressemble la structure de notre projet à ce stade. [19659011] EXPRESS-API-TEMPLATE
├── construire
├── node_modules
├── src
| ├── bin
│ │ ├── www.js
│ ├── itinéraires
│ | ├── index.js
│ └── app.js
├── .babelrc
├── .editorconfig
├── .eslintrc.json
├── .gitignore
├── .prettierrc
├── nodemon.json
├── package.json
├── README.md
└── yarn.lockVous pouvez trouver que vous avez un fichier supplémentaire,
yarn-error.logdans la racine de votre projet. Ajoutez-le au fichier.gitignore. Validez vos modifications.Paramètres et variables d'environnement dans notre fichier .env
Dans presque tous les projets, vous aurez besoin d'un emplacement pour stocker les paramètres qui seront utilisés dans votre application, par exemple une clé secrète AWS. Nous stockons ces paramètres comme des variables d'environnement. Cela les tient à l'abri des regards indiscrets et nous pouvons les utiliser dans notre application selon les besoins.
J'aime avoir un fichier settings.js avec lequel je lis toutes mes variables d'environnement. Ensuite, je peux me référer au fichier de paramètres de n'importe où dans mon application. Vous êtes libre de nommer ce fichier comme vous le souhaitez, mais il existe une sorte de consensus sur le nom de ces fichiers settings.js ou config.js .
Pour nos variables d'environnement , nous les conserverons dans un fichier
.envet les lirons dans nos fichierssettingsà partir de là.Créez le fichier .env à la racine de votre projet et entrez la ligne ci-dessous:
TEST_ENV_VARIABLE = "La variable d'environnement arrive"Pour pouvoir lire les variables d'environnement dans notre projet, il y a une belle bibliothèque,
dotenvqui lit notre fichier.envet nous donne accès aux variables d'environnement définies à l'intérieur. Installons-le.# install dotenv yarn add dotenvAjoutez le fichier .env à la liste des fichiers surveillés par
nodemon.Maintenant, créez le fichier settings.js à l'intérieur du dossier
src /et ajoutez le code ci-dessous:import dotenv from 'dotenv'; dotenv.config (); export const testEnvironmentVariable = process.env.TEST_ENV_VARIABLE;Nous importons le package
dotenvet appelons sa méthode de configuration. Nous exportons ensuite letestEnvironmentVariableque nous avons défini dans notre fichier.env.Ouvrez src / routes / index.js et remplacez le code par celui-ci.
import express from 'express'; import {testEnvironmentVariable} de '../settings'; const indexRouter = express.Router (); indexRouter.get ('/', (req, res) => res.status (200) .json ({message: testEnvironmentVariable})); export default indexRouter;La seule modification que nous avons apportée ici est que nous importons
testEnvironmentVariableà partir de notre fichier de paramètreset que l'utilisation est le message de retour pour une demande du/route.Visitez http: // localhost: 3000 / v1 et vous devriez voir le message, comme illustré ci-dessous.
{ "message": "La variable d'environnement arrive." }Et c'est tout. Désormais, nous pouvons ajouter autant de variables d'environnement que nous le souhaitons et nous pouvons les exporter à partir de notre fichier settings.js .
C'est un bon point pour valider votre code. N'oubliez pas de raffiner et de peloter votre code.
Écriture de notre premier test
Il est temps d'incorporer les tests dans notre application. L'une des choses qui donne au développeur confiance dans son code est les tests. Je suis sûr que vous avez vu d'innombrables articles sur le Web prêchant le développement piloté par les tests (TDD). Il ne peut pas être suffisamment souligné que votre code a besoin d'une certaine mesure de test. TDD est très facile à suivre lorsque vous travaillez avec Express.js.
Dans nos tests, nous passerons des appels à nos points de terminaison API et vérifierons si ce qui est retourné correspond à ce que nous attendons.
Installez la configuration requise dépendances:
# dépendances d'installation yarn add mocha chai nyc sinon-chai supertest combinaison --devChacune de ces bibliothèques a son propre rôle à jouer dans nos tests.
mocha | test runner |
chai | utilisé pour faire des assertions |
nyc | collecte le rapport de couverture des tests |
sinon-chai | étend les assertions de chai |
supertest | utilisé pour effectuer des appels HTTP vers nos points de terminaison API |
combinaisons | pour télécharger la couverture des tests to coveralls.io |
Créez un nouveau dossier test / à la racine de votre projet. Créez deux fichiers dans ce dossier:
- test / setup.js
- test / index.test.js
Mocha trouvera automatiquement le dossier test / . [19659005] Ouvrez test / setup.js et collez le code ci-dessous. Il s'agit simplement d'un fichier d'aide qui nous aide à organiser toutes les importations dont nous avons besoin dans nos fichiers de test.
 import supertest from 'supertest';
importer le chai de 'chai';
importer sinonChai de 'sinon-chai';
importer l'application depuis '../src/app';

chai.use (sinonChai);
export const {expect} = chai;
export const server = supertest.agent (app);
export const BASE_URL = '/ v1';
C'est comme un fichier de paramètres, mais pour nos tests. De cette façon, nous n'avons pas à tout initialiser dans chacun de nos fichiers de test. Nous importons donc les packages nécessaires et exportons ce que nous avons initialisé - que nous pouvons ensuite importer dans les fichiers qui en ont besoin.
Ouvrez index.test.js et collez le code de test suivant.
 importer {expect, server, BASE_URL} depuis './setup';

describe ('Index page test', () => {
  it ('obtient l'url de base', fait => {
    serveur
      .get (`$ {BASE_URL} /`)
      .expect (200)
      .end ((err, res) => {
        attendre (statut res.) égal (200);
        attendez (res.body.message) .to.equal (
          "La variable d'environnement se présente."
        );
        terminé();
      });
  });
});
Ici, nous faisons une demande pour obtenir le point de terminaison de base, qui est / et affirmons que l'objet res. body a un message avec une valeur de La variable d'environnement apparaît.
Si vous n'êtes pas familier avec le décrivez le modèle je vous encourage pour jeter un coup d'œil au document « Mise en route » de Mocha.
Ajoutez la commande de test à la section scripts du package package.json .
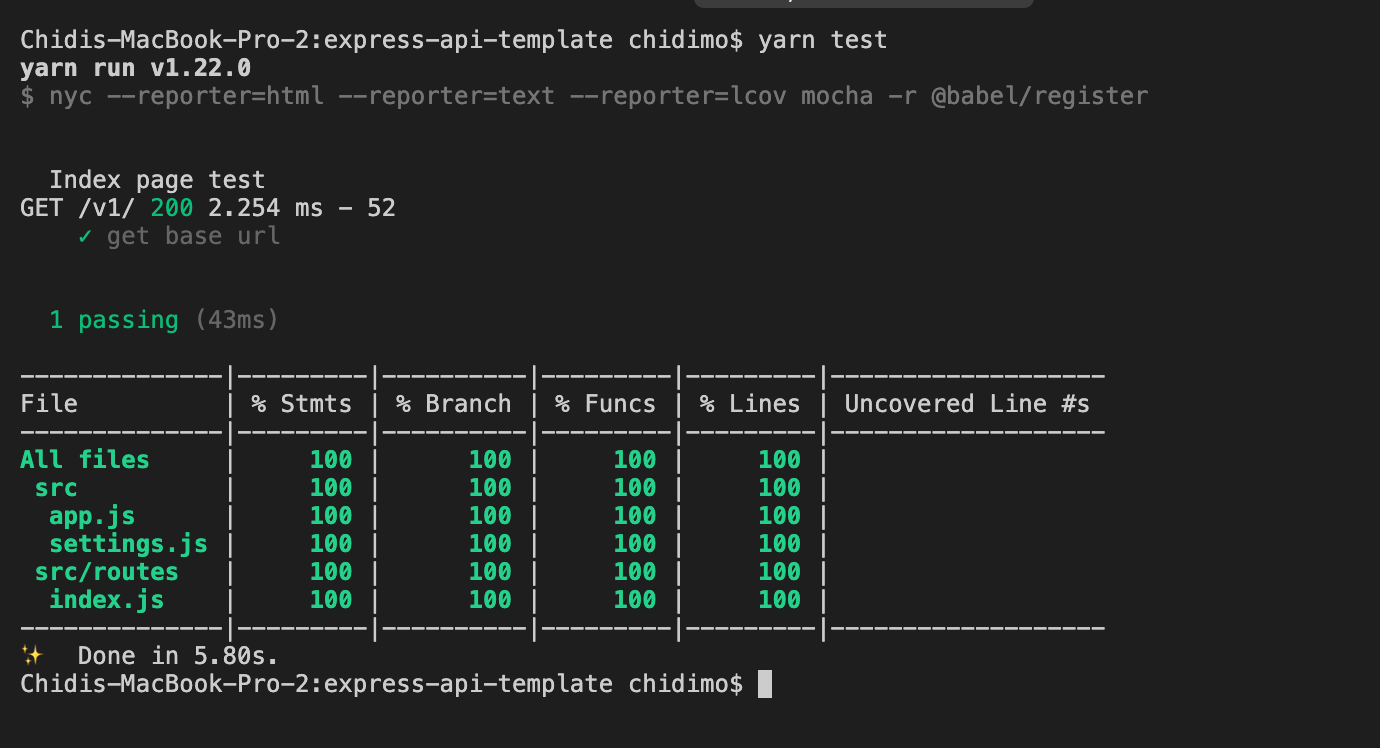
. "test": "nyc --reporter = html --reporter = text --reporter = lcov mocha -r @ babel / register" Ce script exécute notre test avec nyc et génère trois types de rapport de couverture: un rapport HTML, publié dans le dossier coverage / ; un rapport texte sorti sur le terminal et un rapport lcov sorti sur le dossier .nyc_output / .
Exécutez maintenant test de fil . Vous devriez voir un rapport texte dans votre terminal, comme celui de la photo ci-dessous.

Notez que deux dossiers supplémentaires sont générés:
Regardez à l'intérieur .gitignore et vous verrez que nous ignorons déjà les deux. Je vous encourage à ouvrir coverage / index.html dans un navigateur et à consulter le rapport de test pour chaque fichier.
C'est un bon point pour valider vos modifications.
Intégration continue (CD) Et badges: Travis, combinaisons, code climatique, AppVeyor
Il est maintenant temps de configurer les outils d'intégration et de déploiement continus (CI / CD). Nous allons configurer des services communs tels que travis-ci combinaisons AppVeyor et codéclimat et ajouter des badges à notre fichier README. [19659005] Commençons.
Travis CI
Travis CI est un outil qui exécute nos tests automatiquement chaque fois que nous poussons un commit sur GitHub (et récemment, Bitbucket) et chaque fois que nous créons une demande de tirage. Ceci est surtout utile lorsque vous effectuez des requêtes d'extraction en nous montrant si notre nouveau code a cassé l'un de nos tests.
- Visitez travis-ci.com ou travis-ci.org et créez un compte si vous n'en avez pas. Vous devez vous inscrire avec votre compte GitHub.
- Survolez la flèche déroulante à côté de votre photo de profil et cliquez sur
paramètres. - Sous
Référentielscliquez sur l'ongletGérez les référentiels sur Githubà rediriger vers Github. - Sur la page GitHub, faites défiler la liste jusqu'à
Accès au référentielet cochez la case en regard deSélectionnez uniquement les référentiels. [19659041] Cliquez sur le menu déroulantSélectionner les référentielset recherchez le référentielexpress-api-template. Cliquez dessus pour l'ajouter à la liste des référentiels que vous souhaitez ajouter àtravis-ci. - Cliquez sur
Approuvez et installezet attendez d'être redirigé verstravis- ci. - En haut de la page du dépôt, près du nom du dépôt, cliquez sur l'icône
build unknown. Dans le modal Image d'état, sélectionnez Markdown dans la liste déroulante des formats. - Copiez le code résultant et collez-le dans votre fichier README.md .
- Sur la page du projet, cliquez sur
Plus options>Paramètres. Sous la sectionVariables d'environnementajoutez la variable envTEST_ENV_VARIABLE. Lorsque vous saisissez sa valeur, assurez-vous de l'avoir entre guillemets comme celui-ci"La variable d'environnement apparaît." - Créez le fichier .travis.yml à la racine de votre projet et collez le code ci-dessous (nous allons définir la valeur de
CC_TEST_REPORTER_IDdans la section Code Climat ).
 langue: node_js
env:
  global:
    - CC_TEST_REPORTER_ID = obtenir-ce-de-code-page-repo-climat
matrice:
  comprendre:
  - node_js: '12'
cache:
  répertoires: [node_modules]
installer:
  fil
after_success: couverture de fil
before_script:
  - curl -L https://codeclimate.com/downloads/test-reporter/test-reporter-latest-linux-amd64> ./cc-test-reporter
  - chmod + x ./cc-test-reporter
  - ./cc-test-reporter avant la construction
scénario:
  - test de fil
after_script:
  - ./cc-test-reporter après la construction --exit-code $ TRAVIS_TEST_RESUL
First, we tell Travis to run our test with Node.js, then set the CC_TEST_REPORTER_ID global environment variable (we’ll get to this in the Code Climate section). In the matrix section, we tell Travis to run our tests with Node.js v12. We also want to cache the node_modules/ directory so it doesn’t have to be regenerated every time.
We install our dependencies using the yarn command which is a shorthand for yarn install. The before_script and after_script commands are used to upload coverage results to codeclimate. We’ll configure codeclimate shortly. After yarn test runs successfully, we want to also run yarn coverage which will upload our coverage report to coveralls.io.
Coveralls
Coveralls uploads test coverage data for easy visualization. We can view the test coverage on our local machine from the coverage folder, but Coveralls makes it available outside our local machine.
- Visit coveralls.io and either sign in or sign up with your Github account.
- Hover over the left-hand side of the screen to reveal the navigation menu. Click on
ADD REPOS. - Search for the
express-api-templaterepo and turn on coverage using the toggle button on the left-hand side. If you can’t find it, click onSYNC REPOSon the upper right-hand corner and try again. Note that your repo has to be public, unless you have a PRO account. - Click details to go to the repo details page.
- Create the .coveralls.yml file at the root of your project and enter the below code. To get the
repo_tokenclick on the repo details. You will find it easily on that page. You could just do a browser search forrepo_token.
repo_token: get-this-from-repo-settings-on-coveralls.ioThis token maps your coverage data to a repo on Coveralls. Now, add the coverage command to the scripts section of your package.json file:
"coverage": "nyc report --reporter=text-lcov | coveralls"
This command uploads the coverage report in the .nyc_output folder to coveralls.io. Turn on your Internet connection and run:
yarn coverage
This should upload the existing coverage report to coveralls. Refresh the repo page on coveralls to see the full report.
On the details page, scroll down to find the BADGE YOUR REPO section. Click on the EMBED dropdown and copy the markdown code and paste it into your README file.
Code Climate
Code Climate is a tool that helps us measure code quality. It shows us maintenance metrics by checking our code against some defined patterns. It detects things such as unnecessary repetition and deeply nested for loops. It also collects test coverage data just like coveralls.io.
- Visit codeclimate.com and click on ‘Sign up with GitHub’. Log in if you already have an account.
- Once in your dashboard, click on
Add a repository. - Find the
express-api-templaterepo from the list and click onAdd Repo. - Wait for the build to complete and redirect to the repo dashboard.
- Under
Codebase Summaryclick onTest Coverage. Under theTest coveragemenu, copy theTEST REPORTER IDand paste it in your .travis.yml as the value ofCC_TEST_REPORTER_ID. - Still on the same page, on the left-hand navigation, under
EXTRASclick on Badges. Copy themaintainabilityandtest coveragebadges in markdown format and paste them into your README.md file.
It’s important to note that there are two ways of configuring maintainability checks. There are the default settings that are applied to every repo, but if you like, you could provide a .codeclimate.yml file at the root of your project. I’ll be using the default settings, which you can find under the Maintainability tab of the repo settings page. I encourage you to take a look at least. If you still want to configure your own settings, this guide will give you all the information you need.
AppVeyor
AppVeyor and Travis CI are both automated test runners. The main difference is that travis-ci runs tests in a Linux environment while AppVeyor runs tests in a Windows environment. This section is included to show how to get started with AppVeyor.
- Visit AppVeyor and log in or sign up.
- On the next page, click on
NEW PROJECT. - From the repo list, find the
express-api-templaterepo. Hover over it and clickADD. - Click on the
Settingstab. Click onEnvironmenton the left navigation. AddTEST_ENV_VARIABLEand its value. Click ‘Save’ at the bottom of the page. - Create the appveyor.yml file at the root of your project and paste in the below code.
environment:
  matrix:
  - nodejs_version: "12"
install:
  - yarn
test_script:
  - yarn test
build: off
This code instructs AppVeyor to run our tests using Node.js v12. We then install our project dependencies with the yarn command. test_script specifies the command to run our test. The last line tells AppVeyor not to create a build folder.
Click on the Settings tab. On the left-hand navigation, click on badges. Copy the markdown code and paste it in your README.md file.
Commit your code and push to GitHub. If you have done everything as instructed all tests should pass and you should see your shiny new badges as shown below. Check again that you have set the environment variables on Travis and AppVeyor.

Now is a good time to commit our changes.
- The corresponding branch in my repo is 05-ci.
Adding A Controller
Currently, we’re handling the GET request to the root URL, /v1inside the src/routes/index.js. This works as expected and there is nothing wrong with it. However, as your application grows, you want to keep things tidy. You want concerns to be separated — you want a clear separation between the code that handles the request and the code that generates the response that will be sent back to the client. To achieve this, we write controllers. Controllers are simply functions that handle requests coming through a particular URL.
To get started, create a controllers/ folder inside the src/ folder. Inside controllers create two files: index.js and home.js. We would export our functions from within index.js. You could name home.js anything you want, but typically you want to name controllers after what they control. For example, you might have a file usersController.js to hold every function related to users in your app.
Open src/controllers/home.js and enter the code below:
import { testEnvironmentVariable } from '../settings';

export const indexPage = (req, res) => res.status(200).json({ message: testEnvironmentVariable });
You will notice that we only moved the function that handles the request for the / route.
Open src/controllers/index.js and enter the below code.
// export everything from home.js
export * from './home';
We export everything from the home.js file. This allows us shorten our import statements to import { indexPage } from '../controllers';
Open src/routes/index.js and replace the code there with the one below:
import express from 'express';
import { indexPage } from '../controllers';
const indexRouter = express.Router();

indexRouter.get('/', indexPage);

export default indexRouter;
The only change here is that we’ve provided a function to handle the request to the / route.
You just successfully wrote your first controller. From here it’s a matter of adding more files and functions as needed.
Go ahead and play with the app by adding a few more routes and controllers. You could add a route and a controller for the about page. Remember to update your test, though.
Run yarn test to confirm that we’ve not broken anything. Does your test pass? That’s cool.
This is a good point to commit our changes.
Connecting The PostgreSQL Database And Writing A Model
Our controller currently returns hard-coded text messages. In a real-world app, we often need to store and retrieve information from a database. In this section, we will connect our app to a PostgreSQL database.
We’re going to implement the storage and retrieval of simple text messages using a database. We have two options for setting a database: we could provision one from a cloud server, or we could set up our own locally.
I would recommend you provision a database from a cloud server. ElephantSQL has a free plan that gives 20MB of free storage which is sufficient for this tutorial. Visit the site and click on Get a managed database today. Create an account (if you don’t have one) and follow the instructions to create a free plan. Take note of the URL on the database details page. We’ll be needing it soon.

If you would rather set up a database locally, you should visit the PostgreSQL and PgAdmin sites for further instructions.
Once we have a database set up, we need to find a way to allow our Express app to communicate with our database. Node.js by default doesn’t support reading and writing to PostgreSQL database, so we’ll be using an excellent library, appropriately named, node-postgres.
node-postgres executes SQL queries in node and returns the result as an object, from which we can grab items from the rows key.
Let’s connect node-postgres to our application.
# install node-postgres
yarn add pg
Open settings.js and add the line below:
export const connectionString = process.env.CONNECTION_STRING;Open your .env file and add the CONNECTION_STRING variable. This is the connection string we’ll be using to establish a connection to our database. The general form of the connection string is shown below.
CONNECTION_STRING="postgresql://dbuser:dbpassword@localhost:5432/dbname"If you’re using elephantSQL you should copy the URL from the database details page.
Inside your /src folder, create a new folder called models/. Inside this folder, create two files:
Open pools.js and paste the following code:
import { Pool } from 'pg';
import dotenv from 'dotenv';
import { connectionString } from '../settings';
dotenv.config();

export const pool = new Pool({ connectionString });
First, we import the Pool and dotenv from the pg and dotenv packages, and then import the settings we created for our postgres database before initializing dotenv. We establish a connection to our database with the Pool object. In node-postgresevery query is executed by a client. A Pool is a collection of clients for communicating with the database.
To create the connection, the pool constructor takes a config object. You can read more about all the possible configurations here. It also accepts a single connection string, which I will use here.
Open model.js and paste the following code:
import { pool } from './pool';

class Model {
  constructor(table) {
    this.pool = pool;
    this.table = table;
    this.pool.on('error', (err, client) => `Error, ${err}, on idle client${client}`);
  }

  async select(columns, clause) {
    let query = `SELECT ${columns} FROM ${this.table}`;
    if (clause) query += clause;
    return this.pool.query(query);
  }
}

export default Model;
We create a model class whose constructor accepts the database table we wish to operate on. We’ll be using a single pool for all our models.
We then create a select method which we will use to retrieve items from our database. This method accepts the columns we want to retrieve and a clause, such as a WHERE clause. It returns the result of the query, which is a Promise. Remember we said earlier that every query is executed by a client, but here we execute the query with pool. This is because, when we use pool.querynode-postgres executes the query using the first available idle client.
The query you write is entirely up to you, provided it is a valid SQL statement that can be executed by a Postgres engine.
The next step is to actually create an API endpoint to utilize our newly connected database. Before we do that, I’d like us to create some utility functions. The goal is for us to have a way to perform common database operations from the command line.
Create a folder, utils/ inside the src/ folder. Create three files inside this folder:
- queries.js
- queryFunctions.js
- runQuery.js
We’re going to create functions to create a table in our database, insert seed data in the table, and to delete the table.
Open up queries.js and paste the following code:
export const createMessageTable = `
DROP TABLE IF EXISTS messages;
CREATE TABLE IF NOT EXISTS messages (
  id SERIAL PRIMARY KEY,
  name VARCHAR DEFAULT '',
  message VARCHAR NOT NULL
  )
  `;

export const insertMessages = `
INSERT INTO messages(name, message)
VALUES ('chidimo', 'first message'),
      ('orji', 'second message')
`;

export const dropMessagesTable = 'DROP TABLE messages';
In this file, we define three SQL query strings. The first query deletes and recreates the messages table. The second query inserts two rows into the messages table. Feel free to add more items here. The last query drops/deletes the messages table.
Open queryFunctions.js and paste the following code:
import { pool } from '../models/pool';
import {
  insertMessages,
  dropMessagesTable,
  createMessageTable,
} from './queries';

export const executeQueryArray = async arr => new Promise(resolve => {
  const stop = arr.length;
  arr.forEach(async (q, index) => {
    await pool.query(q);
    if (index + 1 === stop) resolve();
  });
});

export const dropTables = () => executeQueryArray([ dropMessagesTable ]);
export const createTables = () => executeQueryArray([ createMessageTable ]);
export const insertIntoTables = () => executeQueryArray([ insertMessages ]);
Here, we create functions to execute the queries we defined earlier. Note that the executeQueryArray function executes an array of queries and waits for each one to complete inside the loop. (Don’t do such a thing in production code though). Then, we only resolve the promise once we have executed the last query in the list. The reason for using an array is that the number of such queries will grow as the number of tables in our database grows.
Open runQuery.js and paste the following code:
import { createTables, insertIntoTables } from './queryFunctions';

(async () => {
  await createTables();
  await insertIntoTables();
})();
This is where we execute the functions to create the table and insert the messages in the table. Let’s add a command in the scripts section of our package.json to execute this file.
"runQuery": "babel-node ./src/utils/runQuery"Now run:
yarn runQuery
If you inspect your database, you will see that the messages table has been created and that the messages were inserted into the table.
If you’re using ElephantSQL, on the database details page, click on BROWSER from the left navigation menu. Select the messages table and click Execute. You should see the messages from the queries.js file.
Let’s create a controller and route to display the messages from our database.
Create a new controller file src/controllers/messages.js and paste the following code:
import Model from '../models/model';

const messagesModel = new Model('messages');
export const messagesPage = async (req, res) => {
  try {
    const data = await messagesModel.select('name, message');
    res.status(200).json({ messages: data.rows });
  } catch (err) {
    res.status(200).json({ messages: err.stack });
  }
};
We import our Model class and create a new instance of that model. This represents the messages table in our database. We then use the select method of the model to query our database. The data (name and message) we get is sent as JSON in the response.
We define the messagesPage controller as an async function. Since node-postgres queries return a promise, we await the result of that query. If we encounter an error during the query we catch it and display the stack to the user. You should decide how choose to handle the error.
Add the get messages endpoint to src/routes/index.js and update the import line.
# update the import line
import { indexPage, messagesPage } from '../controllers';

# add the get messages endpoint
indexRouter.get('/messages', messagesPage)
Visit http://localhost:3000/v1/messages and you should see the messages displayed as shown below.

Now, let’s update our test file. When doing TDD, you usually write your tests before implementing the code that makes the test pass. I’m taking the opposite approach here because we’re still working on setting up the database.
Create a new file, hooks.js in the test/ folder and enter the below code:
import {
  dropTables,
  createTables,
  insertIntoTables,
} from '../src/utils/queryFunctions';

before(async () => {
  await createTables();
  await insertIntoTables();
});

after(async () => {
  await dropTables();
});
When our test starts, Mocha finds this file and executes it before running any test file. It executes the before hook to create the database and insert some items into it. The test files then run after that. Once the test is finished, Mocha runs the after hook in which we drop the database. This ensures that each time we run our tests, we do so with clean and new records in our database.
Create a new test file test/messages.test.js and add the below code:
import { expect, server, BASE_URL } from './setup';
describe('Messages', () => {
  it('get messages page', done => {
    server
      .get(`${BASE_URL}/messages`)
      .expect(200)
      .end((err, res) => {
        expect(res.status).to.equal(200);
        expect(res.body.messages).to.be.instanceOf(Array);
        res.body.messages.forEach(m => {
          expect(m).to.have.property('name');
          expect(m).to.have.property('message');
        });
        done();
      });
  });
});
We assert that the result of the call to /messages is an array. For each message object, we assert that it has the name and message property.
The final step in this section is to update the CI files.
Add the following sections to the .travis.yml file:
services:
  - postgresql
addons:
  postgresql: "10"
  apt:
    packages:
    - postgresql-10
    - postgresql-client-10
before_install:
  - sudo cp /etc/postgresql/{9.6,10}/main/pg_hba.conf
  - sudo /etc/init.d/postgresql restart
This instructs Travis to spin up a PostgreSQL 10 database before running our tests.
Add the command to create the database as the first entry in the before_script section:
# add this as the first line in the before_script section

- psql -c 'create database testdb;' -U postgres
Create the CONNECTION_STRING environment variable on Travis, and use the below value:
CONNECTION_STRING="postgresql://postgres:postgres@localhost:5432/testdb"Add the following sections to the .appveyor.yml file:
before_test:
  - SET PGUSER=postgres
  - SET PGPASSWORD=Password12!
  - PATH=C:Program FilesPostgreSQL10bin;%PATH%
  - createdb testdb
prestations de service:
  - postgresql101
Add the connection string environment variable to appveyor. Use the below line:
CONNECTION_STRING=postgresql://postgres:Password12!@localhost:5432/testdbNow commit your changes and push to GitHub. Your tests should pass on both Travis CI and AppVeyor.
Note: I hope everything works fine on your end, but in case you should be having trouble for some reason, you can always check my code in the repo!
Now, let’s see how we can add a message to our database. For this step, we’ll need a way to send POST requests to our URL. I’ll be using Postman to send POST requests.
Let’s go the TDD route and update our test to reflect what we expect to achieve.
Open test/message.test.js and add the below test case:
it('posts messages', done => {
  const data = { name: 'some name', message: 'new message' };
  server
    .post(`${BASE_URL}/messages`)
    .send(data)
    .expect(200)
    .end((err, res) => {
      expect(res.status).to.equal(200);
      expect(res.body.messages).to.be.instanceOf(Array);
      res.body.messages.forEach(m => {
        expect(m).to.have.property('id');
        expect(m).to.have.property('name', data.name);
        expect(m).to.have.property('message', data.message);
      });
      done();
    });
});
This test makes a POST request to the /v1/messages endpoint and we expect an array to be returned. We also check for the idnameand message properties on the array.
Run your tests to see that this case fails. Let’s now fix it.
To send post requests, we use the post method of the server. We also send the name and message we want to insert. We expect the response to be an array, with a property id and the other info that makes up the query. The id is proof that a record has been inserted into the database.
Open src/models/model.js and add the insert method:
async insertWithReturn(columns, values) {
  const query = `
        INSERT INTO ${this.table}(${columns})
        VALUES (${values})
        RETURNING id, ${columns}
    `;
  return this.pool.query(query);
}
This is the method that allows us to insert messages into the database. After inserting the item, it returns the idname and message.
Open src/controllers/messages.js and add the below controller:
export const addMessage = async (req, res) => {
  const { name, message } = req.body;
  const columns = 'name, message';
  const values = `'${name}', '${message}'`;
  try {
    const data = await messagesModel.insertWithReturn(columns, values);
    res.status(200).json({ messages: data.rows });
  } catch (err) {
    res.status(200).json({ messages: err.stack });
  }
};
We destructure the request body to get the name and message. Then we use the values to form an SQL query string which we then execute with the insertWithReturn method of our model.
Add the below POST endpoint to /src/routes/index.js and update your import line.
import { indexPage, messagesPage, addMessage } from '../controllers';
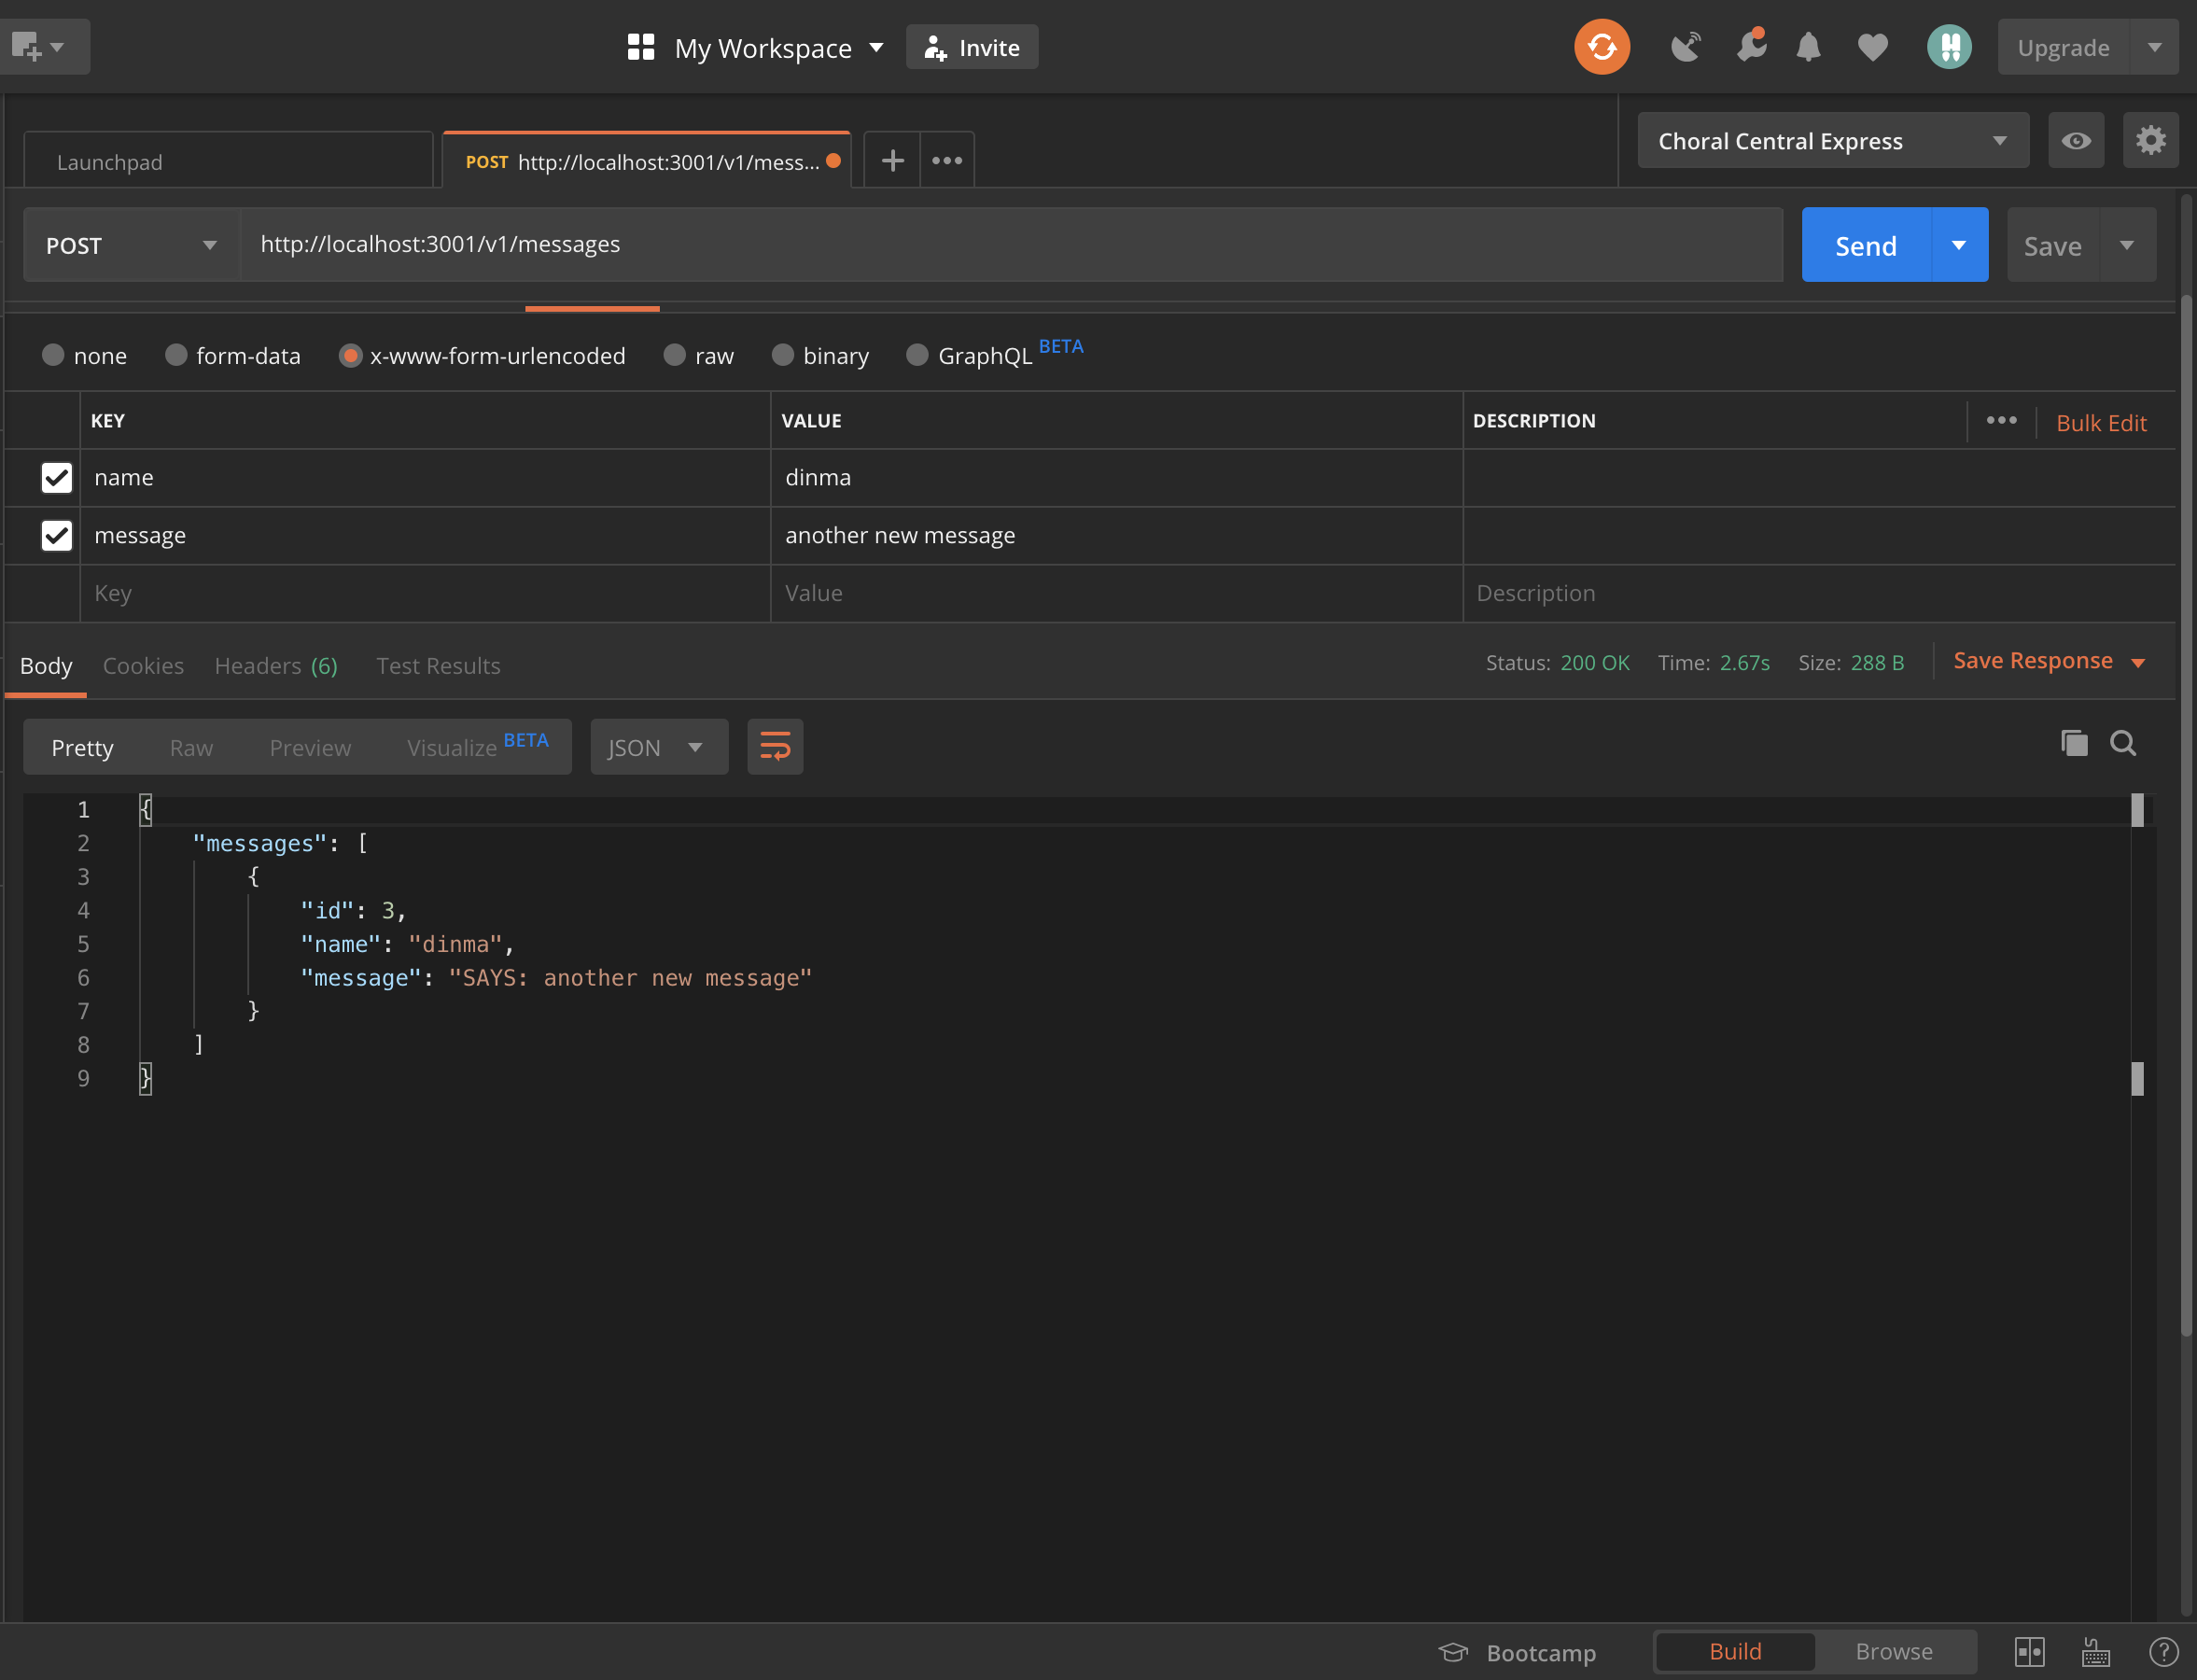
indexRouter.post('/messages', addMessage);Run your tests to see if they pass.
Open Postman and send a POST request to the messages endpoint. If you’ve just run your test, remember to run yarn query to recreate the messages table.
yarn query


Commit your changes and push to GitHub. Your tests should pass on both Travis and AppVeyor. Your test coverage will drop by a few points, but that’s okay.
Middleware
Our discussion of Express won’t be complete without talking about middleware. The Express documentation describes a middlewares as:
“[...] functions that have access to the request object (
req), the response object (res), and the next middleware function in the application’s request-response cycle. The next middleware function is commonly denoted by a variable namednext.”
A middleware can perform any number of functions such as authentication, modifying the request body, and so on. See the Express documentation on using middleware.
We’re going to write a simple middleware that modifies the request body. Our middleware will append the word SAYS: to the incoming message before it is saved in the database.
Before we start, let’s modify our test to reflect what we want to achieve.
Open up test/messages.test.js and modify the last expect line in the posts message test case:
it('posts messages', done => {
   ...
  expect(m).to.have.property('message', `SAYS: ${data.message}`); # update this line
    ...
});
We’re asserting that the SAYS: string has been appended to the message. Run your tests to make sure this test case fails.
Now, let’s write the code to make the test pass.
Create a new middleware/ folder inside src/ folder. Create two files inside this folder:
Enter the below code in middleware.js:
export const modifyMessage = (req, res, next) => {
  req.body.message = `SAYS: ${req.body.message}`;
  next();
};
Here, we append the string SAYS: to the message in the request body. After doing that, we must call the next() function to pass execution to the next function in the request-response chain. Every middleware has to call the next function to pass execution to the next middleware in the request-response cycle.
Enter the below code in index.js:
# export everything from the middleware file

export * from './middleware';
This exports the middleware we have in the /middleware.js file. For now, we only have the modifyMessage middleware.
Open src/routes/index.js and add the middleware to the post message request-response chain.
import { modifyMessage } from '../middleware';

indexRouter.post('/messages', modifyMessage, addMessage);
We can see that the modifyMessage function comes before the addMessage function. We invoke the addMessage function by calling next in the modifyMessage middleware. As an experiment, comment out the next() line in the modifyMessage middle and watch the request hang.
Open Postman and create a new message. You should see the appended string.

This is a good point to commit our changes.
Error Handling And Asynchronous Middleware
Errors are inevitable in any application. The task before the developer is how to deal with errors as gracefully as possible.
In Express:
“Error Handling refers to how Express catches and processes errors that occur both synchronously and asynchronously.
If we were only writing synchronous functions, we might not have to worry so much about error handling as Express already does an excellent job of handling those. According to the docs:
“Errors that occur in synchronous code inside route handlers and middleware require no extra work.”
But once we start writing asynchronous router handlers and middleware, then we have to do some error handling.
Our modifyMessage middleware is a synchronous function. If an error occurs in that function, Express will handle it just fine. Let’s see how we deal with errors in asynchronous middleware.
Let’s say, before creating a message, we want to get a picture from the Lorem Picsum API using this URL https://picsum.photos/id/0/info. This is an asynchronous operation that could either succeed or fail, and that presents a case for us to deal with.
Start by installing Axios.
# install axios
yarn add axios
Open src/middleware/middleware.js and add the below function:
export const performAsyncAction = async (req, res, next) => {
  try {
    await axios.get('https://picsum.photos/id/0/info');
    next();
  } catch (err) {
    next(err);
  }
};
In this async function, we await a call to an API (we don’t actually need the returned data) and afterward call the next function in the request chain. If the request fails, we catch the error and pass it on to next. Once Express sees this error, it skips all other middleware in the chain. If we didn’t call next(err)the request will hang. If we only called next() without errthe request will proceed as if nothing happened and the error will not be caught.
Import this function and add it to the middleware chain of the post messages route:
import { modifyMessage, performAsyncAction } from '../middleware';

indexRouter.post('/messages', modifyMessage, performAsyncAction, addMessage);
Open src/app.js and add the below code just before the export default app line.
app.use((err, req, res, next) => {
  res.status(400).json({ error: err.stack });
});

export default app;
This is our error handler. According to the Express error handling doc:
“[...] error-handling functions have four arguments instead of three:
(err, req, res, next).”
Note that this error handler must come last, after every app.use() call. Once we encounter an error, we return the stack trace with a status code of 400. You could do whatever you like with the error. You might want to log it or send it somewhere.
This is a good place to commit your changes.
Deploy To Heroku
- To get started, go to https://www.heroku.com/ and either log in or register.
- Download and install the Heroku CLI from here.
- Open a terminal in the project folder to run the command.
# login to heroku on command line
heroku login
This will open a browser window and ask you to log into your Heroku account.
Log in to grant your terminal access to your Heroku account, and create a new heroku app by running:
#app name is up to you
heroku create app-name
This will create the app on Heroku and return two URLs.
# app production url and git url
https://app-name.herokuapp.com/ | https://git.heroku.com/app-name.git
Copy the URL on the right and run the below command. Note that this step is optional as you may find that Heroku has already added the remote URL.
# add heroku remote url
git remote add heroku https://git.heroku.com/my-shiny-new-app.git
Open a side terminal and run the command below. This shows you the app log in real-time as shown in the image.
# see process logs
heroku logs --tail
Run the following three commands to set the required environment variables:
heroku config:set TEST_ENV_VARIABLE="Environment variable is coming across."
heroku config:set CONNECTION_STRING=your-db-connection-string-here.
heroku config:set NPM_CONFIG_PRODUCTION=false
Remember in our scripts, we set:
"prestart": "babel ./src --out-dir build",
"start": "node ./build/bin/www",
To start the app, it needs to be compiled down to ES5 using babel in the prestart step because babel only exists in our development dependencies. We have to set NPM_CONFIG_PRODUCTION to false in order to be able to install those as well.
To confirm everything is set correctly, run the command below. You could also visit the settings tab on the app page and click on Reveal Config Vars.
# check configuration variables
heroku config
Now run git push heroku.
To open the app, run:
# open /v1 route
heroku open /v1

# open /v1/messages route
heroku open /v1/messages
If like me, you’re using the same PostgresSQL database for both development and production, you may find that each time you run your tests, the database is deleted. To recreate it, you could run either one of the following commands:
# run script locally
yarn runQuery

# run script with heroku
heroku run yarn runQuery
Continuous Deployment (CD) With Travis
Let’s now add Continuous Deployment (CD) to complete the CI/CD flow. We will be deploying from Travis after every successful test run.
The first step is to install Travis CI. (You can find the installation instructions over here.) After successfully installing the Travis CI, login by running the below command. (Note that this should be done in your project repository.)
# login to travis
travis login --pro

# use this if you’re using two factor authentication
travis login --pro --github-token enter-github-token-here
If your project is hosted on travis-ci.orgremove the --pro flag. To get a GitHub token, visit the developer settings page of your account and generate one. This only applies if your account is secured with 2FA.
Open your .travis.yml and add a deploy section:
deploy:
  provider: heroku
  app:
    master: app-name
Here, we specify that we want to deploy to Heroku. The app sub-section specifies that we want to deploy the master branch of our repo to the app-name app on Heroku. It’s possible to deploy different branches to different apps. You can read more about the available options here.
Run the below command to encrypt your Heroku API key and add it to the deploy section:
# encrypt heroku API key and add to .travis.yml
travis encrypt $(heroku auth:token) --add deploy.api_key --pro
This will add the below sub-section to the deploy section.
api_key:
  secure: very-long-encrypted-api-key-string
Now commit your changes and push to GitHub while monitoring your logs. You will see the build triggered as soon as the Travis test is done. In this way, if we have a failing test, the changes would never be deployed. Likewise, if the build failed, the whole test run would fail. This completes the CI/CD flow.
- The corresponding branch in my repo is 11-cd.
Conclusion
If you’ve made it this far, I say, “Thumbs up!” In this tutorial, we successfully set up a new Express project. We went ahead to configure development dependencies as well as Continuous Integration (CI). We then wrote asynchronous functions to handle requests to our API endpoints — completed with tests. We then looked briefly at error handling. Finally, we deployed our project to Heroku and configured Continuous Deployment.
You now have a template for your next back-end project. We’ve only done enough to get you started, but you should keep learning to keep going. Be sure to check out the express docs as well. If you would rather use MongoDB instead of PostgreSQLI have a template here that does exactly that. You can check it out for the setup. It has only a few points of difference.
Resources
- “Create Express API Backend With MongoDB ,” Orji Chidi Matthew, GitHub
- “A Short Guide To Connect Middleware,” Stephen Sugden
- “Express API template,” GitHub
- “AppVeyor vs Travis CI,” StackShare
- “The Heroku CLI,” Heroku Dev Center
- “Heroku Deployment,” Travis CI
- “Using middleware,” Express.js
- “Error Handling,” Express.js
- “Getting Started,” Mocha
nyc(GitHub)- ElephantSQL
- Postman
- Express
- Travis CI
- Code Climate
- PostgreSQL
- pgAdmin
 (ks, yk, il)
Source link