


Les performances Web sont une bête délicate, n'est-ce pas? Comment savons-nous réellement où nous en sommes en termes de performances et quels sont exactement nos goulots d'étranglement ? Est-ce du code JavaScript coûteux, une livraison lente des polices Web, des images lourdes ou un rendu lent? Cela vaut-il la peine d'explorer les tremblements d'arbre, le levage de la portée, le fractionnement du code et tous les modèles de chargement sophistiqués avec l'observateur d'intersection, la poussée du serveur, les conseils des clients, HTTP / 2, les travailleurs de service et – oh mon – travailleurs de pointe? Et, plus important encore, où pouvons-nous même commencer à améliorer les performances et comment établir une culture de la performance à long terme?
À l'époque, les performances n'étaient souvent qu'une simple réflexion . Souvent différé jusqu'à la toute fin du projet, il se résumait à une minification, une concaténation, une optimisation des actifs et potentiellement quelques ajustements fins dans le fichier de configuration du serveur . En regardant en arrière maintenant, les choses semblent avoir changé de façon assez significative.
Les performances ne sont pas seulement une préoccupation technique: elles affectent tout, de l'accessibilité à la convivialité à l'optimisation des moteurs de recherche, et lors de l'intégration dans le flux de travail, les décisions de conception doivent être éclairées par leurs implications en termes de performances. Les performances doivent être mesurées, surveillées et affinées en permanence et la complexité croissante du Web pose de nouveaux défis qui rendent difficile le suivi des métriques, car les métriques varient considérablement en fonction de l'appareil, du navigateur, du protocole , le type de réseau et la latence (les CDN, les FAI, les caches, les mandataires, les pare-feu, les équilibreurs de charge et les serveurs jouent tous un rôle dans les performances).
Donc, si nous avons créé une vue d'ensemble de toutes les choses que nous devons garder à l'esprit lors de l'amélioration performance – du tout début du processus jusqu'à la version finale du site Web – à quoi ressemblerait cette liste? Vous trouverez ci-dessous une liste de contrôle des performances frontales (espérons-le impartiale et objective) pour 2020 – un aperçu mis à jour des problèmes que vous devrez peut-être prendre en compte pour vous assurer que vos temps de réponse sont rapides, l'interaction utilisateur est fluide. et vos sites ne drainent pas la bande passante de l'utilisateur.
Table des matières
(Vous pouvez aussi simplement télécharger la liste de contrôle PDF (166 Ko) ou télécharger le fichier Apple Pages éditable (275 Ko) ou le fichier .docx (151 Ko). Bonne optimisation, tout le monde!)
Préparatifs: planification et mesures
Les micro-optimisations sont idéales pour maintenir les performances sur la bonne voie, mais il est essentiel d'avoir des objectifs clairement définis à l'esprit – des objectifs mesurables qui pourraient influencer les décisions prises tout au long du processus. Il existe plusieurs modèles différents, et ceux dont il est question ci-dessous sont assez subjectifs – assurez-vous simplement de définir vos propres priorités dès le début.
- Établissez une culture de la performance.
Dans de nombreuses organisations, les développeurs frontaux savent exactement ce que les problèmes sous-jacents courants et les schémas de chargement à utiliser pour les résoudre. Cependant, tant qu'il n'y aura pas d'approbation établie de la culture de la performance, chaque décision se transformera en champ de bataille des départements, divisant l'organisation en silos. Vous avez besoin d'une adhésion des parties prenantes de l'entreprise, et pour l'obtenir, vous devez établir une étude de cas, ou une preuve de concept en utilisant la API de performance sur les avantages de la vitesse pour les mesures et la clé Indicateurs de performance ( KPI ) dont ils se soucient.Sans un fort alignement entre les équipes de développement / conception et commerciales / marketing, les performances ne vont pas durer à long terme. Étudiez les réclamations courantes qui arrivent dans le service client et l'équipe de vente, étudiez l'analyse des taux de rebond élevés et des baisses de conversion. Découvrez comment l'amélioration des performances peut aider à résoudre certains de ces problèmes courants. Ajustez l'argument en fonction du groupe de parties prenantes à qui vous parlez.
Exécutez des tests de performances et mesurez les résultats – à la fois sur mobile et sur ordinateur (par exemple, avec Google Analytics ) . Il vous aidera à créer une étude de cas sur mesure avec des données réelles. De plus, l'utilisation de données d'études de cas et d'expériences publiées sur WPO Stats aidera à accroître la sensibilité des entreprises quant à l'importance des performances et à leur impact sur l'expérience utilisateur et les mesures commerciales. Dire que la performance importe à elle seule ne suffit pas – vous devez également établir des objectifs mesurables et traçables et les observer au fil du temps.
Comment y arriver? Dans son exposé sur Construire des performances à long terme Allison McKnight partage une étude de cas complète sur la manière dont elle a aidé à établir une culture de la performance à Etsy ( diapositives ). Plus récemment, Tammy Averts a parlé des habitudes des équipes de performance très efficaces dans les petites et les grandes organisations.

- Objectif: être au moins 20% plus rapide que votre concurrent le plus rapide.
Selon recherche psychologique si vous voulez que les utilisateurs sentent que votre site Web est plus rapide que le site Web de votre concurrent, vous devez être au moins 20% plus rapide. Étudiez vos principaux concurrents, collectez des mesures sur leurs performances sur mobile et sur ordinateur et définissez des seuils qui vous aideraient à les dépasser. Pour obtenir des résultats et des objectifs précis, assurez-vous d'abord d'avoir une image complète de l'expérience de vos utilisateurs en étudiant vos analyses. Vous pouvez ensuite imiter l'expérience du 90e centile pour les tests.Pour avoir une bonne première impression de la performance de vos concurrents, vous pouvez utiliser Chrome UX Report ( CrUX un prêt- made RUM data set, introduction vidéo par Ilya Grigorik et guide détaillé par Rick Viscomi) ou Treo Sites un outil de surveillance RUM alimenté par Chrome UX Report . Alternativement, vous pouvez également utiliser Speed Scorecard (fournit également un estimateur d'impact sur les revenus), Comparaison des tests d'expérience utilisateur réelle ou SiteSpeed CI (basé sur des tests synthétiques).

Treo Sites fournit une analyse concurrentielle basée sur des données réelles. ( Grand aperçu ) Remarque : Si vous utilisez Page Speed Insights (non, ce n'est pas obsolète), vous pouvez obtenir des données de performances CrUX pour des pages spécifiques à la place juste des agrégats. Ces données peuvent être beaucoup plus utiles pour définir des objectifs de performances pour des actifs tels que la «page de destination» ou la «liste de produits». Et si vous utilisez CI pour tester les budgets, vous devez vous assurer que votre environnement testé correspond à CrUX si vous avez utilisé CrUX pour définir la cible ( merci Patrick Meenan! ).
Si vous avez besoin d'aide pour montrer le raisonnement derrière la priorisation de la vitesse, ou vous souhaitez visualiser la décroissance du taux de conversion ou l'augmentation du taux de rebond avec des performances plus lentes, ou peut-être auriez-vous besoin de plaider pour une solution RUM dans votre organisation, Sergey Chernyshev a construit un UX Speed Calculator un outil open source qui vous aide à simuler des données et à les visualiser pour faire valoir votre point de vue.

Juste au moment où vous avez besoin de faire valoir les performances pour conduire votre point à travers: UX Speed Calculator visualise un impact de perf ormanc sur les taux de rebond, la conversion et le revenu total – sur la base de données réelles. ( Grand aperçu ) Collectez des données, configurez une feuille de calcul réduisez de 20% et définissez vos objectifs ( budgets de performance ) de cette façon. Vous avez maintenant quelque chose de mesurable à tester. Si vous gardez le budget à l'esprit et que vous essayez de ne fournir que la charge utile minimale pour obtenir un temps d'interaction rapide, alors vous êtes sur une voie raisonnable.
Besoin de ressources pour commencer?
Une fois vous avez un budget en place, incorporez-les dans votre processus de construction avec Webpack Performance Hints et Bundlesize Lighthouse CI PWMetrics ou Sitespeed CI pour appliquer les budgets sur les demandes d'extraction et fournir un historique des scores dans les commentaires PR.
Pour exposer les budgets de performances à toute l'équipe, intégrer les budgets de performances dans Lighthouse via Lightwallet . Et si vous avez besoin de quelque chose de personnalisé, vous pouvez utiliser webpagetest-charts-api une API de noeuds finaux pour créer des graphiques à partir des résultats de WebPagetest.
La conscience des performances ne doit cependant pas provenir uniquement des budgets de performances. Tout comme Pinterest vous pouvez créer une règle eslint personnalisée qui interdit l'importation à partir de fichiers et de répertoires connus pour leur lourdeur de dépendance et qui ferait gonfler le bundle. Définissez une liste de packages «sûrs» qui peuvent être partagés par l'ensemble de l'équipe.
Réfléchissez également aux tâches essentielles du client qui sont les plus avantageuses pour votre entreprise. Étudiez, discutez et définissez des seuils de temps acceptables pour les actions critiques et établissez des repères de synchronisation utilisateur "UX ready" que toute l'organisation a approuvés. Dans de nombreux cas, les parcours des utilisateurs toucheront au travail de nombreux départements différents, donc l'alignement en termes de délais acceptables aidera à soutenir ou à empêcher les discussions sur les performances en cours de route. Assurez-vous que les coûts supplémentaires des ressources et des fonctionnalités supplémentaires sont visibles et compris.
C'est une bonne idée d'aligner les efforts de performance avec d'autres initiatives technologiques, allant des nouvelles parties du site à la refactorisation à de nouveaux publics mondiaux. Il est plus facile d'investir lorsque le code est actualisé ou en cours d'actualisation. En outre, 20% plus rapide que la concurrence peut également signifier 20% plus rapide que votre ancien moi une fois que vous avez établi une forte culture de performance dans votre organisation. ( merci, Guy Podjarny! )
De plus, comme l'a suggéré Patrick Meenan, il vaut la peine de planifier une séquence de chargement et des compromis pendant le processus de conception. Si vous priorisez rapidement les parties les plus critiques et définissez l'ordre dans lequel elles doivent apparaître, vous saurez également ce qui peut être retardé. Idéalement, cet ordre reflétera également la séquence de vos importations CSS et JavaScript, donc les manipuler pendant le processus de construction sera plus facile. Réfléchissez également à ce que devrait être l'expérience visuelle dans les états "intermédiaires" pendant le chargement de la page (par exemple, lorsque les polices Web ne sont pas encore chargées).
Planning, planning, planning. Il pourrait être tentant de se lancer rapidement dans des "optimisations rapides" – et, éventuellement, ce pourrait être une bonne stratégie pour des gains rapides – mais il sera très difficile de maintenir la performance prioritaire sans planifier et définir une entreprise réaliste.


![De nouvelles mesures atterrissent dans Lighthouse v6 au début de 2020. La première peinture significative (FMP) est désormais déconseillée, et la plus grande peinture contentante (LCP) et la durée totale de blocage (TBT) arriveront bientôt dans Lighthouse [19659021] De nouvelles mesures atterrissent dans Lighthouse v6 au début de 2020. La première peinture significative (FMP) est maintenant déconseillée, et la plus grande peinture contentieuse (LCP) et le temps de blocage total (TBT) arrivent bientôt dans Lighthouse. (<a href=](https://i0.wp.com/cloud.netlifyusercontent.com/assets/344dbf88-fdf9-42bb-adb4-46f01eedd629/0ae6761d-b6d6-4a0f-baa6-22e7543a3830/11-metrics-front-end-performance-checklist-2020.png?ssl=1)
- Choisissez les bonnes mesures.
Toutes les mesures n'ont pas la même importance . Étudiez les métriques les plus importantes pour votre application: généralement, elles seront définies par la vitesse à laquelle vous pouvez commencer à rendre les pixels les plus importants de votre interface et la vitesse à laquelle vous pouvez fournir une réactivité d'entrée pour ces pixels rendus. Cette connaissance vous donnera la meilleure cible d'optimisation pour les efforts en cours. En fin de compte, ce ne sont pas les événements de chargement ou les temps de réponse du serveur qui définissent l'expérience, mais la perception de la vivacité de l'interface .Qu'est-ce que cela signifie? Plutôt que de se concentrer sur le temps de chargement de la page entière (via onLoad et DOMContentLoaded par exemple), donnez la priorité au chargement de page tel que perçu par vos clients . Cela signifie se concentrer sur un ensemble de mesures légèrement différent. En fait, choisir la bonne métrique est un processus sans gagnants évidents.
Sur la base des recherches de Tim Kadlec et des notes de Marcos Iglesias dans son exposé les métriques traditionnelles pourraient être regroupées en quelques ensembles. Habituellement, nous aurons besoin de chacun d'eux pour obtenir une image complète des performances, et dans votre cas particulier, certains d'entre eux peuvent être plus importants que d'autres.
- Les mesures basées sur la quantité mesurent le nombre de demandes, le poids et un score de performance. Bon pour déclencher des alarmes et surveiller les changements au fil du temps, pas si bon pour comprendre l'expérience utilisateur.
- Les métriques de jalon utilisent des états pendant la durée de vie du processus de chargement, par ex. Time To First Byte et Time To Interactive . Bon pour décrire l'expérience utilisateur et la surveillance, pas très bon pour savoir ce qui se passe entre les jalons.
- Les métriques de rendu fournissent une estimation de la rapidité du rendu du contenu (par exemple Démarrer le rendu ] Indice de vitesse ). Bon pour mesurer et peaufiner les performances de rendu, mais pas si bon pour mesurer quand un contenu important apparaît et peut être interagi avec.
- Les métriques personnalisées mesurent un événement personnalisé particulier pour l'utilisateur, par ex. Twitter Time To First Tweet et Pinterest PinnerWaitTime . Bon pour décrire avec précision l'expérience utilisateur, pas très bon pour mettre à l'échelle les statistiques et comparer avec les concurrents.
Pour compléter le tableau, nous recherchons généralement des statistiques utiles parmi tous ces groupes. Généralement, les plus spécifiques et les plus pertinents sont les suivants:
- Time to Interactive (TTI)
Le point auquel la mise en page s'est stabilisée, les polices Web clés sont visibles et le thread principal est suffisamment disponible pour gérer les entrées utilisateur – Fondamentalement, la date à laquelle un utilisateur peut interagir avec l'interface utilisateur. Les mesures clés pour comprendre combien d'attente un utilisateur doit subir pour utiliser le site sans décalage. - Premier délai d'entrée (FID) ou Réactivité d'entrée [19659048] Le temps entre le moment où un utilisateur interagit pour la première fois avec votre site et le moment où le navigateur est réellement en mesure de répondre à cette interaction. Complète très bien TTI car il décrit la partie manquante de l'image: ce qui se passe lorsqu'un utilisateur interagit réellement avec le site. Destiné en tant que métrique RUM uniquement. Il existe une bibliothèque JavaScript pour mesurer le FID dans le navigateur.
- La plus grande peinture riche en contenu (LCP)
Marque le point dans la chronologie de chargement de la page lorsque le contenu important de la page a probablement été chargé. L'hypothèse est que l'élément le plus important de la page est le plus grand visible dans la fenêtre d'affichage de l'utilisateur . Si les éléments sont rendus au-dessus et en dessous du pli, seule la partie visible est considérée comme pertinente. Actuellement une métrique cachée dans Lighthouse, à déployer si elle s'avère utile. - Temps de blocage total ( TBT )
Une nouvelle métrique qui permet de quantifier la gravité de la non -une page interactive est avant qu'elle ne devienne de manière fiable interactive (c'est-à-dire que le thread principal n'a été soumis à aucune tâche de plus de 50 ms ( tâches longues ) pendant au moins 5 s). La métrique mesure le temps total entre la première peinture et le temps d'interaction (TTI) où le thread principal a été bloqué suffisamment longtemps pour empêcher la réactivité de l'entrée. Pas étonnant, alors, qu'un TBT faible soit un bon indicateur de bonnes performances. (merci, Artem, Phil) - Décalage de mise en page cumulatif ( CLS )
La métrique met en évidence la fréquence à laquelle les utilisateurs subissent des changements de mise en page inattendus ( reflows ) lors de l'accès au site. Il examine les éléments instables et leur impact sur l'expérience globale. Plus le score est bas, mieux c'est. - Indice de vitesse
Mesure la vitesse de remplissage visuel du contenu de la page; plus le score est bas, mieux c'est. Le score de l'indice de vitesse est calculé en fonction de la vitesse de progression visuelle, mais il s'agit simplement d'une valeur calculée. Il est également sensible à la taille de la fenêtre d'affichage. Vous devez donc définir une gamme de configurations de test qui correspondent à votre public cible. Notez que cela devient moins important avec l'arrivée de LCP en tant que nouvelle métrique ( merci, Boris Artem! ). - Temps CPU passé
Une métrique qui montre combien de fois et combien de temps le fil principal est bloqué, travaillant sur la peinture, le rendu, l'écriture de scripts et le chargement. Un temps CPU élevé est un indicateur clair d'une expérience janky c'est-à-dire lorsque l'utilisateur connaît un décalage notable entre son action et une réponse. Avec WebPageTest, vous pouvez sélectionner "Capture Dev Tools Timeline" dans l'onglet "Chrome" pour exposer la répartition du thread principal lors de son exécution sur n'importe quel appareil utilisant WebPageTest. - Component-Level Coûts CPU
Tout comme avec le temps CPU passé cette métrique, proposée par Stoyan Stefanov, explore l'impact de JavaScript sur le CPU. L'idée est d'utiliser le nombre d'instructions CPU par composant pour comprendre son impact sur l'expérience globale, de manière isolée. Pourrait être implémenté en utilisant Puppeteer et Chrome . - FrustrationIndex
Alors que de nombreuses mesures présentées ci-dessus expliquent quand un événement particulier se produit, FrustrationIndex de Tim Vereecke examine les écarts entre au lieu de les regarder individuellement. Il examine les étapes clés perçues par l'utilisateur final, telles que le titre est visible, le premier contenu est visible, visuellement prêt et la page semble prête et calcule un score indiquant le niveau de frustration lors du chargement d'une page. Plus l'écart est grand, plus les chances qu'un utilisateur soit frustré sont grandes. Potentiellement un bon KPI pour l'expérience utilisateur. Tim a publié un article détaillé sur FrustrationIndex et son fonctionnement. - Impact du poids de l'annonce
Si votre site dépend des revenus générés par la publicité, il est utile de suivre le poids de l'annonce code associé. Le script de Paddy Ganti construit deux URL (une normale et une bloquant les publicités), invite à la génération d'une comparaison vidéo via WebPageTest et signale un delta. - Mesures de déviation
Comme l'a noté par Les ingénieurs de Wikipédia les données de la variance existant dans vos résultats pourraient vous informer de la fiabilité de vos instruments et de l'attention à accorder aux écarts et aux sorties. Une grande variance est un indicateur des ajustements nécessaires dans la configuration. Il permet également de comprendre si certaines pages sont plus difficiles à mesurer de manière fiable, par exemple en raison de scripts tiers provoquant des variations importantes. Il peut également être judicieux de suivre la version du navigateur pour comprendre les hausses de performances lorsqu'une nouvelle version du navigateur est déployée. - Mesures personnalisées
Les mesures personnalisées sont définies par les besoins de votre entreprise et l'expérience client. Cela vous oblige à identifier les pixels importants, les scripts critiques, les CSS nécessaires et les actifs pertinents et à mesurer la vitesse à laquelle ils sont livrés à l'utilisateur . Pour celui-ci, vous pouvez surveiller Hero Rendering Times ou utiliser Performance API en marquant des horodatages particuliers pour les événements importants pour votre entreprise. De plus, vous pouvez collecter des mesures personnalisées avec WebPagetest en exécutant du JavaScript arbitraire à la fin d'un test.
Notez que la Première peinture significative (FMP) ne fonctionne pas apparaissent dans l'aperçu ci-dessus. Il fournissait un aperçu de la vitesse à laquelle le serveur sort toutes les données . Le long FMP indiquait généralement que JavaScript bloquait le thread principal, mais pouvait également être lié à des problèmes de back-end / serveur. Cependant, la métrique a été déconseillée récemment car elle ne semble pas exacte dans environ 20% des cas. Il ne sera plus pris en charge dans les prochaines versions de Lighthouse.
Steve Souders a une explication détaillée de la plupart de ces mesures . Il est important de noter que si le temps d'interaction est mesuré en exécutant des audits automatisés dans l'environnement de laboratoire le premier délai d'entrée représente l'expérience utilisateur réelle avec utilisateurs réels connaissant un décalage notable. En général, c'est probablement une bonne idée de toujours mesurer et suivre les deux.
Selon le contexte de votre application, les mesures préférées peuvent différer: par exemple pour Netflix TV UI, la réactivité des entrées clés, l'utilisation de la mémoire et le TTI sont plus critiques, et pour Wikipedia, les premiers / derniers changements visuels et les mesures de temps CPU passé sont plus importants.
Remarque : FID et TTI ne tiennent pas compte du comportement de défilement; le défilement peut se produire indépendamment car il est hors fil principal, donc pour de nombreux sites de consommation de contenu, ces métriques peuvent être beaucoup moins importantes ( merci, Patrick! ).

- Rassemblez des données sur un appareil représentatif de votre public.
Pour recueillir des données précises, nous devons choisir soigneusement les appareils sur lesquels tester. Dans la plupart des entreprises, cela signifie examiner les analyses et créer des profils d'utilisateurs basés sur les types d'appareils les plus courants. Pourtant, souvent, l'analyse seule ne fournit pas une image complète. Une partie importante du public cible pourrait abandonner le site (et ne pas revenir) simplement parce que son expérience est trop lente et que ses appareils ne se présenteront probablement pas comme les appareils les plus populaires en analytique. Par conséquent, mener des recherches sur les appareils courants dans votre groupe cible pourrait également être une bonne idée.À l'échelle mondiale en 2018-2019, selon l'IDC, 87% de tous les téléphones mobiles expédiés sont des appareils Android . Un consommateur moyen met à niveau son téléphone tous les 2 ans et aux États-Unis le cycle de remplacement est de 33 mois . En moyenne, les téléphones les plus vendus dans le monde coûteront moins de 200 $.
Un appareil représentatif est donc un appareil Android qui a au moins 24 mois coûtant 200 $ ou moins, fonctionnant sur 3G lent, RTT 400 ms et un transfert de 400 kbps, juste pour être un peu plus pessimiste. Cela peut être très différent pour votre entreprise, bien sûr, mais c'est une approximation suffisamment proche de la majorité des clients. En fait, il pourrait être judicieux d'examiner les best-sellers d'Amazon actuels pour votre marché cible. ( Merci à Tim Kadlec, Henri Helvetica et Alex Russel pour les pointeurs! ).
Quels appareils de test choisir alors? Celles qui correspondent bien au profil décrit ci-dessus. C'est une bonne option pour choisir un Moto G4 / G5 Plus un appareil Samsung milieu de gamme (Galaxy A50, S8), un bon appareil intermédiaire comme un Nexus 5X, Xiaomi Mi A3 ou Xiaomi Redmi Note 7 et un appareil lent comme Alcatel 1X ou Cubot X19, peut-être dans un laboratoire d'appareils ouvert . Pour les tests sur des appareils à régulation thermique plus lents, vous pouvez également obtenir un Nexus 4, qui coûte environ 100 $.
Vérifiez également les chipsets utilisés dans chaque appareil et ne surreprésente pas un chipset : quelques générations de Snapdragon et Apple ainsi que de Rockchip bas de gamme, Mediatek serait suffisant (merci, Patrick!) .
Si vous n'avez pas d'appareil à portée de main, émulez l'expérience mobile sur ordinateur de bureau en testant sur un réseau 3G étranglé (par exemple 300 ms RTT, 1,6 Mbps vers le bas, 0,8 Mbps vers le haut) avec un processeur étranglé (5 × ralentissement). Basculez éventuellement vers la 3G régulière, la 4G lente (par exemple 170 ms RTT, 9 Mbps vers le bas, 9Mbps vers le haut) et le Wi-Fi. Pour rendre l'impact sur les performances plus visible, vous pouvez même introduire les mardis 2G ou configurer un réseau 3G / 4G limité dans votre bureau pour des tests plus rapides.
Gardez à l'esprit que sur un appareil mobile, nous devrions nous attendre à un ralentissement 4 × –5 × par rapport aux ordinateurs de bureau . Les appareils mobiles ont des GPU, CPU, mémoire et caractéristiques de batterie différents. C'est pourquoi il est important d'avoir un bon profil d'un appareil moyen et de toujours tester sur un tel appareil .

Heureusement, il existe de nombreuses options qui vous aident à automatiser la collecte de données et à mesurer les performances de votre site Web au fil du temps en fonction de ces mesures. Gardez à l'esprit qu'une bonne image des performances couvre un ensemble de mesures de performances, données de laboratoire et données de terrain :
- Les outils de test synthétique collectent les données de laboratoire dans un environnement reproductible avec paramètres de périphérique et de réseau prédéfinis (par exemple Lighthouse Calibre WebPageTest ) et
- Real User Monitoring ( RUM ) les outils évaluent les interactions des utilisateurs en continu et collectent les données de terrain (par exemple SpeedCurve New Relic – les outils fournissent également des tests synthétiques).
Le Le premier est particulièrement utile pendant le développement de car il vous aidera à identifier, isoler et résoudre les problèmes de performances tout en travaillant sur le produit. Ce dernier est utile pour la maintenance à long terme car il vous aidera à comprendre vos goulots d'étranglement de performances lorsqu'ils se produisent en direct – lorsque les utilisateurs accèdent réellement au site.
En utilisant des API RUM intégrées telles que Synchronisation de la navigation Synchronisation des ressources Synchronisation de la peinture Tâches longues etc., les outils de test synthétique et le RUM fournissent ensemble une image complète de performances dans votre application. Vous pouvez utiliser PWMetrics Calibre SpeedCurve mPulse et Boomerang Sitespeed.io qui sont tous d'excellentes options pour la surveillance des performances. De plus, avec En-tête de synchronisation du serveur vous pouvez même
surveiller les performances du back-end et du front-end en un seul endroit.
Remarque : Il est toujours plus sûr de choisir des régulateurs de niveau réseau externes au navigateur, comme, par exemple, DevTools a des problèmes d'interaction avec HTTP / 2 push, en raison de la façon dont il est implémenté (merci, Yoav, Patrick!). Pour Mac OS, nous pouvons utiliser Network Link Conditioner pour Windows Windows Traffic Shaper pour Linux netem et pour FreeBSD dummynet .

- Configurer des profils "propres" et "client" pour les tests.
Lors de l'exécution de tests dans des outils de surveillance passive, c'est une stratégie courante pour désactiver l'antivirus et le processeur d'arrière-plan , supprimez les transferts de bande passante en arrière-plan et testez avec un profil utilisateur propre sans extensions de navigateur pour éviter des résultats biaisés ( Firefox Chrome ).Cependant, c'est aussi une bonne idée d'étudier les extensions que vos clients utilisent fréquemment et testez également avec un profil "client" dédié. En fait, certaines extensions peuvent avoir un impact profond sur les performances ( étude ) sur votre application, et si vos utilisateurs les utilisent beaucoup, vous voudrez peut-être en tenir compte dès le départ. Les résultats du profil «propre» à eux seuls sont trop optimistes et peuvent être écrasés dans des scénarios réels.
- Partagez les objectifs de performance avec vos collègues.
Assurez-vous que les objectifs de performance sont familiers à chaque membre de votre équipe pour éviter les malentendus sur toute la ligne. Chaque décision – que ce soit la conception, le marketing ou tout ce qui se situe entre les deux – a des implications en termes de performances, et la distribution des responsabilités et de la propriété à l'ensemble de l'équipe rationaliserait les décisions axées sur les performances ultérieurement. Mapper les décisions de conception par rapport au budget de performance et aux priorités définies très tôt.
Fixation d'objectifs réalistes
- Temps de réponse de 100 millisecondes, 60 ips.
Pour qu'une interaction soit fluide, l'interface dispose de 100 ms pour répondre aux entrées de l'utilisateur . Plus longtemps que cela, et l'utilisateur perçoit l'application comme lente. The RAIL, a user-centered performance model gives you healthy targets: To allow for <100 milliseconds response, the page must yield control back to main thread at latest after every <50 milliseconds. Estimated Input Latency tells us if we are hitting that threshold, and ideally, it should be below 50ms. For high-pressure points like animation, it’s best to do nothing else where you can and the absolute minimum where you can't.

RAILa user-centric performance model. Also, each frame of animation should be completed in less than 16 milliseconds, thereby achieving 60 frames per second (1 second ÷ 60 = 16.6 milliseconds) — preferably under 10 milliseconds. Because the browser needs time to paint the new frame to the screen, your code should finish executing before hitting the 16.6 milliseconds mark. We’re starting to have conversations about 120fps (e.g. iPad Pro’s screens run at 120Hz) and Surma has covered some rendering performance solutions for 120fpsbut that’s probably not a target we’re looking at just yet.
Be pessimistic in performance expectations, but be optimistic in interface design and use idle time wisely (check idlize and idle-until-urgent). Obviously, these targets apply to runtime performance, rather than loading performance.
- FID < 100ms, TTI < 5s on 3G, Speed Index < 3s, Critical file size budget
Although it might be very difficult to achieve, a good ultimate goal would be Speed Index under 3s and Time to Interactive under 5sand for repeat visits, aim for under 2s (achievable only with a service worker). Aim for Largest Contentful Paint of under 1s and minimize Total Blocking Time and Cumulative Layout Shift. An acceptable First Input Delay (highlighted as Max Potential First Input Delay in Lighthouse) is under 130–100ms. As mentioned above, we’re considering the baseline being a $200 Android phone (e.g. Moto G4) on a slow 3G network, emulated at 400ms RTT and 400kbps transfer speed.We have two major constraints that effectively shape a reasonable target for speedy delivery of the content on the web. On the one hand, we have network delivery constraints due to TCP Slow Start. The first 14KB of the HTML — 10 TCP packets, each 1460 bytes, making around 14.25 KB, albeit not to be taken literally — is the most critical payload chunk, and the only part of the budget that can be delivered in the first roundtrip (which is all you get in 1 sec at 400ms RTT due to mobile wake-up times).
(Note: as TCP generally under-utilizes network connection by a significant amount, Google has developed TCP Bottleneck Bandwidth and RRT (BBR), a relatively new TCP delay-controlled TCP flow control algorithm. Designed for the modern web, it responds to actual congestion, rather than packet loss like TCP does, it is significantly fasterwith higher throughput and lower latency — and the algorithm works differently. It's still important to prioritize critical resources as early as possible, but 14 KB might not be that relevant with BBR in place.) (thanks, Victor, Barry!)
On the other hand, we have hardware constraints on memory and CPU due to JavaScript parsing times (we’ll talk about them in detail later). To achieve the goals stated in the first paragraph, we have to consider the critical file size budget for JavaScript. Opinions vary on what that budget should be (and it heavily depends on the nature of your project), but a budget of 170KB JavaScript gzipped already would take up to 1s to parse and compile on an average phone. Assuming that 170KB expands to 3× that size when decompressed (0.7MB), that already could be the death knell of a "decent" user experience on a Moto G4/G5 Plus.
If you want to target growing markets such as South East Asia, Africa or India, you'll have to look into a very different set of constraints. Addy Osmani covers major feature phone constraintssuch as few low costs, high-quality devices, unavailability of high-quality networks and expensive mobile data — along with PRPL-30 budget and development guidelines for these environments.

According to Addy Osmania recommended size for lazy-loaded routes is also less than 35 KB. (Large preview) 
Addy Osmani suggests PRPL-30 performance budget (30KB gzipped + minified initial bundle) if targeting a feature phone. (Large preview) In fact, Google’s Alex Russel recommends to aim for 130–170KB gzipped as a reasonable upper boundary. In real-life world, most products aren’t even close: an median bundle size today is around 417KBwhich is up 42% compared to early 2015. On a middle-class mobile device, that accounts for 15–25 seconds for Time-To-Interactive.

Geekbench CPU performance benchmarks for the highest selling smartphones globally in 2019. JavaScript stresses single-core performance (remember, it’s inherently more single-threaded than the rest of the Web Platform) and is CPU bound. From Addy’s article “Loading Web Pages Fast On A $20 Feature Phone”. (Large preview) We could also go beyond the bundle size budget though. For example, we could set performance budgets based on the activities of the browser’s main thread, i.e. paint time before start render, or track down front-end CPU hogs. Tools such as CalibreSpeedCurve and Bundlesize can help you keep your budgets in check, and can be integrated into your build process.
Finally, a performance budget probably shouldn’t be a fixed value. Depending on the network connection, performance budgets should adaptbut payload on slower connection is much more "expensive", regardless of how they’re used.
Note: It might sound strange to set such rigid budgets in times of wide-spread HTTP/2, upcoming 5Grapidly evolving mobile phones and flourishing SPAs. However, they do sound reasonable when we deal with the unpredictable nature of the network and hardware, including everything from congested networks to slowly developing infrastructure, to data capsproxy browsers, save-data mode and sneaky roaming charges.


Defining The Environment
- Choose and set up your build tools.
Don’t pay too much attention to what’s supposedly cool these days. Stick to your environment for building, be it Grunt, Gulp, Webpack, Parcel, or a combination of tools. As long as you are getting results you need and you have no issues maintaining your build process, you’re doing just fine.Among the build tools, Rollup is gaining traction, but Webpack seems to be the most established one, with literally hundreds of plugins available to optimize the size of your builds. Getting started with Webpack can be tough though. So if you want to get started, there are some great resources out there:
- Webpack documentation — obviously — is a good starting point, and so are Webpack — The Confusing Bits by Raja Rao and An Annotated Webpack Config by Andrew Welch.
- Sean Larkin has a free course on Webpack: The Core Concepts and Jeffrey Way has released a fantastic free course on Webpack for everyone. Both of them are great introductions for diving into Webpack.
- Webpack Fundamentals is a very comprehensive 4h course with Sean Larkin, released by FrontendMasters.
- If you are slightly more advanced, Rowan Oulton has published a Field Guide for Better Build Performance with Webpack and Benedikt Rötsch’s made a tremendous research on putting Webpack bundle on a diet.
- Webpack examples has hundreds of ready-to-use Webpack configurations, categorized by topic and purpose. Bonus: there is also a Webpack config configurator that generates a basic configuration file.
- awesome-webpack is a curated list of useful Webpack resources, libraries and tools, including articles, videos, courses, books and examples for Angular, React and framework-agnostic projects.
- Use progressive enhancement as a default.
Still, after all these years, keeping progressive enhancement as the guiding principle of your front-end architecture and deployment is a safe bet. Design and build the core experience first, and then enhance the experience with advanced features for capable browsers, creating resilient experiences. If your website runs fast on a slow machine with a poor screen in a poor browser on a sub-optimal network, then it will only run faster on a fast machine with a good browser on a decent network.In fact, with adaptive module servingwe seem to be taking progressive enhancement to another level, serving "lite" core experiences to low-end devices, and enhancing with more sophisticated features for high-end devices. Progressive enhancement isn't likely to fade away any time soon, so it seems.
- Choose a strong performance baseline.
With so many unknowns impacting loading — the network, thermal throttling, cache eviction, third-party scripts, parser blocking patterns, disk I/O, IPC latency, installed extensions, antivirus software and firewalls, background CPU tasks, hardware and memory constraints, differences in L2/L3 caching, RTTS — JavaScript has the heaviest cost of the experiencenext to web fonts blocking rendering by default and images often consuming too much memory. With the performance bottlenecks moving away from the server to the clientas developers, we have to consider all of these unknowns in much more detail.With a 170KB budget that already contains the critical-path HTML/CSS/JavaScript, router, state management, utilities, framework, and the application logic, we have to thoroughly examine network transfer cost, the parse/compile-time and the runtime cost of the framework of our choice. Luckily, we’ve seen a huge improvement over the last few years in how fast browsers can parse and compile scripts. Yet the execution of JavaScript is still the main bottleneck, so paying close attention to script execution time and network can be impactful.
As noted by Seb Markbåge, a good way to measure start-up costs for frameworks is to first render a view, then delete it and then render again as it can tell you how the framework scales. The first render tends to warm up a bunch of lazily compiled code, which a larger tree can benefit from when it scales. The second render is basically an emulation of how code reuse on a page affects the performance characteristics as the page grows in complexity.
- Evaluate frameworks and dependencies.
Now, not every project needs a framework and not every page of a single-page-application needs to load a framework. In Netflix’s case, "removing React, several libraries and the corresponding app code from the client-side reduced the total amount of JavaScript by over 200KB, causing an over-50% reduction in Netflix’s Time-to-Interactivity for the logged-out homepage." The team then utilized the time spent by users on the landing page to prefetch React for subsequent pages that users were likely to land on (read on for details).It might sound obvious but worth stating: some projects can also benefit benefit from removing an existing framework altogether. Once a framework is chosen, you’ll be staying with it for at least a few years, so if you need to use one, make sure your choice is informed and well considered.
Inian Parameshwaran has measured performance footprint of top 50 frameworks (against First Contentful Paint — the time from navigation to the time when the browser renders the first bit of content from the DOM). Inian discovered that, out there in the wild, Vue and Preact are the fastest across the board — both on desktop and mobile, followed by React (slides). You could examine your framework candidates and the proposed architecture, and study how most solutions out there perform, e.g. with server-side rendering or client-side rendering, on average.
Baseline performance cost matters. According to a study by Ankur Sethi"your React application will never load faster than about 1.1 seconds on an average phone in India, no matter how much you optimize it. Your Angular app will always take at least 2.7 seconds to boot up. The users of your Vue app will need to wait at least 1 second before they can start using it." You might not be targeting India as your primary market anyway, but users accessing your site with suboptimal network conditions will have a comparable experience. In exchange, your team gains maintainability and developer efficiency, of course. But this consideration needs to be deliberate.
You could go as far as evaluating a framework (or any JavaScript library) on Sacha Greif’s 12-point scale scoring system by exploring features, accessibility, stability, performance, package ecosystem, community, learning curve, documentation, tooling, track record, team, compatibility, security for example. But on a tough schedule, it’s a good idea to consider at least the total cost on size + initial parse times before choosing an option; lightweight options such as PreactInfernoVueSvelte or Polymer can get the job done just fine. The size of your baseline will define the constraints for your application’s code.
There are many tools to help you make an informed decision about the impact of your dependencies and viable alternatives:
A good starting point is to choose a good default stack for your application. Gatsby (React), Vuepress (Vue)Preact CLIand PWA Starter Kit provide reasonable defaults for fast loading out of the box on average mobile hardware. Also, take a look at web.dev framework-specific performance guidance for React and Angular that's supposed to be expanded later this year (thanks, Phillip!).

- Consider using PRPL pattern and app shell architecture.
Different frameworks will have different effects on performance and will require different strategies of optimization, so you have to clearly understand all of the nuts and bolts of the framework you’ll be relying on. When building a web app, look into the PRPL pattern and application shell architecture. The idea is quite straightforward: Push the minimal code needed to get interactive for the initial route to render quickly, then use service worker for caching and pre-caching resources and then lazy-load routes that you need, asynchronously.


- Have you optimized the performance of your APIs?
APIs are communication channels for an application to expose data to internal and third-party applications via so-called endpoints. When designing and building an APIwe need a reasonable protocol to enable the communication between the server and third-party requests. Representational State Transfer (REST) is a well-established, logical choice: it defines a set of constraints that developers follow to make content accessible in a performant, reliable and scalable fashion. Web services that conform to the REST constraints, are called RESTful web services.As with good ol' HTTP requests, when data is retrieved from an API, any delay in server response will propagate to the end user, hence delaying rendering. When a resource wants to retrieve some data from an API, it will need to request the data from the corresponding endpoint. A component that renders data from several resources, such as an article with comments and author photos in each comment, may need several roundtrips to the server to fetch all the data before it can be rendered. Furthermore, the amount of data returned through REST is often more than what is needed to render that component.
If many resources require data from an API, the API might become a performance bottleneck. GraphQL provides a performant solution to these issues. Per se, GraphQL is a query language for your API, and a server-side runtime for executing queries by using a type system you define for your data. Unlike REST, GraphQL can retrieve all data in a single request, and the response will be exactly what is required, without over or under-fetching data as it typically happens with REST.
In addition, because GraphQL is using schema (metadata that tells how the data is structured), it can already organize data into the preferred structure, so, for example, with GraphQL, we could remove JavaScript code used for dealing with state managementproducing a cleaner application code that runs faster on the client.
If you want to get started with GraphQL, Eric Baer published two fantastic articles on yours truly Smashing Magazine: A GraphQL Primer: Why We Need A New Kind Of API and A GraphQL Primer: The Evolution Of API Design (thanks for the hint, Leonardo!).

- Will you be using AMP or Instant Articles?
Depending on the priorities and strategy of your organization, you might want to consider using Google’s AMP or Facebook’s Instant Articles or Apple’s Apple News. You can achieve good performance without them, but AMP does provide a solid performance framework with a free content delivery network (CDN), while Instant Articles will boost your visibility and performance on Facebook.The seemingly obvious benefit of these technologies for users is guaranteed performanceso at times they might even prefer AMP-/Apple News/Instant Pages-links over "regular" and potentially bloated pages. For content-heavy websites that are dealing with a lot of third-party content, these options could potentially help speed up render times dramatically.
Unless they don't. According to Tim Kadlec, for example, "AMP documents tend to be faster than their counterparts, but they don’t necessarily mean a page is performant. AMP is not what makes the biggest difference from a performance perspective."
A benefit for the website owner is obvious: discoverability of these formats on their respective platforms and increased visibility in search engines. You could build progressive web AMPstoo, by reusing AMPs as a data source for your PWA. Downside? Obviously, a presence in a walled garden places developers in a position to produce and maintain a separate version of their content, and in case of Instant Articles and Apple News without actual URLs (thanks Addy, Jeremy!).
- Choose your CDN wisely.
Depending on how much dynamic data you have, you might be able to "outsource" some part of the content to a static site generatorpushing it to a CDN and serving a static version from it, thus avoiding database requests. You could even choose a static-hosting platform based on a CDN, enriching your pages with interactive components as enhancements (JAMStack). In fact, some of those generators (like Gatsby on top of React) are actually website compilers with many automated optimizations provided out of the box. As compilers add optimizations over time, the compiled output gets smaller and faster over time.Notice that CDNs can serve (and offload) dynamic content as well. So, restricting your CDN to static assets is not necessary. Double-check whether your CDN performs compression and conversion (e.g. image optimization in terms of formats, compression and resizing at the edge), support for servers workersedge-side includes, which assemble static and dynamic parts of pages at the CDN’s edge (i.e. the server closest to the user), and other tasks. If you want to be on the edge, check if your CDN supports HTTP over QUIC (HTTP/3) as well.
Note: based on research by Patrick Meenan and Andy Davies, HTTP/2 prioritization is effectively broken on many CDNsso be careful when choosing a CDN. Patrick has more details in his recent talk on HTTP/2 Prioritization (thanks, Barry!).
Assets Optimizations
- Use Brotli for plain text compression.
In 2015, Google introduced Brotlia new open-source lossless data format, which is now supported in all modern browsers. In practice, Brotli appears to be much more effective than Gzip and Deflate. It might be (very) slow to compress, depending on the settings, but slower compression will ultimately lead to higher compression rates. Still, it decompresses fast. You can also estimate Brotli compression savings for your site.Browsers will accept it only if the user is visiting a website over HTTPS. Brotli is widely supported, and many CDNs support it (AkamaiAWSKeyCDNFastlyCloudlareCDN77) and you can enable Brotli even on CDNs that don’t support it yet (with a service worker).
The catch is that compressing all assets with Brotli is quite expensive, so a number of servers can’t use it just because of the cost overhead it produces. In fact, at the highest level of compression, Brotli is so slow that any potential gains in file size could be nullified by the amount of time it takes for the server to begin sending the response as it waits to dynamically compress the asset. With static compression, however, higher compression settings are preferred.
If you can bypass the cost of dynamically compressing static assets, it’s worth the effort. Brotli can be used for any plaintext payload — HTML, CSS, SVG, JavaScript, and so on.
The strategy? Pre-compress static assets with Brotli+Gzip at the highest level and compress (dynamic) HTML on the fly with Brotli at level 3–5. Make sure that the server handles content negotiation for Brotli or gzip properly.

- Use responsive images and WebP.
As far as possible, use responsive images withsrcsetsizesand theelement. While you’re at it, you could also make use of the WebP format (supported in all modern browsers except Safari and iOS Safari) by serving WebP images with theelement and a JPEG fallback (see Andreas Bovens' code snippet) or by using content negotiation (usingAcceptheaders). Ire Aderinokun has a very detailed tutorial on converting images to WebPtoo.Sketch natively supports WebP, and WebP images can be exported from Photoshop using a WebP plugin for Photoshop. Other options are availabletoo. If you’re using WordPress or Joomla, there are extensions to help you easily implement support for WebP, such as Optimus and Cache Enabler for WordPress and Joomla’s own supported extension (via Cody Arsenault).
It’s important to note that while WebP image file sizes compared to equivalent Guetzli and Zopflithe format doesn’t support progressive rendering like JPEGwhich is why users might see an actual image faster with a good ol' JPEG although WebP images might get faster through the network. With JPEG, we can serve a "decent" user experience with the half or even quarter of the data and load the rest later, rather than have a half-empty image as it is in the case of WebP. Your decision will depend on what you are after: with WebP, you’ll reduce the payload, and with JPEG you’ll improve perceived performance.
On Smashing Magazine, we use the postfix
-optfor image names — for example,brotli-compression-opt.png; whenever an image contains that postfix, everybody on the team knows that the image has already been optimized. And — shameless plug! — Jeremy Wagner even published a Smashing book on WebP.

- Are images properly optimized?
When you’re working on a landing page on which it’s critical that a particular image loads blazingly fast, make sure that JPEGs are progressive and compressed with mozJPEG (which improves the start rendering time by manipulating scan levels) or take a look at GuetzliGoogle’s new open-source encoder focusing on perceptual performance, and utilizing learnings from Zopfli and WebP. The only downside: slow processing times (a minute of CPU per megapixel). For PNG, we can use Pingoand for SVG, we can use SVGO or SVGOMG. And if you need to quickly preview and copy or download all the SVG assets from a website, svg-grabber can do that for you, too.Every single image optimization article would state it, but keeping vector assets clean and tight is always worth reminding. Make sure to clean up unused assets, remove unnecessary metadata and reduces the number of path points in artwork (and thus SVG code). (Thanks, Jeremy!)
There are more advanced options though. You could:
- Use Squoosh to compress, resize and manipulate images at the optimal compression levels (lossy or lossless),
- Use the Responsive Image Breakpoints Generator or a service such as Cloudinary or Imgix to automate image optimization. Also, in many cases, using
srcsetandsizesalone will reap significant benefits. - To check the efficiency of your responsive markup, you can use imaging-heapa command line tool that measure the efficiency across viewport sizes and device pixel ratios.
- Lazy load images and iframes with hybrid lazy-loadingutilizing native lazy-loading and lazyloada library that detects any visibility changes triggered through user interaction (with IntersectionObserver which we’ll explore later).
- For offscreen images, we can display a placeholder first, and when the image is within the viewport, using IntersectionObserver, trigger a network call for the image to be downloaded in background. We can then defer render until decode with img.decode() or download the image if the Image Decode API isn't available. When rendering the image, we can use fade-in animations, for example. Katie Hempenius and Addy Osmani share more insights in their talk Speed at Scale: Web Performance Tips and Tricks from the Trenches.
- You can add automatic image compression to your Pull Requestsso no image can hit production uncompressed. The action uses mozjpeg and libvips that work with PNGs and JPGs.
- Watch out for images that are loaded by default, but might never be displayed — e.g. in carousels, accordions and image galleries.
- Consider Swapping Images with the Sizes Attribute by specifying different image display dimensions depending on media queries, e.g. to manipulate
sizesto swap sources in a magnifier component. - Review image download inconsistencies to prevent unexpected downloads for foreground and background images.
- Sometimes optimizing images alone won't do the trick. To improve the time needed to start the rendering of a critical imagelazy-load less important images and defer any scripts to load after critical images have already rendered.
- To optimize storage interally, you could use Dropbox’s new Lepton format for losslessly compressing JPEGs by an average of 22%.
- Watch out for the
aspect-ratioproperty in CSS andintrinsicsizeattribute which will allow us to set aspect ratios and dimensions for images, so browser can reserve a pre-defined layout slot early to avoid layout jumps during the page load. - If you feel adventurous, you could chop and rearrange HTTP/2 streams using Edge workersbasically a real-time filter living on the CDN, to send images faster through the network. Edge workers use JavaScript streams that use chunks which you can control (basically they are JavaScript that runs on the CDN edge that can modify the streaming responses), so you can control the delivery of images. With service worker it’s too late as you can’t control what’s on the wire, but it does work with Edge workers. So you can use them on top of static JPEGs saved progressively for a particular landing page.

A sample output by imaging-heapa command line tool that measure the efficiency across viewport sizes and device pixel ratios. (Image source) (Large preview) The future of responsive images might change dramatically with the adoption of client hints. Client hints are HTTP request header fields, e.g.
DPRViewport-WidthWidthSave-DataAccept(to specify image format preferences) and others. They are supposed to inform the server about the specifics of user’s browser, screen, connection etc. As a result, the server can decide how to fill in the layout with appropriately sized images, and serve only these images in desired formats. With client hints, we move the resource selection from HTML markup and into the request-response negotiation between the client and server.As Ilya Grigorik notedclient hints complete the picture — they aren’t an alternative to responsive images. "The
element provides the necessary art-direction control in the HTML markup. Client hints provide annotations on resulting image requests that enable resource selection automation. Service Worker provides full request and response management capabilities on the client." A service worker could, for example, append new client hints headers values to the request, rewrite the URL and point the image request to a CDN, adapt response based on connectivity and user preferences, etc. It holds true not only for image assets but for pretty much all other requests as well.For clients that support client hints, one could measure 42% byte savings on images and 1MB+ fewer bytes for 70th+ percentile. On Smashing Magazine, we could measure 19-32% improvementtoo. Unfortunately, client hints still have to gain some browser support. Still under consideration in Firefox. However, if you supply both the normal responsive images markup and the
tag for Client Hints, then the browser will evaluate the responsive images markup and request the appropriate image source using the Client Hints HTTP headers.Not good enough? Well, you can also improve perceived performance for images with the multiple background images technique. Keep in mind that playing with contrast and blurring out unnecessary details (or removing colors) can reduce file size as well. Ah, you need to enlarge a small photo without losing quality? Consider using Letsenhance.io.
These optimizations so far cover just the basics. Addy Osmani has published a very detailed guide on Essential Image Optimization that goes very deep into details of image compression and color management. For example, you could blur out unnecessary parts of the image (by applying a Gaussian blur filter to them) to reduce the file size, and eventually you might even start removing colors or turn the picture into black and white to reduce the size even further. For background images, exporting photos from Photoshop with 0 to 10% quality can be absolutely acceptable as well. Ah, and don’t use JPEG-XR on the web — "the processing of decoding JPEG-XRs software-side on the CPU nullifies and even outweighs the potentially positive impact of byte size savings, especially in the context of SPAs".


- Are videos properly optimized?
We covered images so far, but we’ve avoided a conversation about good ol' GIFs. Frankly, instead of loading heavy animated GIFs which impact both rendering performance and bandwidth, it’s a good idea to switch either to animated WebP (with GIF being a fallback) or replace them with looping HTML5 videos altogether. Yes, unlike with images, browsers do not preloadcontent, but HTML5 videos tend to be lighter and smaller than GIFs. Not an option? Well, at least we can add lossy compression to GIFs with Lossy GIFgifsicle or giflossy.Tests show that inline videos within
imgtags display 20× faster and decode 7× faster than the GIF equivalent, in addition to being a fraction in file size.In the land of good news, video formats have been advancing massively over the years. For a long time, we had hoped that WebM would become the format to rule them all, and WebP (which is basically one still image inside of the WebM video container) will become a replacement for dated image formats. But despite WebP and WebM gaining support these days, the breakthrough didn’t happen.
In 2018, the Alliance of Open Media has released a new promising video format called AV1. AV1 has compression similar to the H.265 codec (the evolution of H.264) but unlike the latter, AV1 is free. The H.265 license pricing pushed browser vendors to adopt a comparably performant AV1 instead: AV1 (just like H.265) compresses twice as good as WebM.

AV1 has good chances of becoming the ultimate standard for video on the web. (Image credit: Wikimedia.org) (Large preview) In fact, Apple currently uses HEIF format and HEVC (H.265), and all the photos and videos on the latest iOS are saved in these formats, not JPEG. While HEIF and HEVC (H.265) aren’t properly exposed to the web (yet?), AV1 is — and it’s gaining browser support. So adding the
AV1source in yourtag is reasonable, as all browser vendors seem to be on board.For now, the most widely used and supported encoding is H.264, served by MP4 files, so before serving the file, make sure that your MP4s are processed with a multipass-encodingblurred with the frei0r iirblur effect (if applicable) and moov atom metadata is moved to the head of the file, while your server accepts byte serving. Boris Schapira provides exact instructions for FFmpeg to optimize videos to the maximum. Of course, providing WebM format as an alternative would help, too.
Have to start rendering videos quickly (e.g. background videos)? A common technique to use is to quickly show the first frame or display a short looping segment that could be interpreted as a part of the video, and then embed video aftewards (thanks, Guy Podjarny!).
Video playback performance is a story on its ownand if you’d like to dive into it in details, take a look at Doug Sillar’s series on The Current State of Video and Video Delivery Best Practices that include details on video delivery metrics, video preloading, compression and streaming.

- Are web fonts optimized?
The first question that’s worth asking if you can get away with using UI system fonts in the first place — just make sure to double check that they appear correctly on various platforms. If it’s not the case, chances are high that the web fonts you are serving include glyphs and extra features and weights that aren’t being used. You can ask your type foundry to subset web fonts or if you are using open-source fonts, subset them on your own with Glyphhanger or Fontsquirrel. You can even automate your entire workflow with Peter Müller’s subfonta command line tool that statically analyses your page in order to generate the most optimal web font subsets, and then inject them into your page.WOFF2 support is great, and you can use WOFF as fallback for browsers that don’t support it — or perhaps legacy browsers could be served well enough with system fonts instead. There are many, many, many options for web font loading, and you can choose one of the strategies from Zach Leatherman’s "Comprehensive Guide to Font-Loading Strategies," (code snippets also available as Web font loading recipes).
Probably the better options to consider today are Critical FOFT with
preloadand "The Compromise" method. Both of them use a two-stage render for delivering web fonts in steps — first a small supersubset required to render the page fast and accurately with the web font, and then load the rest of the family async. The difference is that "The Compromise" technique loads polyfill asynchronously only if font load events are not supported, so you don’t need to load the polyfill by default. Need a quick win? Zach Leatherman has a quick 23-min tutorial and case study to get your fonts in order.In general, it might be a good idea to use the
preloadresource hint to preload fonts, but in your markup include the hints after the link to critical CSS and JavaScript. Withpreloadthere is a puzzle of prioritiesso consider injectingrel="preload"elements into the DOM just before the external blocking scripts. According to Andy Davies, "resources injected using a script are hidden from the browser until the script executes, and we can use this behaviour to delay when the browser discovers thepreloadhint." Otherwise, font loading will cost you in the first render time.It’s a good idea to be selective and choose files that matter most, e.g. the ones that are critical for rendering or that would help you avoiding visible and disruptive text reflows. In general, Zach advises to preload one or two fonts of each family — it also makes sense to delay some font loading if they are less critical.
It has become quite common to use
local()value (which refers to a local font by name) when defining afont-familyin the@font-facerule:/* Warning! Probably not a good idea! */ @font-face { font-family: Open Sans; src: local('Open Sans Regular'), local('OpenSans-Regular'), url('opensans.woff2') format ('woff2'), url('opensans.woff') format('woff'); }The idea is reasonable: some popular open-source fonts such as Open Sans are coming pre-installed with some drivers or apps, so if the font is available locally, the browser doesn’t need to download the web font and can display the local font immediately. As Bram Stein noted"though a local font matches the name of a web font, it most likely isn't the same font. Many web fonts differ from their "desktop" version. The text might be rendered differently, some characters may fall back to other fonts, OpenType features can be missing entirely, or the line height may be different."
Also, as typefaces evolve over time, the locally installed version might be very different from the web font, with characters looking very different. So, according to Bram, it's better to never mix locally installed fonts and web fonts in
@font-facerules.Nobody likes waiting for the content to be displayed. With the
font-displayCSS descriptorwe can control the font loading behavior and enable content to be readable immediately (font-display: optional) or almost immediately (font-display: swap). However, if you want to avoid text reflowswe still need to use the Font Loading API, specifically to group repaintsor when you are using third party hosts. Unless you can use Google Fonts with Cloudflare Workersof course.Talking about Google Fonts: although the support for font-display was added recentlyconsider using google-webfonts-helpera hassle-free way to self-host Google Fonts. Always self-host your fonts for maximum control if you can.
In general, if you use
font-display: optionalit might not be a good idea to also usepreloadas it will trigger that web font request early (causing network congestion if you have other critical path resources that need to be fetched). Usepreconnectfor faster cross-origin font requests, but be cautious withpreloadas preloading fonts from a different origin wlll incur network contention. All of these techniques are covered in Zach’s Web font loading recipes.It might be a good idea to opt out of web fonts (or at least second stage render) if the user has enabled Reduce Motion in accessibility preferences or has opted in for Data Saver Mode (see
Save-Dataheader). Or when the user happens to have slow connectivity (via Network Information API). Eventually, we might also be able to useprefers-reduced-dataCSS media query to not define font declarations if the user has opted into data-saving mode. The media query would basically expose if theSave-Datarequest header from the Client Hint HTTP extension is on/off to allow for usage with CSS. Not quite there yet though.To measure the web font loading performance, consider the All Text Visible metric (the moment when all fonts have loaded and all content is displayed in web fonts), Time to Real Italics as well as Web Font Reflow Count after first render. Obviously, the lower both metrics are, the better the performance is. It’s important to notice that variable fonts might require a significant performance consideration. They give designers a much broader design space for typographic choices, but it comes at the cost of a single serial request opposed to a number of individual file requests. That single request might be slow, blocking the rendering of the content on a page. So subsetting and splitting the font into character sets will still matter. On the good side though, with a variable font in place, we’ll get exactly one reflow by default, so no JavaScript will be required to group repaints.
Now, what would make a bulletproof web font loading strategy then? Subset fonts and prepare them for the 2-stage-render, declare them with a
font-displaydescriptor, use Font Loading API to group repaints and store fonts in a persistent service worker’s cache. On the first visit, inject the preloading of scripts just before the blocking external scripts. You could fall back to Bram Stein’s Font Face Observer if necessary. And if you’re interested in measuring the performance of font loading, Andreas Marschke explores performance tracking with Font API and UserTiming API.Finally, don’t forget to include
unicode-rangeto break down a large font into smaller language-specific fonts, and use Monica Dinculescu’s font-style-matcher to minimize a jarring shift in layout, due to sizing discrepancies between the fallback and the web fonts.Does the future look bright? With progressive font enrichmenteventually we might be able to "download only the required part of the font on any given page, and for subsequent requests for that font to dynamically ‘patch’ the original download with additional sets of glyphs as required on successive page views", as Jason Pamental explains it. Incremental Transfer Demo is already available, and it’s work in progress.
Build Optimizations
- Set your priorities straight.
It’s a good idea to know what you are dealing with first. Run an inventory of all of your assets (JavaScript, images, fonts, third-party scripts and "expensive" modules on the page, such as carousels, complex infographics and multimedia content), and break them down in groups.Set up a spreadsheet. Define the basic core experience for legacy browsers (i.e. fully accessible core content), the enhanced experience for capable browsers (i.e. the enriched, full experience) and the extras (assets that aren’t absolutely required and can be lazy-loaded, such as web fonts, unnecessary styles, carousel scripts, video players, social media buttons, large images). A while back, we published an article on "Improving Smashing Magazine’s Performance," which describes this approach in detail.
When optimizing for performance we need to reflect our priorities. Load the core experience immediately, then enhancementsand then the extras.
- Use native JavaScript modules in production.
Remember the good ol' cutting-the-mustard technique to send the core experience to legacy browsers and an enhanced experience to modern browsers? An updated variant of the technique could use ES2015+ also known as module/nomodule pattern. As Philip Walton writes, "the technique uses bundlers and transpilers to generate two versions of your codebase, one with modern syntax (loaded via ) and one with ES5 syntax (loaded via )." Modern browsers would interpret the script as a JavaScript module and run it as expected, while legacy browsers wouldn’t recognize the attribute and ignore it because it’s unknown HTML syntax. We can ship significantly less code to module-supporting browsers, and it’s now supported by most frameworks and CLIs. One note of warning though: the module/nomodule pattern can backfire on some clientsso you might want to consider a workaround: Jeremy's less risky differential serving pattern which, however, sidesteps the preload scanner, which could affect performance in ways one might not anticipate. (thanks, Jeremy!) In fact, Rollup supports modules as an output formatso we can both bundle code and deploy modules in production. Parcel has just added module support in Parcel 2. Webpack isn't quite there yet. Also, watch out for Pika that is looking into simplifying build process and management of JavaScript modules. Note: It’s worth stating that feature detection alone isn’t enough to make an informed decision about the payload to ship to that browser. On its own, we can’t deduce device capability from browser version. For example, cheap Android phones in developing countries mostly run Chrome and will cut the mustard despite their limited memory and CPU capabilities. Eventually, using the Device Memory Client Hints Headerwe’ll be able to target low-end devices more reliably. At the moment of writing, the header is supported only in Blink (it goes for client hints in general). Since Device Memory also has a JavaScript API which is available in Chromeone option could be to feature detect based on the API, and fall back to module/nomodule technique if it’s not supported (thanks, Yoav!). - Are you using tree-shaking, scope hoisting and code-splitting?Tree-shaking is a way to clean up your build process by only including code that is actually used in production and eliminate unused imports in Webpack. With Webpack and Rollup, we also have scope hoisting that allows both tools to detect where
importchaining can be flattened and converted into one inlined function without compromising the code. With Webpack, we can also use JSON Tree Shaking as well. Also, you might want to consider learning how to avoid bloat and expensive styles. Feeling like going beyond that? You can also use Webpack to shorten the class names and use scope isolation to rename CSS class names dynamically at the compilation time. Code-splitting is another Webpack feature that splits your codebase into "chunks" that are loaded on demand. Not all of the JavaScript has to be downloaded, parsed and compiled right away. Once you define split points in your code, Webpack can take care of the dependencies and outputted files. It enables you to keep the initial download small and to request code on demand when requested by the application. Alexander Kondrov has a fantastic introduction to code-splitting with Webpack and React. Consider using preload-webpack-plugin that takes routes you code-split and then prompts browser to preload them usingor. Webpack inline directives also give some control overpreload/prefetch. (Watch out for prioritization issues though.) Where to define split points? By tracking which chunks of CSS/JavaScript are used, and which aren’t used. Umar Hansa explains how you can use Code Coverage from Devtools to achieve it. If you aren’t using Webpack, note that Rollup shows significantly better results than good ol' Browserify exports. While we’re at it, you might want to check out rollup-plugin-closure-compiler and Rollupifywhich converts ECMAScript 2015 modules into one big CommonJS module — because small modules can have a surprisingly high performance cost depending on your choice of bundler and module system. When dealing with single-page applications, we need some time to initialize the app before we can render the page. Your setting will require your custom solution, but you could watch out for modules and techniques to speed up the initial rendering time. For example, here’s how to debug React performance and eliminate common React performance issuesand here’s how to improve performance in Angular. In general, most performance issues come from the initial time to bootstrap the app. So, what’s the best way to code-split aggressively, but not too aggressively? According to Phil Walton, "in addition to code-splitting via dynamic imports, [we could] also use code-splitting at the package levelwhere each imported node modules get put into a chunk based on its package’s name." Phil provides a tutorial on how to build it as well. - Can you offload JavaScript into a Web Worker?To reduce the negative impact to Time-to-Interactive, it might be a good idea to look into offloading heavy JavaScript into a Web Worker or caching via a Service Worker. As the code base keeps growing, the UI performance bottlenecks will show up, slowing down the user’s experience. That’s because DOM operations are running alongside your JavaScript on the main thread. With web workerswe can move these expensive operations to a background process that’s running on a different thread. Typical use cases for web workers are prefetching data and Progressive Web Apps to load and store some data in advance so that you can use it later when needed. And you could use Comlink to streamline the communication between the main page and the worker. Still some work to do, but we are getting there. How to get started? Here are a few resources that are worth looking into: Note that Web Workers don’t have access to the DOM because the DOM is not "thread-safe", and the code that they execute needs to be contained in a separate file.
- Can you offload "hot paths" to WebAssembly?We could offload computationally heavy tasks off to WebAssembly (WASM), a binary instruction format, designed as a portable target for compilation of high-level languages like C/C++/Rust. Its browser support is remarkableand it has recently become viable as function calls between JavaScript and WASM are getting faster. Plus, it’s even supported on Fastly’s edge cloud. Of course, WebAssembly isn’t supposed to replace JavaScript, but it can complement it in cases when you notice CPU hogs. For most web apps, JavaScript is a better fit, and WebAssembly is best used for computationally intensive web apps, such as web games. If you’d like to learn more about WebAssembly:

- Are you using an ahead-of-time compiler?Make sure to use an ahead-of-time compiler to offload some of the client-side rendering to the server and, hence, output usable results quickly. Finally, consider using Optimize.js for faster initial loading by wrapping eagerly invoked functions (it might not be necessary any longer, though).
- Serve legacy code only to legacy browsers.With ES2015 being remarkably well supported in modern browserswe can use
babel-preset-envto only transpile ES2015+ features unsupported by the modern browsers you are targeting. Then set up two buildsone in ES6 and one in ES5. As mentioned above, JavaScript modules are now supported in all major browsersso use usescript type="module"to let browsers with ES module support load the file, while older browsers could load legacy builds withscript nomodule. And we can automate the entire process with Webpack ESNext Boilerplate. Note that these days we can write module-based JavaScript that runs natively in the browser, without transpilers or bundlers.header provides a way to initiate early (and high-priority) loading of module scripts. Basically, it’s a nifty way to help in maximizing bandwidth usage, by telling the browser about what it needs to fetch so that it’s not stuck with anything to do during those long roundtrips. Also, Jake Archibald has published a detailed article with gotchas and things to keep in mind with ES Modules that’s worth reading. For lodash, usebabel-plugin-lodashthat will load only modules that you are using in your source. Your dependencies might also depend on other versions of Lodash, so transform generic lodashrequiresto cherry-picked ones to avoid code duplication. This might save you quite a bit of JavaScript payload. Shubham Kanodia has written a detailed low-maintenance guide on smart bundling: to shipping legacy code to only legacy browsers in production with the code snippet you could use right away.

- Are you using module/nomodule pattern for JavaScript?We want to send just the necessary JavaScript through the network, yet it means being slightly more focused and granular about the delivery of those assets. A while back Philip Walton introduced the idea of module/nomodule pattern (also introduced by Jeremy Wagner as differential serving). The idea is to compile and serve two separate JavaScript bundles: the “regular” build, the one with Babel-transforms and polyfills and serve them only to legacy browsers that actually need them, and another bundle (same functionality) that has no transforms or polyfills. As a result, we help reduce blocking of the main thread by reducing the amount of scripts the browser needs to process. Jeremy Wagner has published a comprehensive article on differential serving and how to set it up in your build pipeline, from setting up Babel, to what tweaks you’ll need to make in Webpack, as well as the benefits of doing all this work.
- Identify and rewrite legacy code with incremental decoupling.Long-living projects have a tendency to gather dust and dated code. Revisit your dependencies and assess how much time would be required to refactor or rewrite legacy code that has been causing trouble lately. Of course, it’s always a big undertaking, but once you know the impact of the legacy code, you could start with incremental decoupling. First, set up metrics that tracks if the ratio of legacy code calls is staying constant or going down, not up. Publicly discourage the team from using the library and make sure that your CI alerts developers if it’s used in pull requests. polyfills could help transition from legacy code to rewritten codebase that uses standard browser features.
- Identify and remove unused CSS/JS.CSS and JavaScript code coverage in Chrome allows you to learn which code has been executed/applied and which hasn't. You can start recording the coverage, perform actions on a page, and then explore the code coverage results. Once you’ve detected unused code, find those modules and lazy load with
import()(see the entire thread). Then repeat the coverage profile and validate that it’s now shipping less code on initial load. You can use Puppeteer to programmatically collect code coverage and Canary already allows you to export code coverage resultstoo. As Andy Davies noted, you might want to collect code coverage for both modern and legacy browsers though. There are many other use-cases for Puppeteersuch as, for example, automatic visual diffing or monitoring unused CSS with every build. If you’re looking for a detailed guide to Puppeteer, Nitay Neeman has a very comprehensive overview of Puppeteerwith examples and use cases. Furthermore, purgecssUnCSS and Helium can help you remove unused styles from CSS. And if you aren’t certain if a suspicious piece of code is used somewhere, you can follow Harry Roberts' advice: create a 1×1px transparent GIF for a particular class and drop it into adead/directory, e.g./assets/img/dead/comments.gif. After that, you set that specific image as a background on the corresponding selector in your CSS, sit back and wait for a few months if the file is going to appear in your logs. If there are no entries, nobody had that legacy component rendered on their screen: you can probably go ahead and delete it all. For the I-feel-adventurous-department, you could even automate gathering on unused CSS through a set of pages by monitoring DevTools using DevTools. - Trim the size of your JavaScript bundles.As Addy Osmani notedthere’s a high chance you’re shipping full JavaScript libraries when you only need a fraction, along with dated polyfills for browsers that don’t need them, or just duplicate code. To avoid the overhead, consider using webpack-libs-optimizations that removes unused methods and polyfills during the build process. Add bundle auditing into your regular workflow as well. There might be some lightweight alternatives to heavy libraries you’ve added years ago, e.g. Moment.js could be replaced with native Internationalization APIdate-fns or Luxon. Benedikt Rötsch’s research showed that a switch from Moment.js to date-fns could shave around 300ms for First paint on 3G and a low-end mobile phone. That’s where tools like Bundlephobia could help find the cost of adding a npm package to your bundle. size-limit extends basic bundle size check with details on JavaScript execution time. You can even integrate these costs with a Lighthouse Custom Audit. This goes for frameworks, too. By removing or trimming the Vue MDC Adapter (Material Components for Vue), styles drop from 194KB to 10KB. Feeling adventurous? You could look into Prepack. It compiles JavaScript to equivalent JavaScript code, but unlike Babel or Uglify, it lets you write normal JavaScript code, and outputs equivalent JavaScript code that runs faster. Alternatively to shipping the entire framework, you could even trim your framework and compile it into a raw JavaScript bundle that does not require additional code. Svelte does itand so does Rawact Babel plugin which transpiles React.js components to native DOM operations at build-time. Pourquoi? Well, as maintainers explain, "react-dom includes code for every possible component/HTMLElement that can be rendered, including code for incremental rendering, scheduling, event handling, etc. But there are applications that do not need all these features (at initial page load). For such applications, it might make sense to use native DOM operations to build the interactive user interface."


- Are you using predictive prefetching for JavaScript chunks?We could use heuristics to decide when to preload JavaScript chunks. Guess.js is a set of tools and libraries that use Google Analytics data to determine which page a user is most likely to visit next from a given page. Based on user navigation patterns collected from Google Analytics or other sources, Guess.js builds a machine-learning model to predict and prefetch JavaScript that will be required on each subsequent page.
Hence, every interactive element is receiving a probability score for engagement, and based on that score, a client-side script decides to prefetch a resource ahead of time. You can integrate the technique to your Next.js applicationAngular and Reactand there is a Webpack plugin which automates the setup process as well.
Obviously, you might be prompting the browser to consume unneeded data and prefetch undesirable pages, so it’s a good idea to be quite conservative in the number of prefetched requests. A good use case would be prefetching validation scripts required in the checkout, or speculative prefetch when a critical call-to-action comes into the viewport.
Need something less sophisticated? DNStradamus does DNS prefetching for outbound links as they appear in the viewport. Quicklink and Instant.page are small libraries that automatically prefetch links in the viewport during idle time in attempt to make next-page navigations load faster. Quicklink is data-considerate, so it doesn’t prefetch on 2G or if
Data-Saveris on, and so is Instant.page if the modet is set to use viewport prefetching (which is a default). - Take advantage of optimizations for your target JavaScript engine.Study what JavaScript engines dominate in your user base, then explore ways of optimizing for them. For example, when optimizing for V8 which is used in Blink-browsers, Node.js runtime and Electron, make use of script streaming for monolithic scripts.
Script streaming allows
asyncordefer scriptsto be parsed on a separate background thread once downloading begins, hence in some cases improving page loading times by up to 10%. Practically, use in theso that the browsers can discover the resource early and then parse it on the background thread. Caveat: Opera Mini doesn’t support script defermentso if you are developing for India or Africa,deferwill be ignored, resulting in blocking rendering until the script has been evaluated (thanks Jeremy!). You could also hook into V8’s code caching as well, by splitting out libraries from code using them, or the other way around, merge libraries and their uses into a single script, group small files together and avoid inline scripts. Or perhaps even use v8-compile-cache. Firefox’s recently released Baseline Interpreter has speed up Firefox and there are a few JIT Optimization Strategies available as well.

- Client-side rendering or server-side rendering? Both!That's a quite heated conversation to have. Ultimately, the decision has to be driven by the performance of the application. The ultimate approach would be to set up some sort of progressive booting: Use server-side rendering to get a quick first meaningful paint, but also include some minimal necessary JavaScript to keep the time-to-interactive close to the first meaningful paint. If JavaScript is coming too late after the First Meaningful Paint, the browser will lock up the main thread while parsing, compiling and executing late-discovered JavaScript, hence handcuffing the interactivity of site or application.
To avoid it, always break up the execution of functions into separate, asynchronous tasks, and where possible use
requestIdleCallback. Consider lazy loading parts of the UI using WebPack’s dynamicimport()supportavoiding the load, parse, and compile cost until users really need them (thanks Addy!). In its essence, Time to Interactive (TTI) tells us the time between navigation and interactivity. The metric is defined by looking at the first five-second window after the initial content is rendered, in which no JavaScript tasks take longer than 50ms. If a task over 50ms occurs, the search for a five-second window starts over. As a result, the browser will first assume that it reached Interactivejust to switch to Frozenjust to eventually switch back to Interactive. Once we reached Interactivewe can then — either on demand or as time allows — boot non-essential parts of the app. Unfortunately, as Paul Lewis noticedframeworks typically have no simple concept of priority that can be surfaced to developers, and hence progressive booting isn't easy to implement with most libraries and frameworks. Still, we are getting there. These days there are a couple of choices we can explore, and Houssein Djirdeh and Jason Miller provide an excellent overview of these options in their talk on Rendering on the Web. The overview below is based on their talk.- Full Server-Side Rendering (SSR)In classic SSR, such as WordPress, all requests are handled entirely on the server. The requested content is returned as a finished HTML page and browsers can render it right away. Hence, SSR-apps can't really make use of the DOM APIs, for example. The gap between First Contentful Paint and Time to Interactive is usually small, and the page can be rendered right away as HTML is being streamed to the browser. However, we end up with longer server think time and consequently Time To First Byte and we don't make use of responsive and rich features of modern applications.
- Static SSR (SSR)We build out the product as a single page application, but all pages are prerendered to static HTML with minimal JavaScript as a build step. Thus, we can display a landing page quickly and then prefetch a SPA-framework for subsequent pages. Netflix has adopted this approach decreasing loading and Time-to-Interactive by 50%.
-
Server-Side Rendering With (Re)Hydration (SSR + CSR)With hydration in the mix, the HTML page returned from the server also contains a script that loads a fully-fledged client-side application.
With React, we can use
ReactDOMServermodule on a Node server like Expressand then call therenderToStringmethod to render the top level components as a static HTML string. With Vue, we can use the vue-server-renderer to render a Vue instance into HTML usingrenderToString. In Angular, we can use@nguniversalto turn client requests into fully server-rendered HTML pages. A fully server-rendered experience can also be achieved out of the box with Next.js (React) or Nuxt.js (Vue). The approach has its downsides. As a result, we do gain full flexibility of client-side apps while providing faster server-side rendering, but we also end up with a longer gap between First Meaningful Paint and Time To Interactive and increased First Input Delay. Rehydration is very expensiveand usually this strategy alone will not be good enough as it heavily delays Time To Interactive. -
Streaming Server-Side Rendering With Progressive Hydration (SSR + CSR)To minimize the gap between Time To Interactive and First Contentful Paint, we render multiple requests at once and send down content in chunks as they get generated. So we don't have to wait for the full string of HTML before sending content to the browser, and hence improve Time To First Byte.
In React, instead of
renderToStringwe can use renderToNodeStream to pipe the response and send the HTML down in chunks. In Vue, we can use renderToStream that can be piped and streamed. With React Suspense on the horizon, we might use asynchronous rendering for that purpose, too. On the client-side, rather than booting the entire application at once, we boot up components progressively. Sections of the applications are first broken down into standalone scripts with code splitting, and then hydrated gradually (in order of our priorities). In fact, we can hydrate critical components first, while the rest could be hydrated later. The role of client-side and server-side rendering can then be defined differently per component. We can then also defer hydration of some components until they come into view, or are needed for user interaction, or when the browser is idle. For Vue, Markus Oberlehner has published a guide on reducing Time To Interactive of SSR apps using hydration on user interaction as well as vue-lazy-hydrationan early-stage plugin that enables component hydration on visibility or specific user interaction. The Angular team works on progressive hydration with Ivy Universal. You can implement partial hydration with Preact and Next.jstoo. For React, partial hydration is on the Suspense roadmap (and it looks promising!). If you feel adventurous, Jason Miller has published working demos on how progressive hydration could be implemented with React, so you can use them right away: demo 1demo 2demo 3 (also available on GitHub). Plus, you can look into the react-prerendered-component library. - Trisomorphic RenderingWith service workers in place, we can use streaming server rendering for initial/non-JS navigations, and then have the service worker taking on rendering of HTML for navigations after it has been installed. In that case, service-worker prerenders content and enables SPA-style navigations for rendering new views in the same session. Works well when you can share the same templating and routing code between the server, client page, and service worker.

Trisomorphic rendering, with the same code rendering in any 3 places: on the server, in the DOM or in a service worker. (Image source: Google Developers) (Large preview) - CSR With PrerenderingPrerendering is similar to server-side rendering but rather than rendering pages on the server dynamically, we render the application to static HTML at build time.
Gatsbyan open source static site generator that uses React, uses
renderToStaticMarkupmethod instead ofrenderToStringmethod during builds, with main JS chunk being preloaded and future routes are prefetched, without DOM attributes that aren't needed for simple static pages. For Vue, we can use Vuepress to achieve the same goal. You can also use prerender-loader with Webpack. The result is a better Time To First Byte and First Contentful Paint, and we reduce the gap between Time To Interactive and First Contentful Paint. We can't use the approach if the content is expected to change much. Plus, all URLs have to be known ahead of time to generate all the pages. So some components might be rendered using prerendering, but if we need something dynamic, we have to rely on the app to fetch the content. - Full Client-Side Rendering (CSR)All logic, rendering and booting are done on the client. The result is usually a huge gap between Time-To-Interactive and First Contentful Paint. As a result, applications feel sluggish as the entire app has to be booted on the client to render anything. In general, SSR is faster than CSR. Yet still, It's a most frequent implementation for many apps out there.

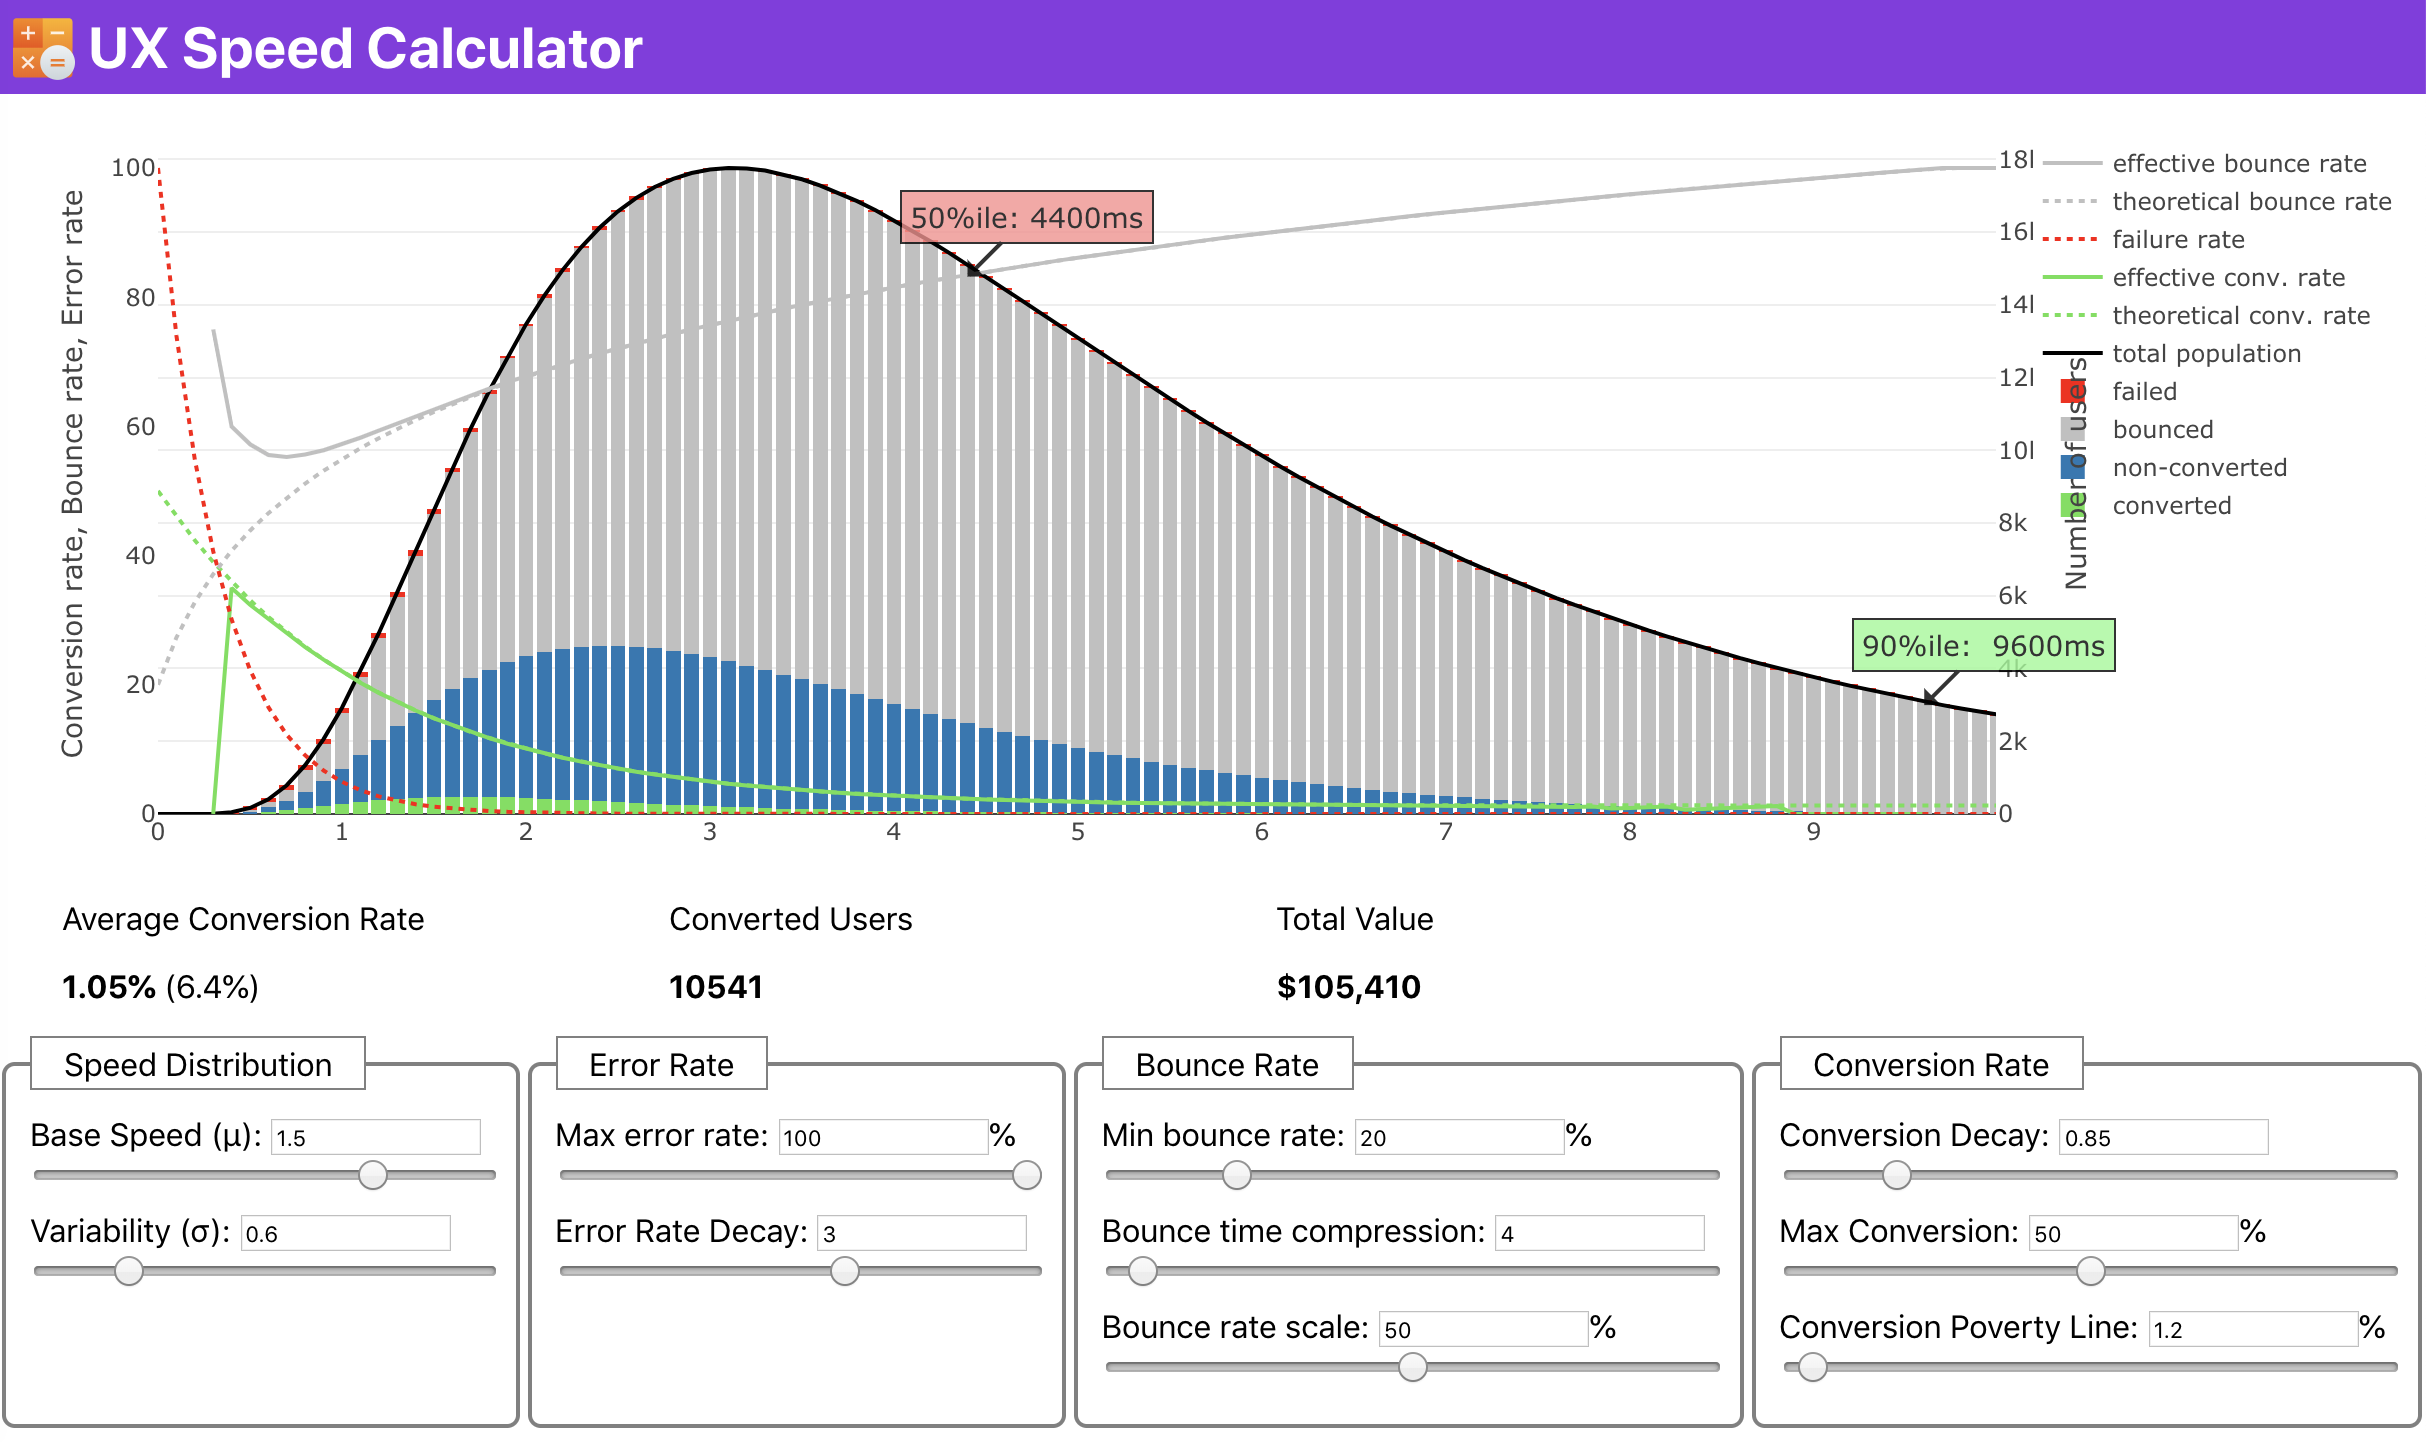
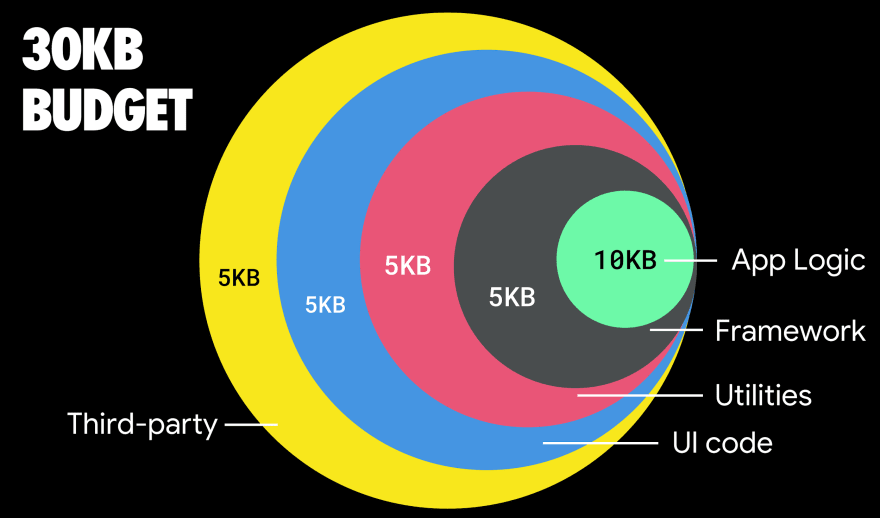
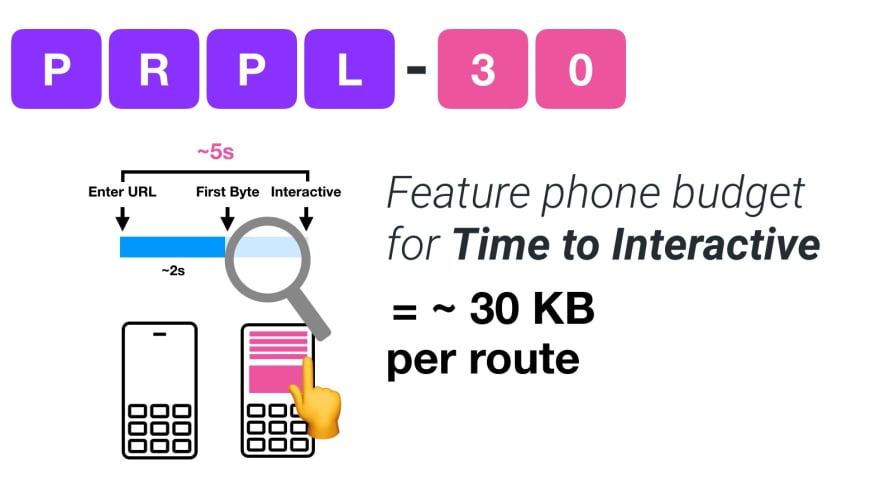
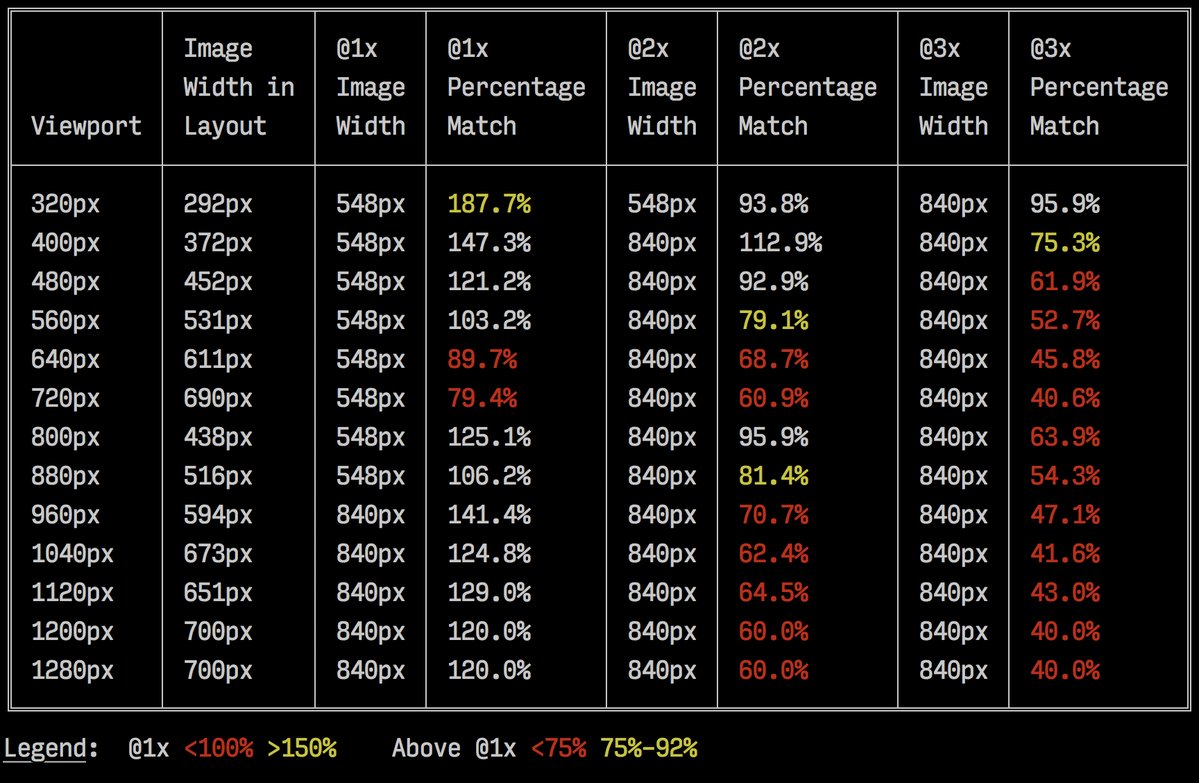
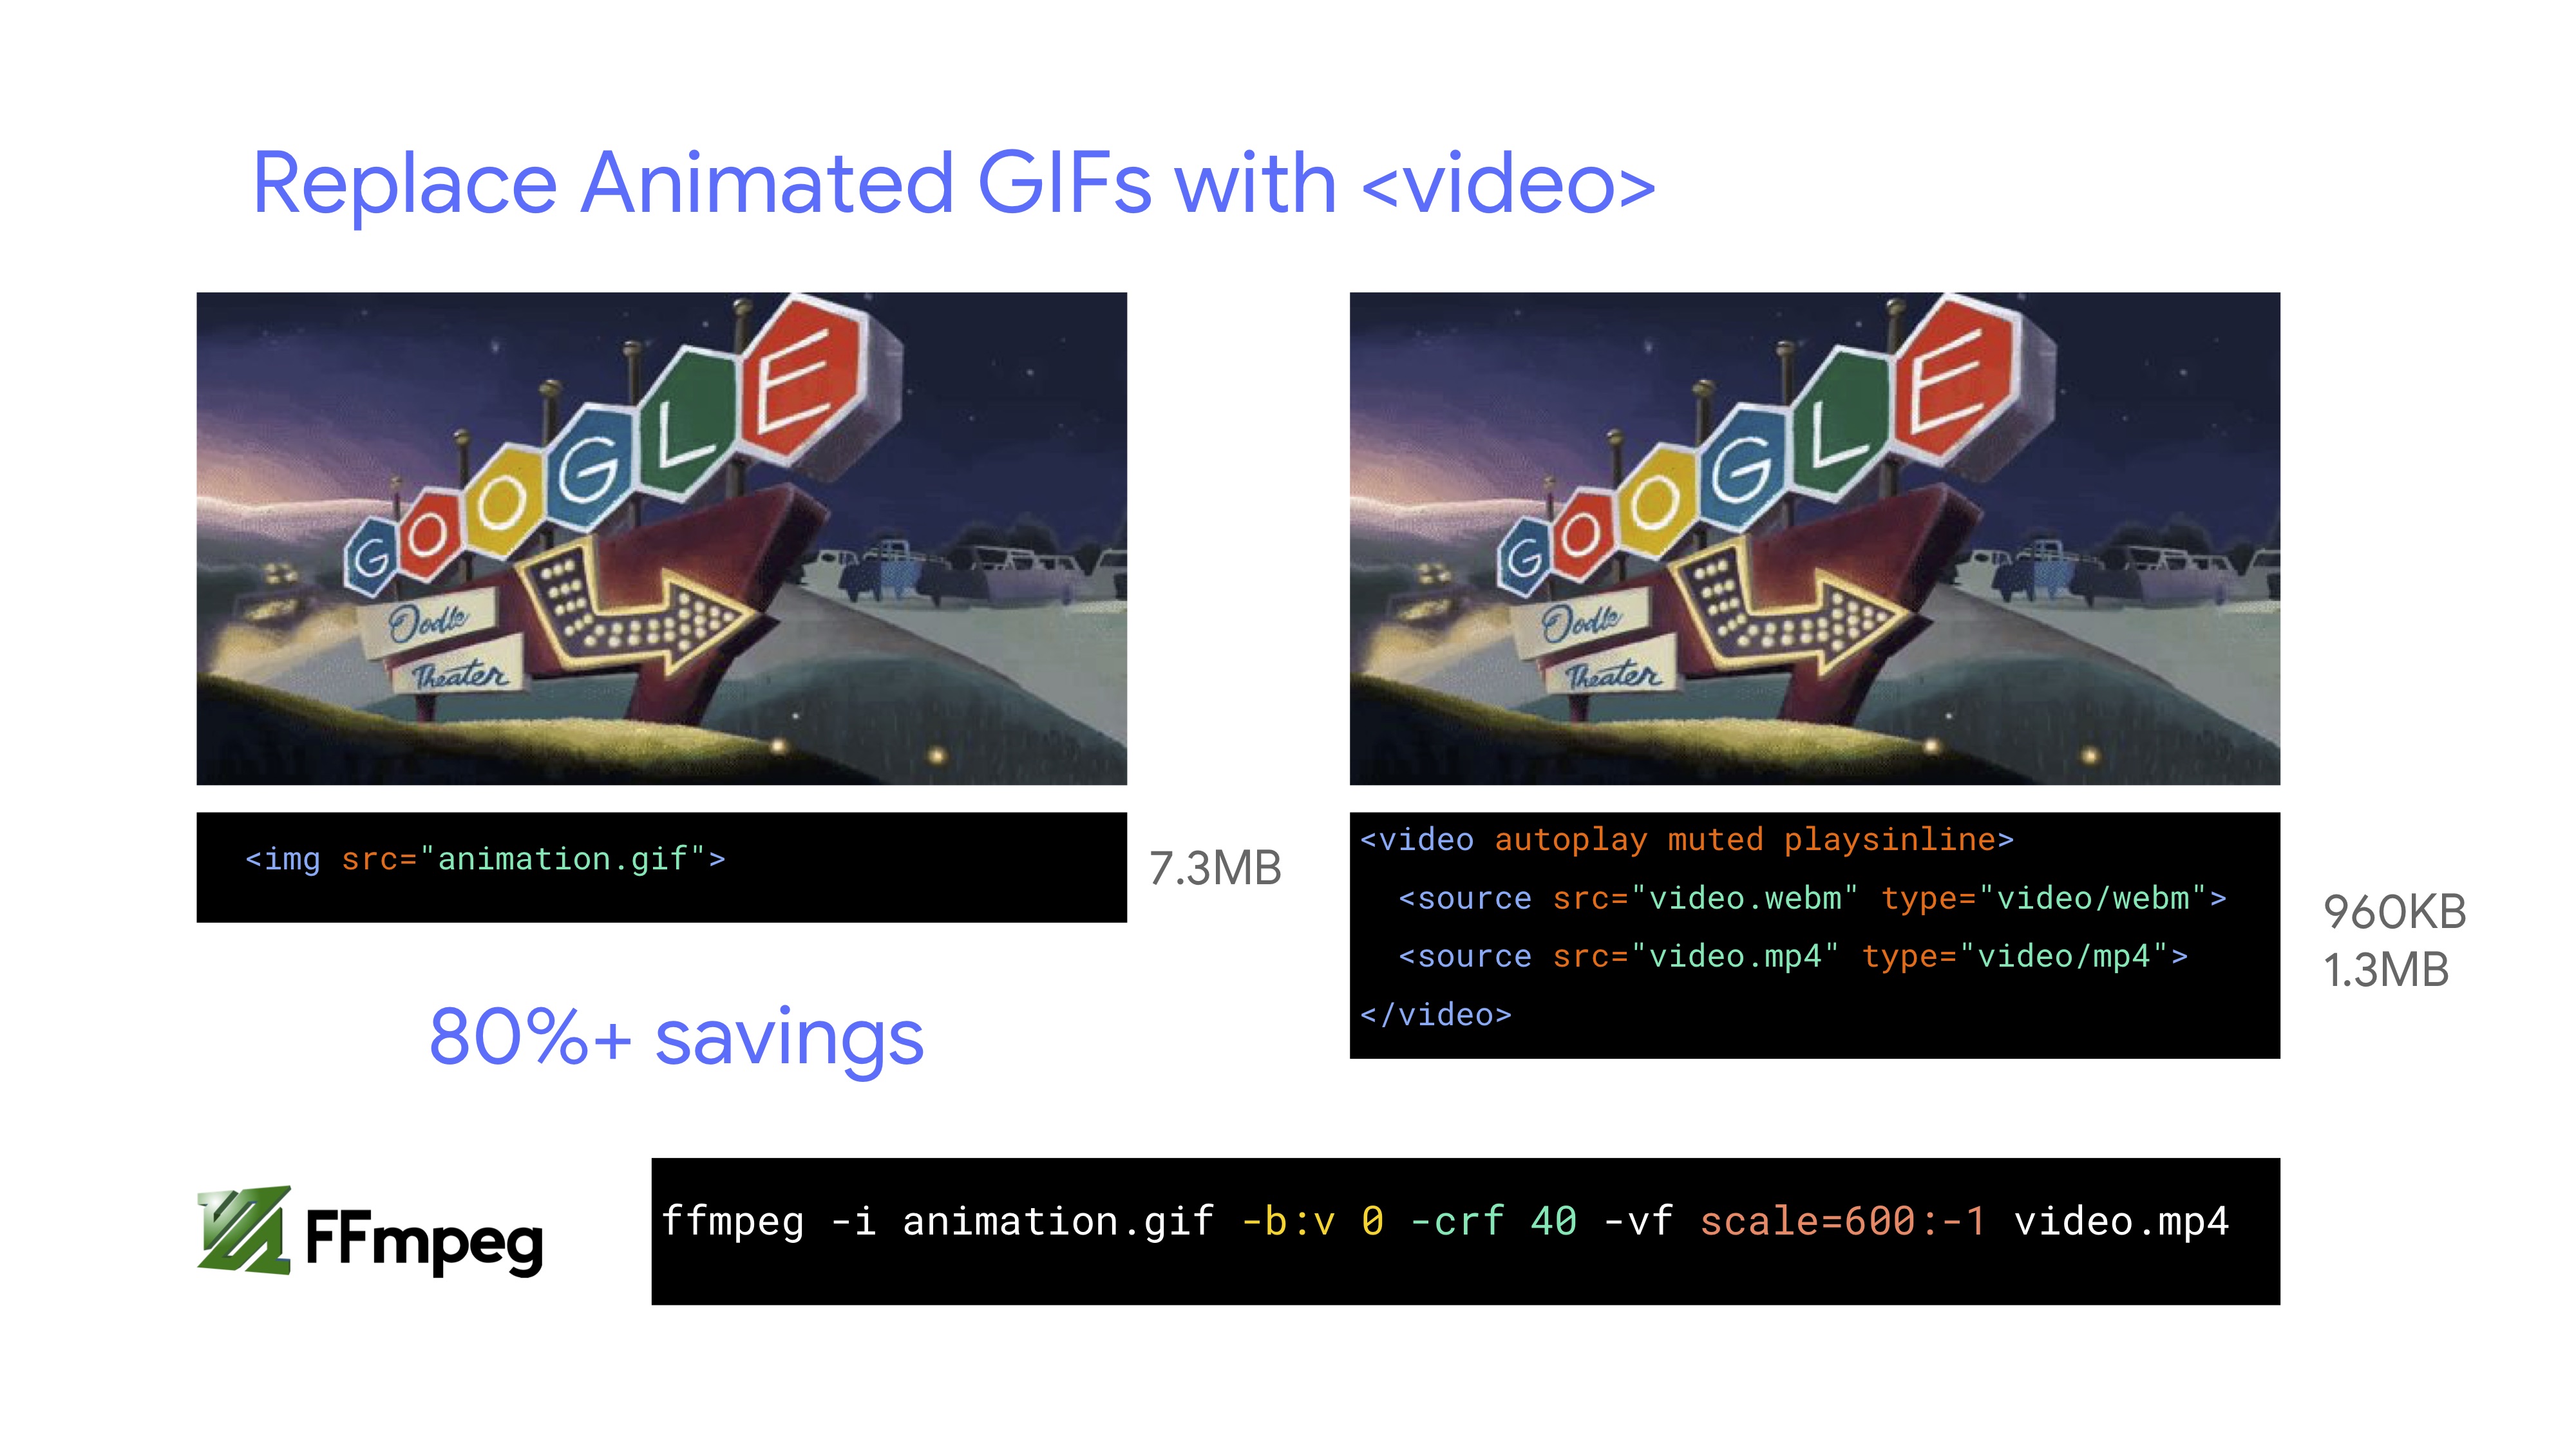
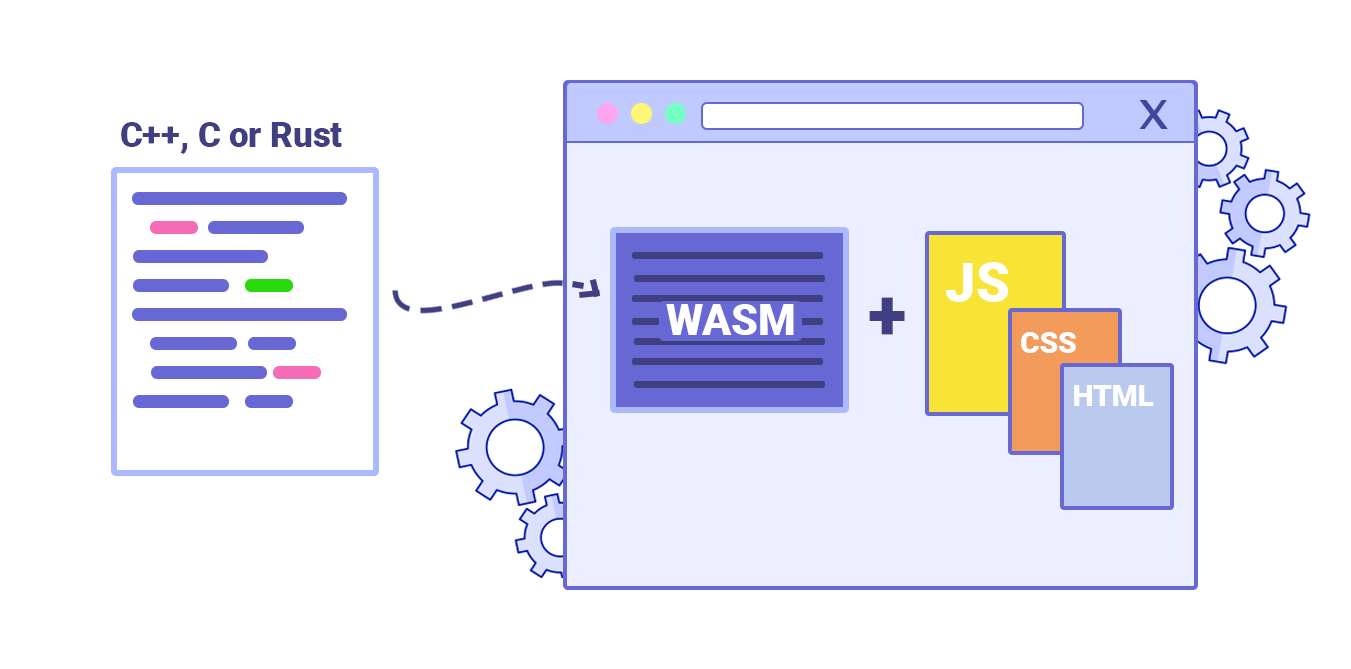
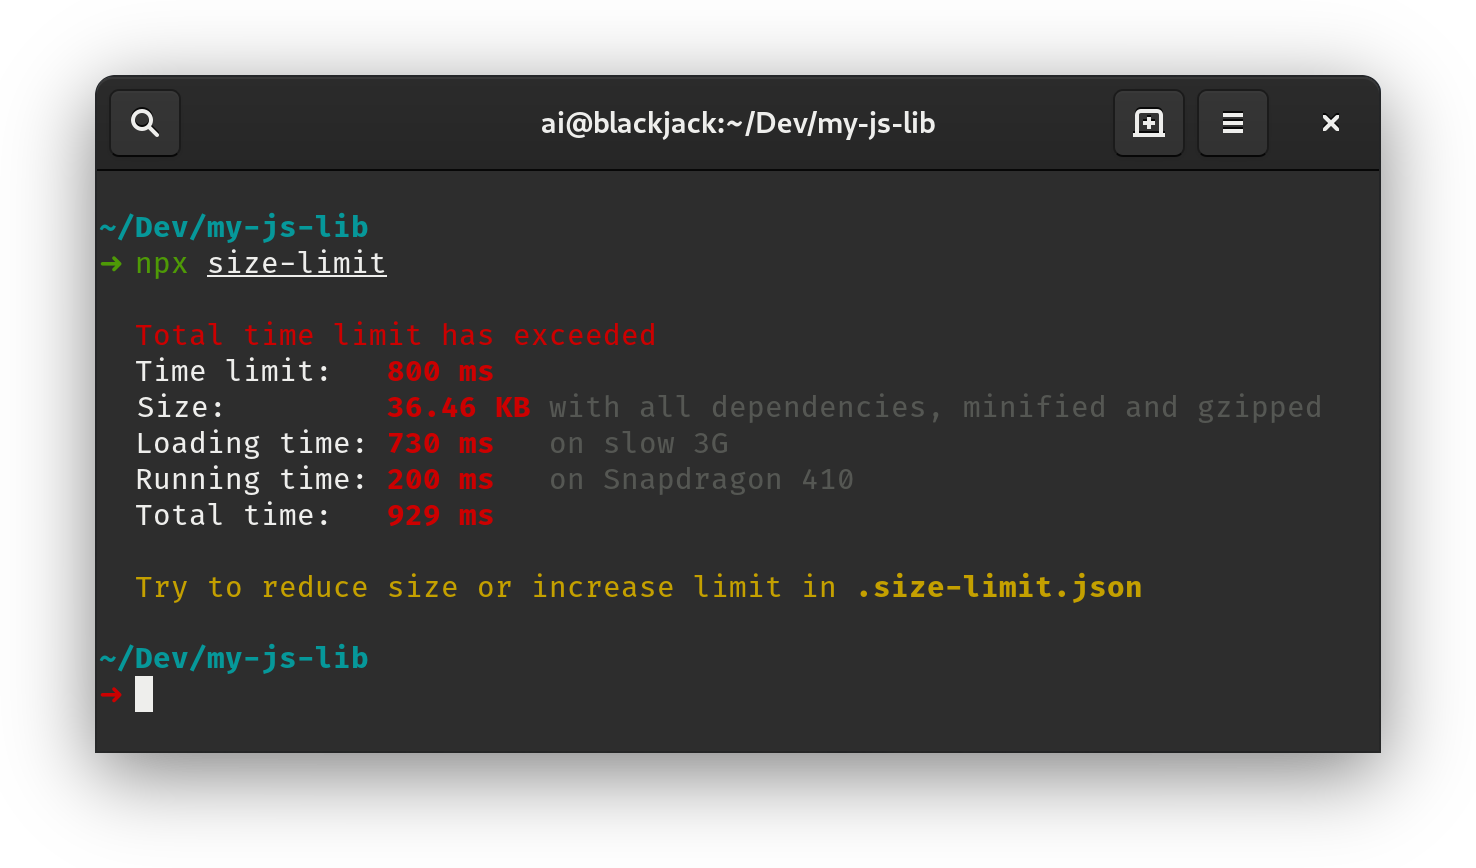
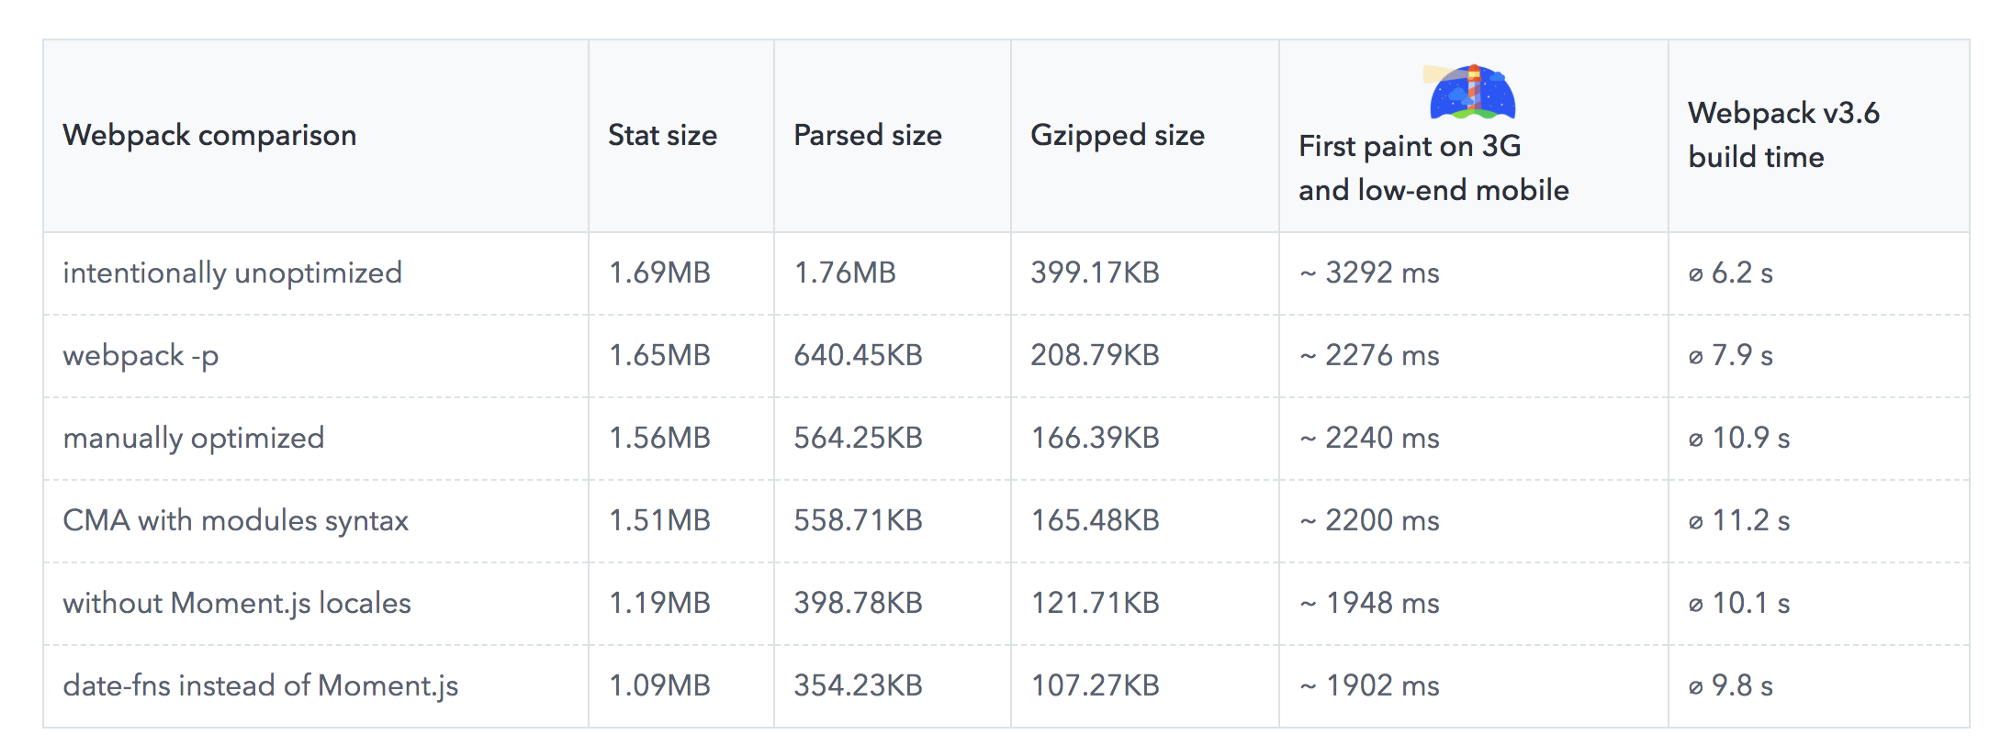
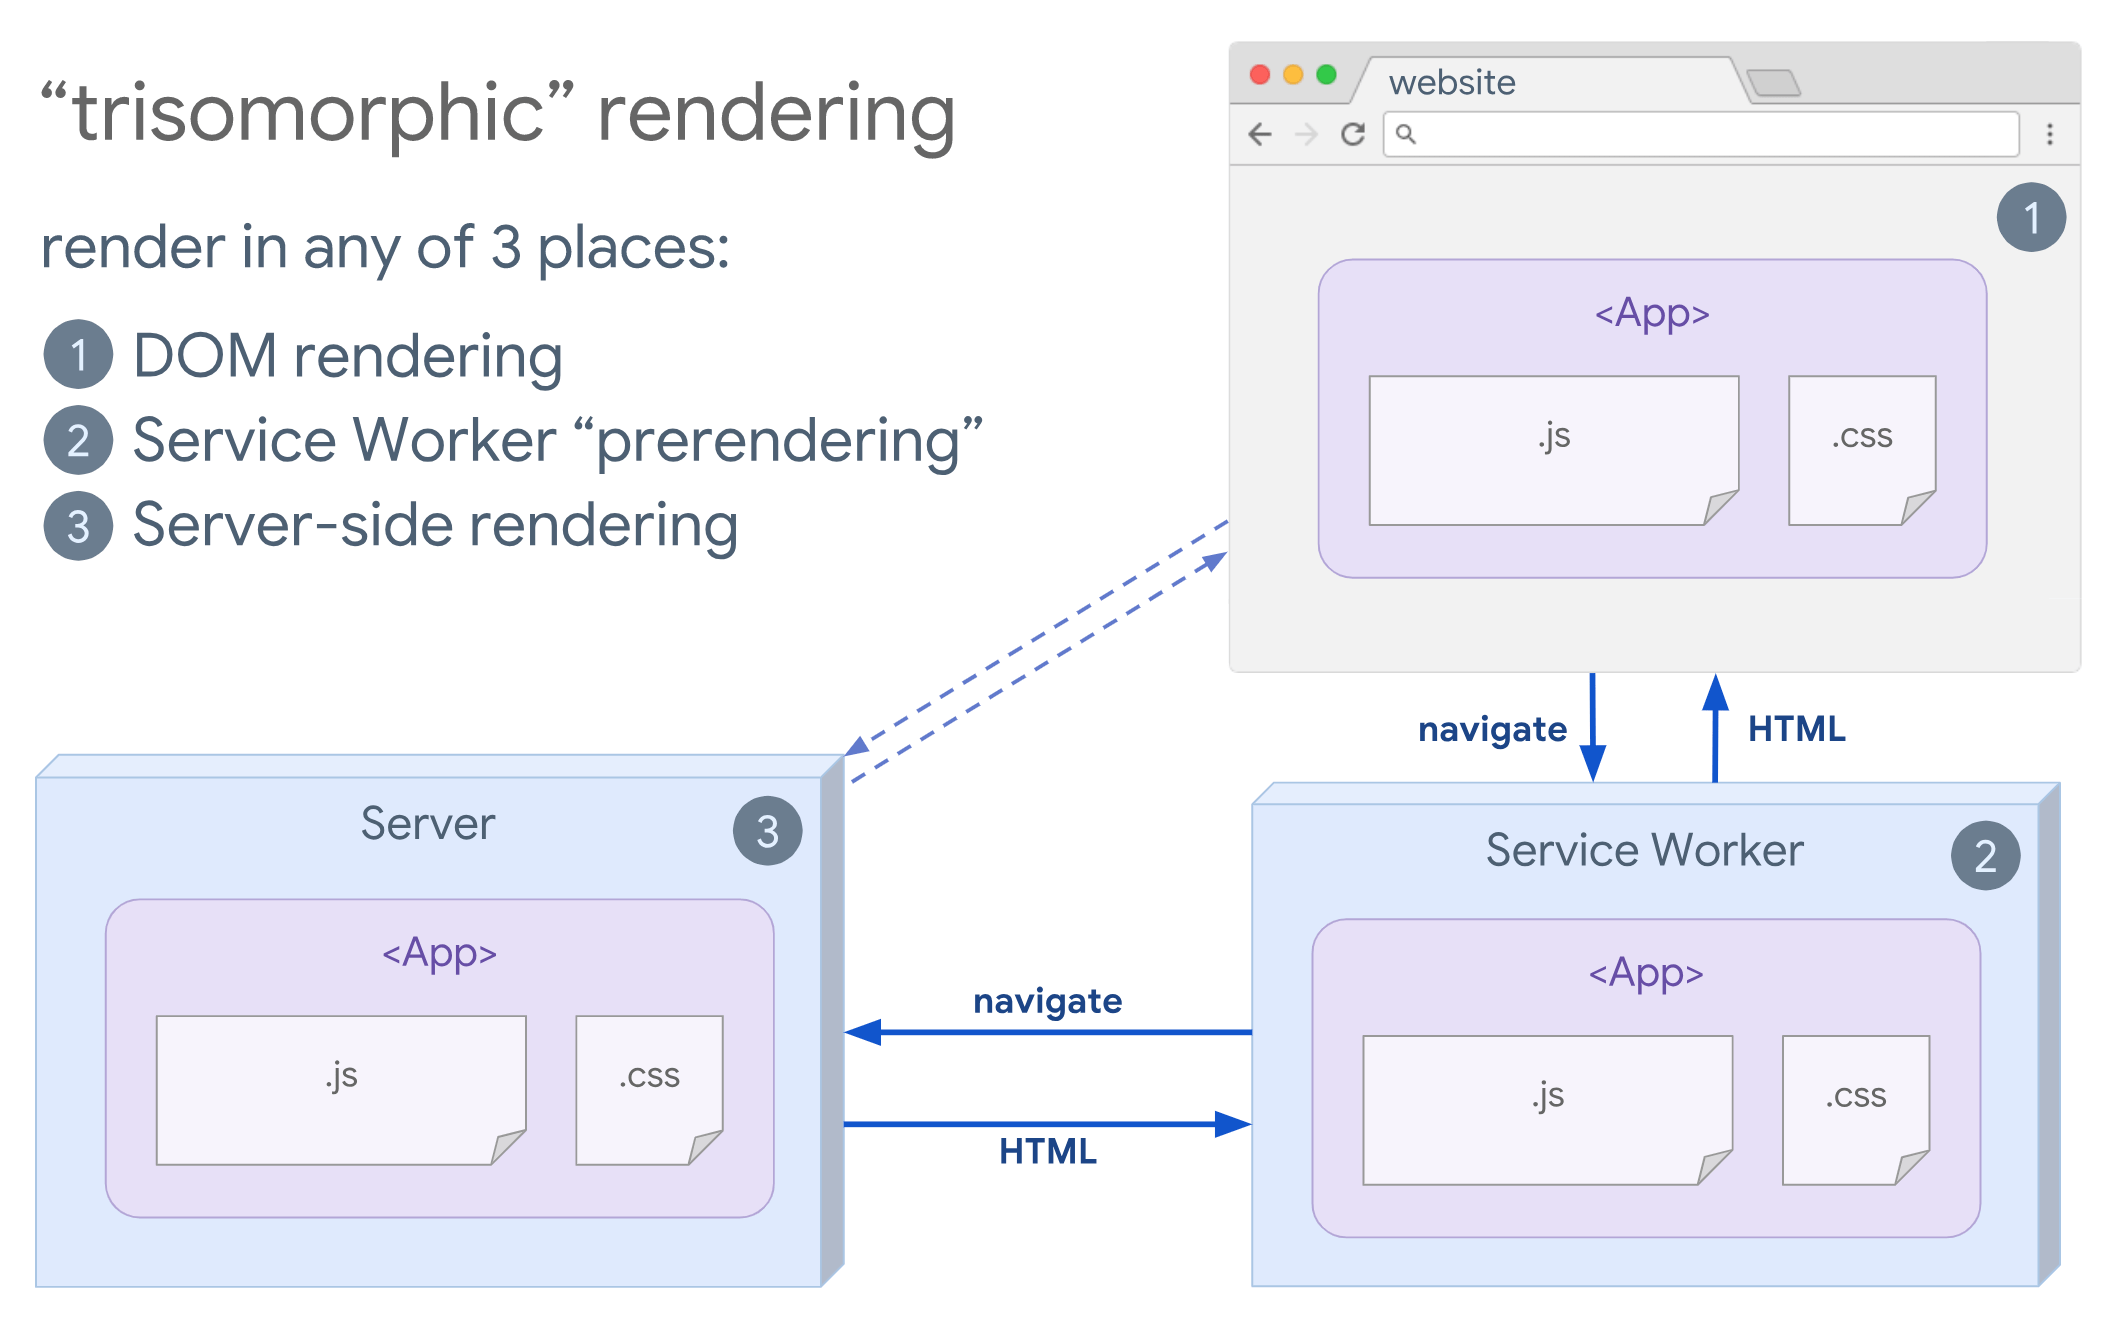

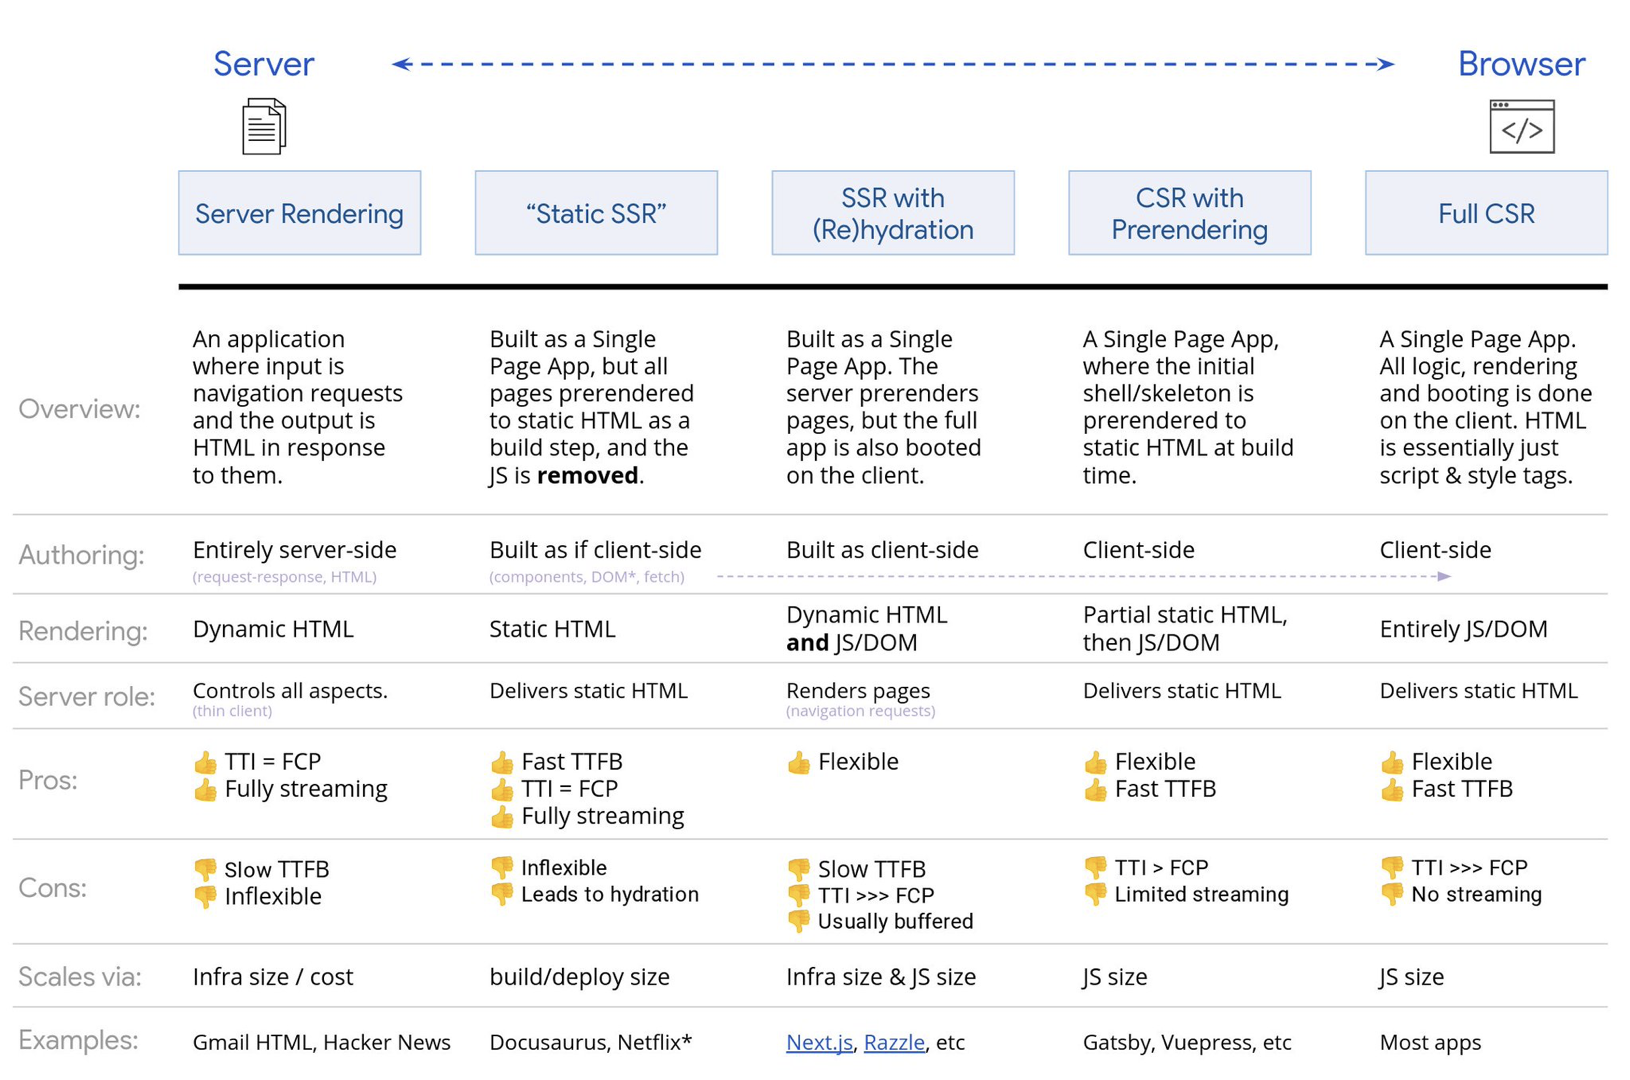

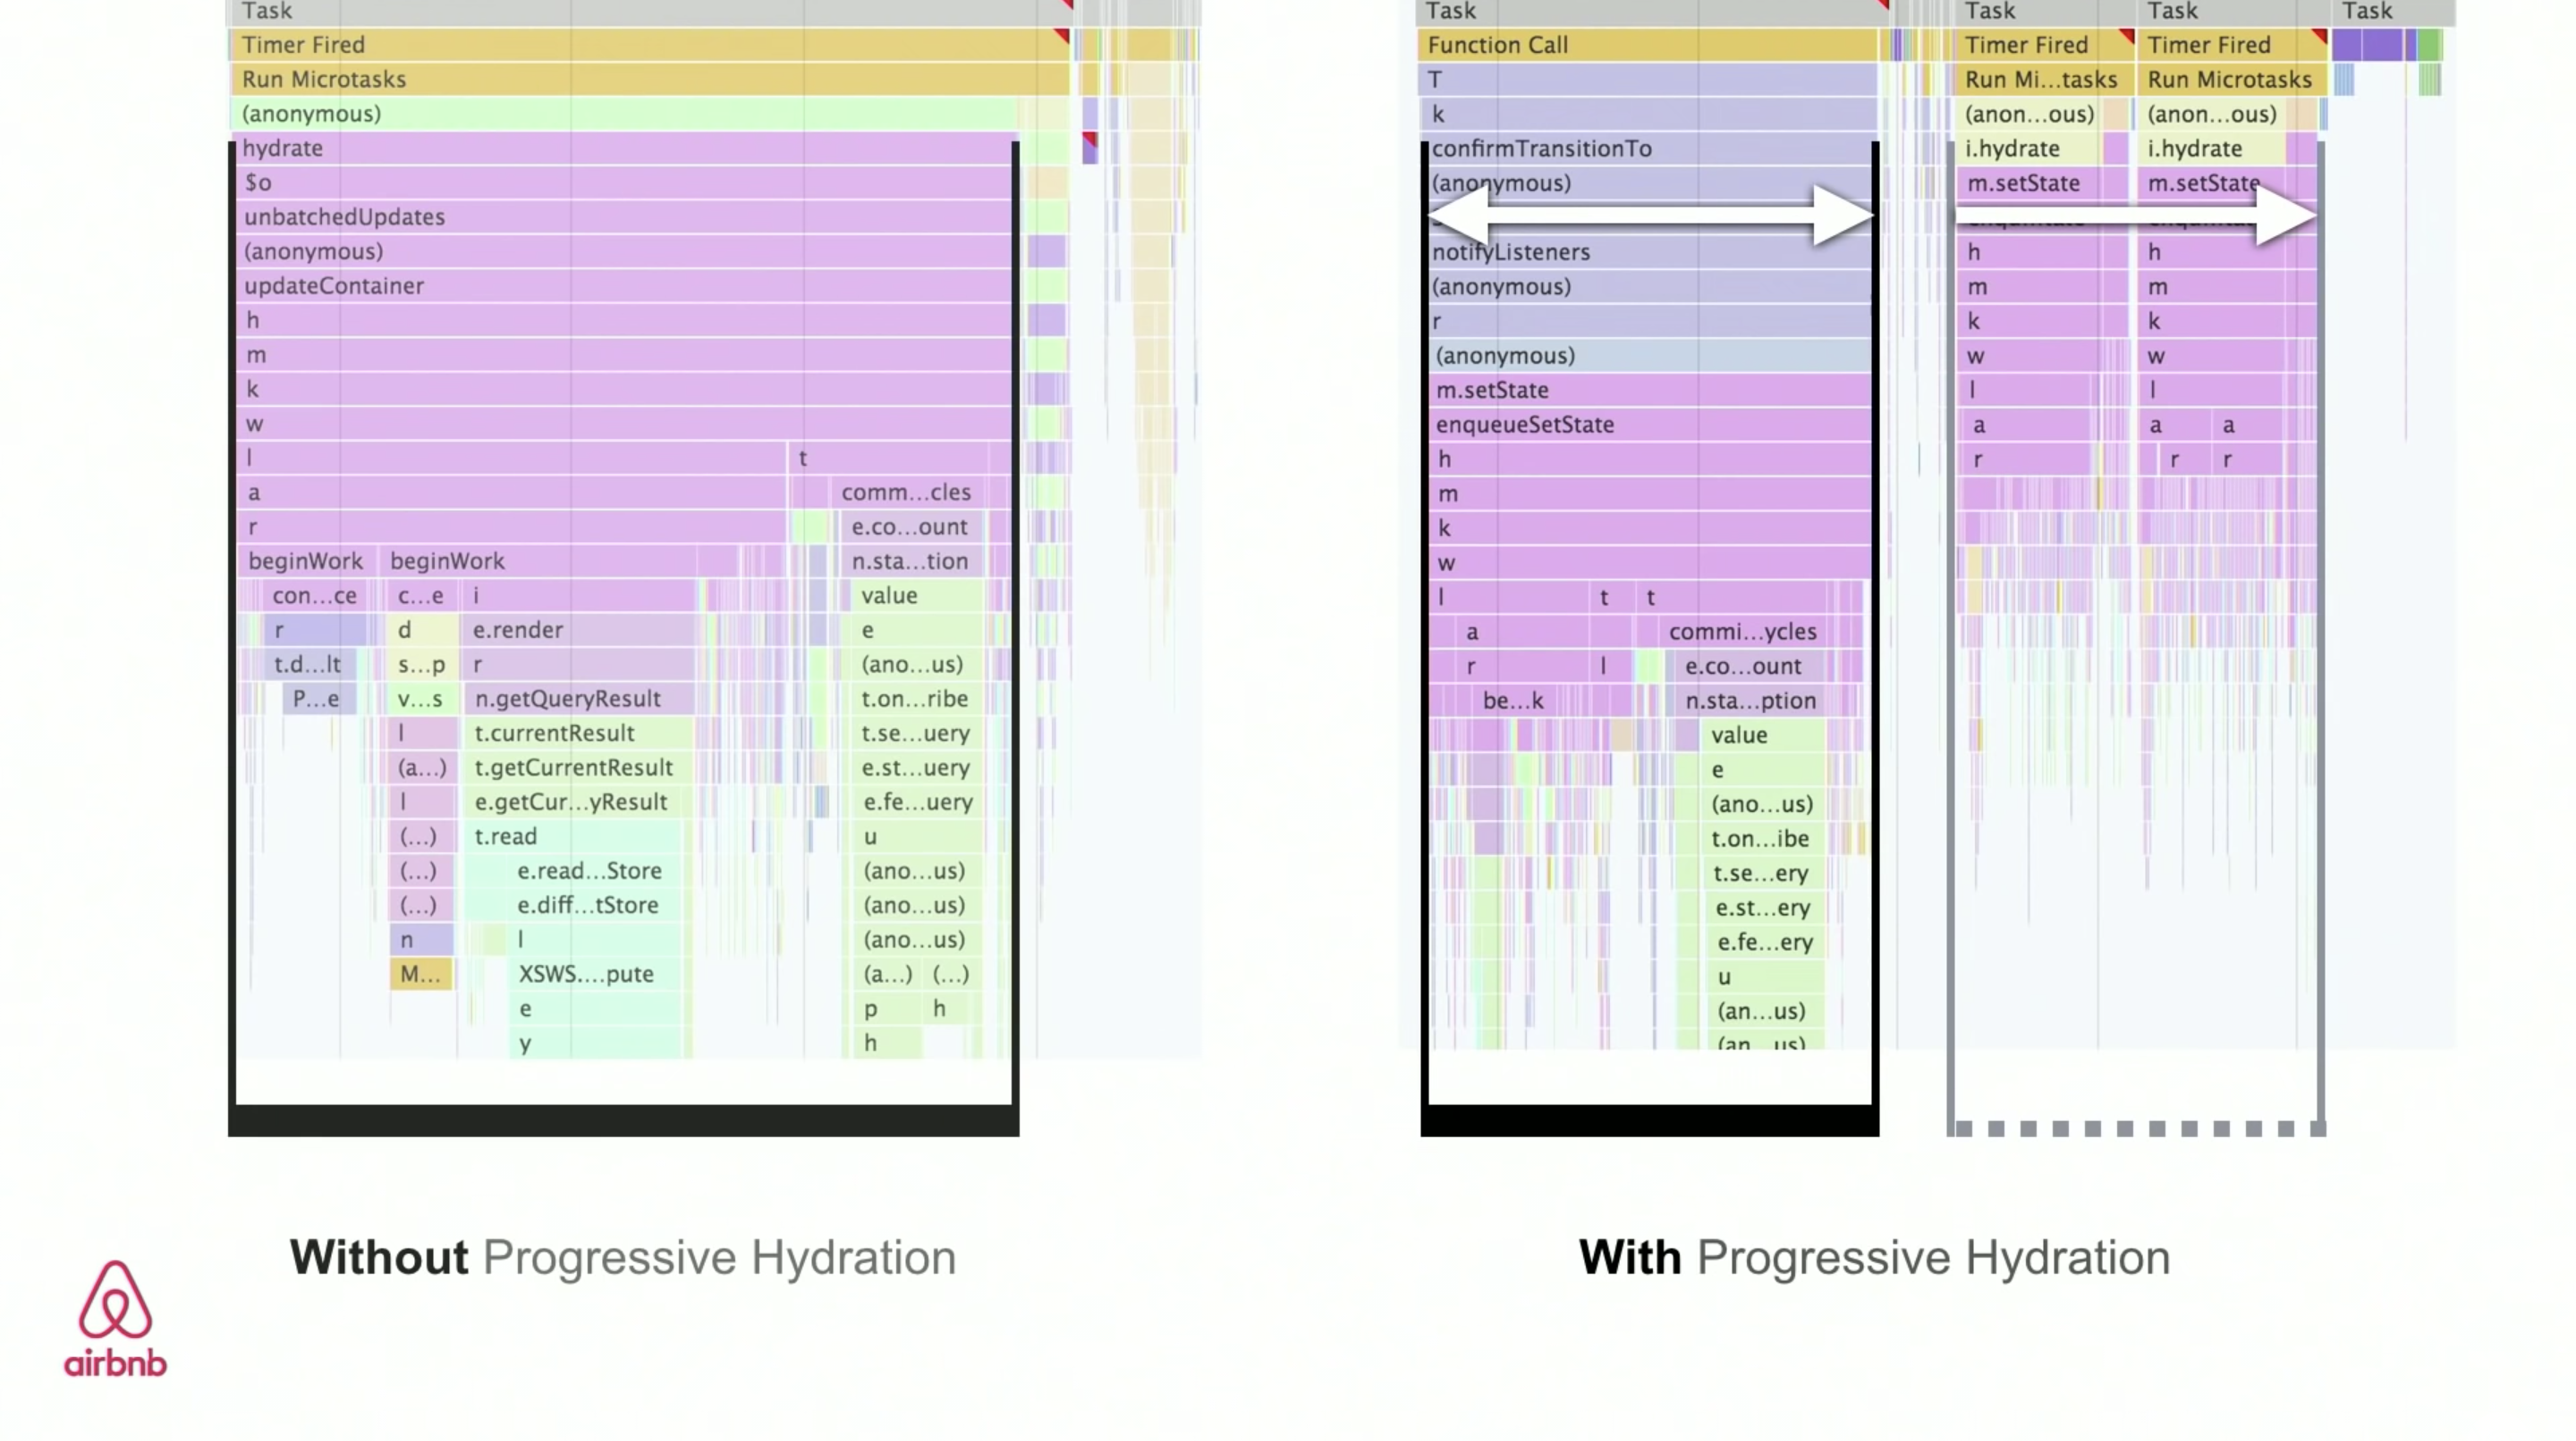
- Always prefer to self-host third-party assets.In general, it’s a good rule of thumb to self-host your static assets by default. It's common to assume that if many sites use the same public CDN and the same version of a JavaScript library or a web font, then the visitors would land on our site with the scripts and fonts already cached in their browser, speeding up their experience considerably. However, it's very unlikely to happen. For security reasons, to avoid fingerprinting, browsers have been implementing partitioned caching that was introduced in Safari back in 2013, and in Chrome last year. So if two sites point to the exact same third-party resource URL, the code is downloaded once per domainand the cache is "sandboxed" to that domain due to privacy implications (thanks, David Calhoun!). Hence, using a public CDN will not automatically lead to better performance. Furthermore, it's worth noting that resources don't live in the browser's cache as long as we might expectand first-party assets are more likely to stay in the cache than third-party assets. Therefore, self-hosting is usually more reliable and secure, and better for performance, too.
- Constrain the impact of third-party scripts.With all performance optimizations in place, often we can’t control third-party scripts coming from business requirements. Third-party-scripts metrics aren’t influenced by end-user experience, so too often one single script ends up calling a long tail of obnoxious third-party scripts, hence ruining a dedicated performance effort. To contain and mitigate performance penalties that these scripts bring along, it’s not enough to just load them asynchronously (probably via defer) and accelerate them via resource hints such as
dns-prefetchorpreconnect. 57% of all JavaScript code excution time is spent on third-party codeso regularly auditing your dependencies and tag managers is important. As Yoav Weiss explained in his must-watch talk on third-party scriptsin many cases these scripts download resources that are dynamic. The resources change between page loads, so we don’t necessarily know which hosts the resources will be downloaded from and what resources they would be. What options do we have then? Consider using service workers by racing the resource download with a timeout and if the resource hasn’t responded within a certain timeout, return an empty response to tell the browser to carry on with parsing of the page. You can also log or block third-party requests that aren’t successful or don’t fulfill certain criteria. If you can, load the 3rd-party-script from your own server rather than from the vendor’s server and lazy load them. E.g. Zendesk has avoided 2.3 MB chat widget on page load by creating a fake chat button which downloads the script only on click because the majority of users don’t engage. Another option is to establish a Content Security Policy (CSP) to restrict the impact of third-party scripts, e.g. disallowing the download of audio or video. The best option is to embed scripts viaso that the scripts are running in the context of the iframe and hence don’t have access to the DOM of the page, and can’t run arbitrary code on your domain. Iframes can be further constrained using thesandboxattribute, so you can disable any functionality that iframe may do, e.g. prevent scripts from running, prevent alerts, form submission, plugins, access to the top navigation, and so on. For example, it’s probably going to be necessary to allow scripts to run with. Each of the limitations can be lifted via variousallowvalues on thesandboxattribute (supported almost everywhere), so constrain them to the bare minimum of what they should be allowed to do. Consider using Intersection Observer; that would enable ads to be iframed while still dispatching events or getting the information that they need from the DOM (e.g. ad visibility). Watch out for new policies such as Feature policyresource size limits and CPU/Bandwidth priority to limit harmful web features and scripts that would slow down the browser, e.g. synchronous scripts, synchronous XHR requests, document.write and outdated implementations. To stress-test third partiesexamine bottom-up summaries in Performance profile page in DevTools, test what happens if a request is blocked or it has timed out — for the latter, you can use WebPageTest’s Blackhole serverblackhole.webpagetest.orgthat you can point specific domains to in yourhostsfile. Preferably self-host and use a single hostnamebut also generate a request map that exposes fourth-party calls and detect when the scripts change. You can use Harry Roberts' approach for auditing third parties and produce spreadsheets like this one. Harry also explains the auditing workflow in his talk on third-party performance and auditing. Have to deal with almighty Google Tag Manager? Barry Pollards provides some guidelines to contain the impact of Google Tag Manager. Also, Christian Schaefer explores strategies for loading ads in 2020.

- Set HTTP cache headers properly.Double-check that
expiresmax-agecache-controland other HTTP cache headers have been set properly. In general, resources should be cacheable either for a very short time (if they are likely to change) or indefinitely (if they are static) — you can just change their version in the URL when needed. UseCache-control: immutabledesigned for fingerprinted static resources, to avoid revalidation (supported in Firefox, Edge and Safari). In fact, according to Web Almanac, "its usage has grown to 3.4%and it’s widely used in Facebook and Google third-party responses." Remember the stale-while-revalidate? As you probably know, we specify the caching time with theCache-Controlresponse header, e.g.Cache-Control: max-age=604800. After 604800 seconds have passed, the cache will re-fetch the requested content, causing the page to load slower. This slowdown can be avoided by usingstale-while-revalidate; it basically defines an extra window of time during which a cache can use a stale asset as long as it revalidates it async in the background. Thus, it "hides" latency (both in the network and on the server) from clients. In June–July 2019, Chrome and Firefox launched support ofstale-while-revalidatein HTTP Cache-Control header, so as a result, it should improve subsequent page load latencies as stale assets are no longer in the critical path. Result: zero RTT for repeat views. You can use Heroku’s primer on HTTP caching headersJake Archibald’s "Caching Best Practices" and Ilya Grigorik’s HTTP caching primer as guides. Also, be wary of the vary headerespecially in relation to CDNsand watch out for the Key header which helps avoiding an additional round trip for validation whenever a new request differs slightly (but not significantly) from prior requests (thanks, Guy!). Also, double-check that you aren’t sending unnecessary headers (e.g.x-powered-bypragmax-ua-compatibleexpiresand others) and that you include useful security and performance headers (such asContent-Security-PolicyX-XSS-ProtectionX-Content-Type-Optionsand others). Finally, keep in mind the performance cost of CORS requests in single-page applications.
Delivery Optimizations
- Do you load all JavaScript libraries asynchronously?When the user requests a page, the browser fetches the HTML and constructs the DOM, then fetches the CSS and constructs the CSSOM, and then generates a rendering tree by matching the DOM and CSSOM. If any JavaScript needs to be resolved, the browser won’t start rendering the page until it’s resolved, thus delaying rendering. As developers, we have to explicitly tell the browser not to wait and to start rendering the page. The way to do this for scripts is with the
deferandasyncattributes in HTML. In practice, it turns out we should preferdefertoasync(at a cost to users of Internet Explorer up to and including version 9, because you’re likely to break scripts for them). According to Steve Soudersonceasyncscripts arrive, they are executed immediately. If that happens very fast, for example when the script is in cache aleady, it can actually block HTML parser. Withdeferbrowser doesn’t execute scripts until HTML is parsed. So, unless you need JavaScript to execute before start render, it’s better to usedefer. Also, as mentioned above, limit the impact of third-party libraries and scripts, especially with social sharing buttons andembeds (such as maps). Size Limit helps you prevent JavaScript libraries bloat: If you accidentally add a large dependency, the tool will inform you and throw an error. You can use static social sharing buttons (such as by SSBG) and static links to interactive maps instead. You might want to revise your non-blocking script loader for CSP compliance. - Lazy load expensive components with IntersectionObserver and priority hints.In general, it’s a good idea to lazy-load all expensive components, such as heavy JavaScript, videos, iframes, widgets, and potentially images. Native lazy-loading is already available for images and iframes, and we can use
importanceattribute (highorlow) on aor element (Blink only). In fact, it’s a great way to deprioritize images in carousels or fectes, as well as re-prioritize scripts. However, sometimes we might need a bit more granular control.The most performant way to do lazy load script is by using the Intersection Observer API that provides a way to asynchronously observe changes in the intersection of a target element with an ancestor element or with a top-level document’s viewport. Basically, you need to create a new
IntersectionObserverobject, which receives a callback function and a set of options. Then we add a target to observe.The callback function executes when the target becomes visible or invisible, so when it intercepts the viewport, you can start taking some actions before the element becomes visible. In fact, we have a granular control over when the observer’s callback should be invoked, with
rootMargin(margin around the root) andthreshold(a single number or an array of numbers which indicate at what percentage of the target’s visibility we are aiming).Alejandro Garcia Anglada has published a handy tutorial on how to actually implement it, Rahul Nanwani wrote a detailed post on lazy-loading foreground and background imagesand Google Fundamentals provide a detailed tutorial on lazy loading images and video with Intersection Observer as well. Remember art-directed storytelling long reads with moving and sticky objects? You can implement performant scrollytelling with Intersection Observertoo.
Also, watch out for the Feature policy: LazyLoad will provide a mechanism that allows us to force opting in or out of LazyLoad functionality on a per-domain basis (similar to how Content Security Policies work).
Check again what else you could lazy load. Even lazy-loading translation strings and emoji could help. By doing so, Mobile Twitter managed to achieve 80% faster JavaScript execution from the new internationalization pipeline.

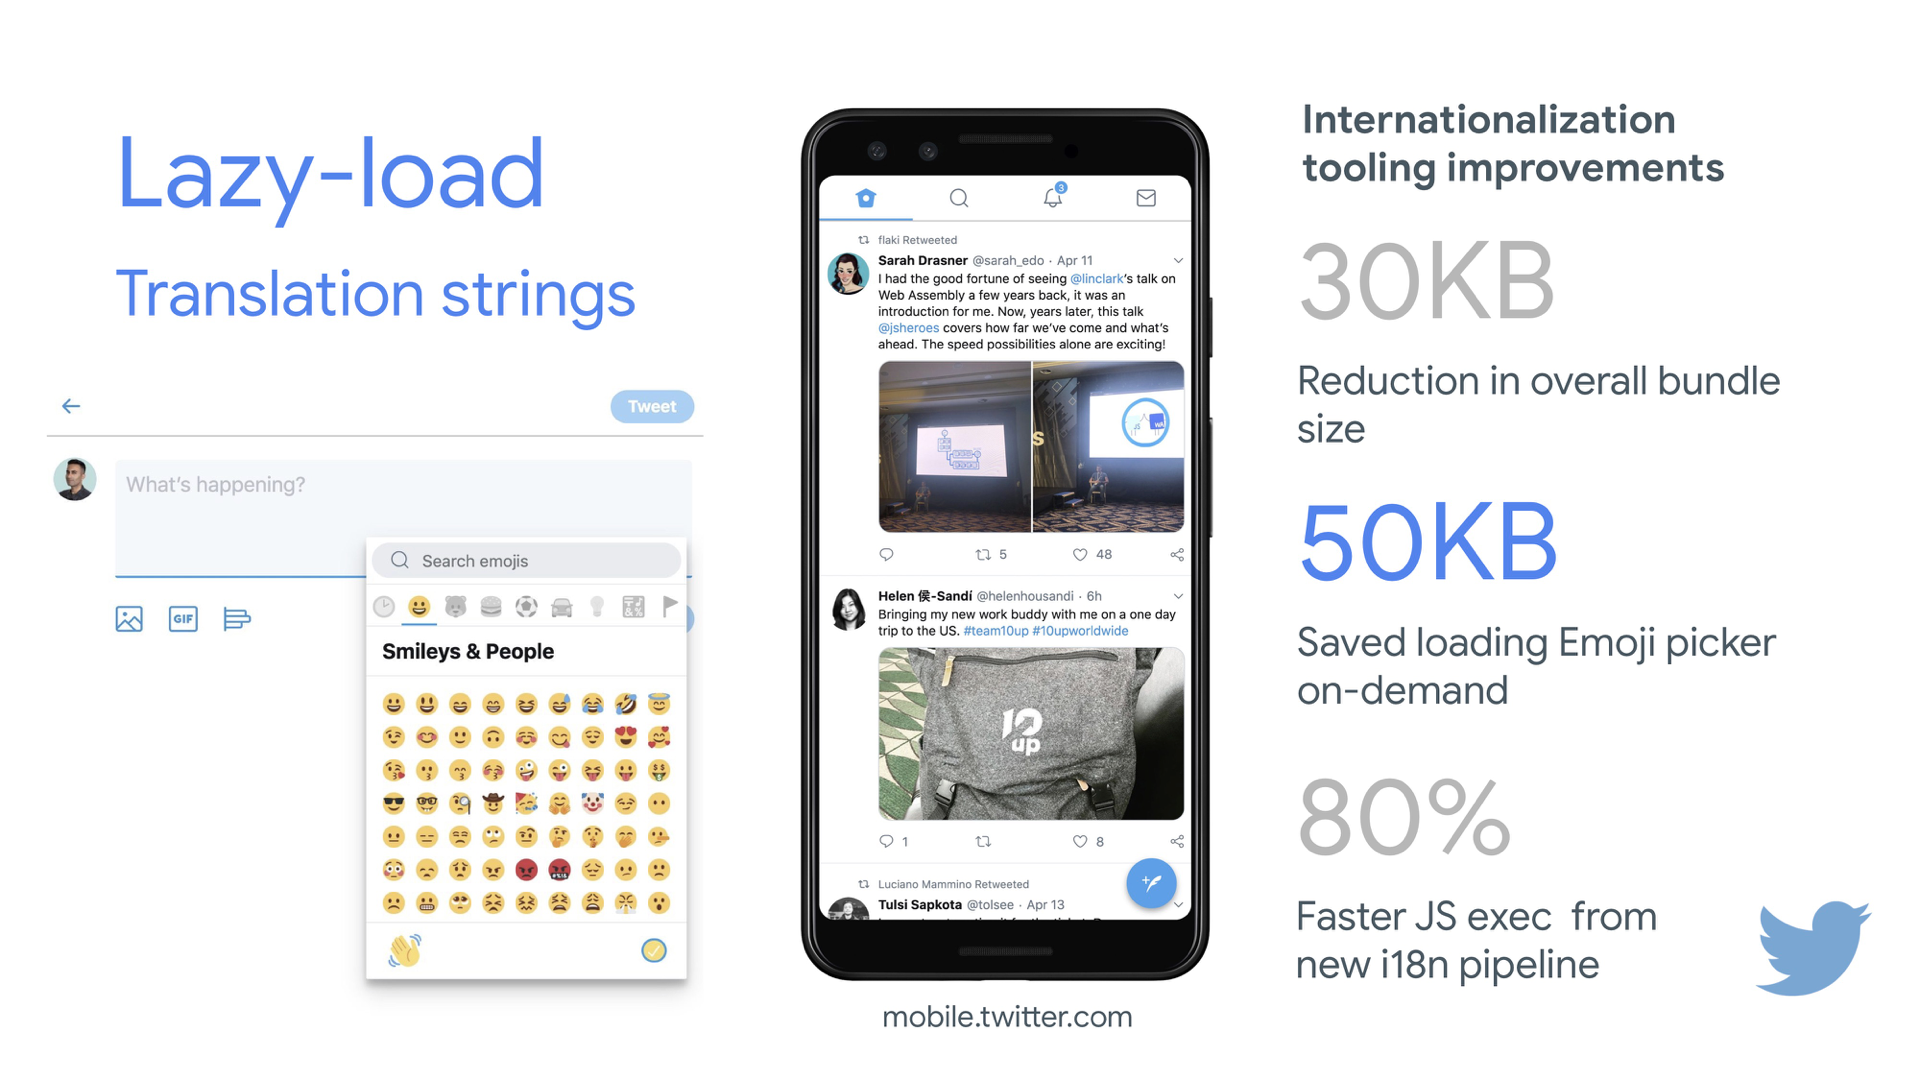
- Load images progressively.
You could even take lazy loading to the next level by adding progressive image loading to your pages. Similarly to Facebook, Pinterest and Medium, you could load low quality or even blurry images first, and then as the page continues to load, replace them with the full quality versions by using the LQIP (Low Quality Image Placeholders) technique proposed by Guy Podjarny.Opinions differ if these techniques improve user experience or not, but it definitely improves time to first meaningful paint. We can even automate it by using SQIP that creates a low quality version of an image as an SVG placeholder, or Gradient Image Placeholders with CSS linear gradients. These placeholders could be embedded within HTML as they naturally compress well with text compression methods. In his article, Dean Hume has described how this technique can be implemented using Intersection Observer.
Browser support? Decentwith Chrome, Firefox, Edge and Samsung Internet being on board. WebKit status is currently supported in preview. Fallback? If the browser doesn’t support intersection observer, we can still lazy load a polyfill or load the images immediately. And there is even a library for it.
Want to go fancier? You could trace your images and use primitive shapes and edges to create a lightweight SVG placeholder, load it first, and then transition from the placeholder vector image to the (loaded) bitmap image.
- Do you send critical CSS?
To ensure that browsers start rendering your page as quickly as possible, it’s become a common practice to collect all of the CSS required to start rendering the first visible portion of the page (known as "critical CSS" or "above-the-fold CSS") and add it inline in theof the page, thus reducing roundtrips. Due to the limited size of packages exchanged during the slow start phase, your budget for critical CSS is around 14KB. (This specific limitation doesn't apply with TCP BBR in place although it's still important to prioritize critical resources and load them as early as possible).If you go beyond that, the browser will need additional roundtrips to fetch more styles. CriticalCSS and Critical enable you to discover critical CSS. You might need to do it for every template you’re using.
You can then inline critical CSS and lazy-load the rest with critters Webpack plugin. If possible, consider using the conditional inlining approach used by the Filament Group, or convert inline code to static assets on the fly.
If you load your full CSS asynchronously with libraries such as loadCSSit’s not really necessary. With
media="print"onlinkyou can trick browser into fetching the CSS asynchronously but applying to the screen environment once it loads. (thanks, Scott!)With HTTP/2, critical CSS could be stored in a separate CSS file and delivered via a server push without bloating the HTML. The catch is that server pushing is troublesome with many gotchas and race conditions across browsers. It isn’t supported consistently and has some caching issues (see slide 114 onwards of Hooman Beheshti’s presentation). The effect could, in fact, be negative and bloat the network buffers, preventing genuine frames in the document from being delivered. Also, it appears that server pushing is much more effective on warm connections due to the TCP slow start.
Even with HTTP/1, putting critical CSS (and other important assets) in a separate file on the root domain has benefitssometimes even more than inlining due to caching. Chrome speculatively opens a second HTTP connection to the root domain when requesting the page, which removes the need for a TCP connection to fetch this CSS (thanks, Philip!)
A few gotchas to keep in mind: unlike
preloadthat can trigger preload from any domain, you can only push resources from your own domain or domains you are authoritative for. It can be initiated as soon as the server gets the very first request from the client. Server-pushed resources land in the Push cache and are removed when the connection is terminated. However, since an HTTP/2 connection can be re-used across multiple tabs, pushed resources can be claimed by requests from other tabs as well. We can't depend on it thoughespecially in Safari and Edge (thanks, Inian, Barry!).At the moment, there is no simple way for the server to know if pushed resources are already in one of the user’s cachesso resources will keep being pushed with every user’s visit. You may then need to create a cache-aware HTTP/2 server push mechanism. If fetched, you could try to get them from a cache based on the index of what’s already in the cache, avoiding secondary server pushes altogether.
For a while, the
cache-digestspecification was considered to help negate the need to manually build such "cache-aware" servers, basically declaring a new frame type in HTTP/2 to communicate what’s already in the cache for that hostname. However,cache-digestspec was abandonedso the solution isn't quite in sight yet. (thanks, Barry!).For dynamic content, when a server needs some time to generate a response, the browser isn’t able to make any requests since it’s not aware of any sub-resources that the page might reference. For that case, we can warm up the connection and increase the TCP congestion window size, so that future requests can be completed faster. Also, all inlined assets are usually good candidates for server pushing. In fact, Inian Parameshwaran did remarkable research comparing HTTP/2 Push vs. HTTP Preloadand it’s a fantastic read with all the details you might need.
Bottom line: As Sam Saccone noted
preloadis good for moving the start download time of an asset closer to the initial request, while Server Push is good for cutting out a full RTT (or moredepending on your server think time) — if you have a service worker to prevent unnecessary pushing, that is. - Experiment with regrouping your CSS rules.
We’ve got used to critical CSS, but there are a few optimizations that could go beyond that. Harry Roberts conducted a remarkable research with quite surprising results. For example, it might be a good idea to split the main CSS file out into its individual media queries. That way, the browser will retrieve critical CSS with high priority, and everything else with low priority — completely off the critical path.Also, avoid placing
beforeasyncsnippets. If scripts don’t depend on stylesheets, consider placing blocking scripts above blocking styles. If they do, split that JavaScript in two and load it either side of your CSS.Scott Jehl solved another interesting problem by caching an inlined CSS file with a service workera common problem familiar if you’re using critical CSS. Basically, we add an ID attribute onto the
styleelement so that it’s easy to find it using JavaScript, then a small piece of JavaScript finds that CSS and uses the Cache API to store it in a local browser cache (with a content type oftext/css) for use on subsequent pages. To avoid inlining on subsequent pages and instead reference the cached assets externally, we then set a cookie on the first visit to a site. Voilà!It's worth noting that dynamic styling can be expensivetoo, but usually only in cases when you rely on hundreds of concurrently rendered composed components. So if you're using CSS-in-JS, make sure that your CSS-in-JS library optimizes the execution when your CSS has no dependencies on theme or props, and don't over-compose styled components. Aggelos Arvanitakis shares more insights into performance costs of CSS-in-JS.

- Do you stream responses?
Often forgotten and neglected, streams provide an interface for reading or writing asynchronous chunks of data, only a subset of which might be available in memory at any given time. Basically, they allow the page that made the original request to start working with the response as soon as the first chunk of data is available, and use parsers that are optimized for streaming to progressively display the content.We could create one stream from multiple sources. For example, instead of serving an empty UI shell and letting JavaScript populate it, you can let the service worker construct a stream where the shell comes from a cache, but the body comes from the network. As Jeff Posnick notedif your web app is powered by a CMS that server-renders HTML by stitching together partial templates, that model translates directly into using streaming responses, with the templating logic replicated in the service worker instead of your server. Jake Archibald’s The Year of Web Streams article highlights how exactly you could build it. Performance boost is quite noticeable.
One important advantage of streaming the entire HTML response is that HTML rendered during the initial navigation request can take full advantage of the browser’s streaming HTML parser. Chunks of HTML that are inserted into a document after the page has loaded (as is common with content populated via JavaScript) can’t take advantage of this optimization.
Browser support? Getting there with partial support in Chrome, Firefox, Safari and Edge supporting the API and Service Workers being supported in all modern browsers.
- Consider making your components connection-aware.
Data can be expensive and with growing payload, we need to respect users who choose to opt into data savings while accessing our sites or apps. The Save-Data client hint request header allows us to customize the application and the payload to cost- and performance-constrained users. In fact, you could rewrite requests for high DPI images to low DPI imagesremove web fonts, fancy parallax effects, preview thumbnails and infinite scroll, turn off video autoplay, server pushes, reduce the number of displayed items and downgrade image quality, or even change how you deliver markup. Tim Vereecke has published a very detailed article on data-s(h)aver strategies featuring many options for data saving.The header is currently supported only in Chromium, on the Android version of Chrome or via the Data Saver extension on a desktop device. Finally, you can also use the Network Information API to deliver low/high resolution images and videos based on the network type. Network Information API and specifically
navigator.connection.effectiveTypeuseRTTdownlinkeffectiveTypevalues (and a few others) to provide a representation of the connection and the data that users can handle.In this context, Max Stoiber speaks of connection-aware components and Addy Osmani speaks of adaptive module serving. For example, with React, we could write a component that renders differently for different connection types. As Max suggested, a component in a news article might output:
Offline: a placeholder withalttext,2G/save-datamode: a low-resolution image,3Gon non-Retina screen: a mid-resolution image,3Gon Retina screens: high-res Retina image,4G: an HD video.
Dean Hume provides a practical implementation of a similar logic using a service worker. For a video, we could display a video poster by default, and then display the "Play" icon as well as the video player shell, meta-data of the video etc. on better connections. As a fallback for non-supporting browsers, we could listen to
canplaythroughevent and usePromise.race()to timeout the source loading if thecanplaythroughevent doesn’t fire within 2 seconds.If you want to dive in a bit deeper, here are a couple of resources to get started:
- Consider making your components device memory-aware.
Network connection gives us only one perspective at the context of the user though. Going further, you could also dynamically adjust resources based on available device memorywith the Device Memory API.navigator.deviceMemoryreturns how much RAM the device has in gigabytes, rounded down to the nearest power of two. The API also features a Client Hints Header,Device-Memorythat reports the same value.Bonus: Umar Hansa shows how to defer expensive scripts with dynamic imports to change the experience based on device memory, network connectivity and hardware concurrency .

- Warm up the connection to speed up delivery.
Use resource hints to save time ondns-prefetch(which performs a DNS lookup in the background),preconnect(which asks the browser to start the connection handshake (DNS, TCP, TLS) in the background),prefetch(which asks the browser to request a resource) andpreload(which prefetches resources without executing them, among other things).Remember
prerender? The resource hint used to prompt browser to build out the entire page in the background for next navigation. The implementations issues were quite problematicranging from a huge memory footprint and bandwidth usage to multiple registered analytics hits and ad impressions.Unsurprinsingly, it was deprecated, but the Chrome team has brought it back as NoState Prefetch mechanism. In fact, Chrome treats the
prerenderhint as a NoState Prefetch instead, so we can use it today. As Katie Hempenius explains in that article, "like prerendering, NoState Prefetch fetches resources in advance; but unlike prerendering, it does not execute JavaScript or render any part of the page in advance." NoState Prefetch only uses ~45MiB of memory and subresources that are fetched will be fetched with anIDLENet Priority. Since Chrome 69, NoState Prefetch adds the header Purpose: Prefetch to all requests in order to make them distinguishable from normal browsing.Most of the time these days, we’ll be using at least
preconnectanddns-prefetchand we’ll be cautious with usingprefetchpreloadandprerender; the former should only be used if you are confident about what assets the user will need next (for example, in a purchasing funnel).Note that even with
preconnectanddns-prefetchthe browser has a limit on the number of hosts it will look up/connect to in parallel, so it’s a safe bet to order them based on priority (thanks Philip Tellis!).In fact, using resource hints is probably the easiest way to boost performance, and it works well indeed. When to use what? As Addy Osmani has explainedit's a good idea to preload resources that we have high-confidence will be used on the current page. Prefetch resources likely to be used for future navigations across multiple navigation boundaries, e.g. Webpack bundles needed for pages the user hasn’t visited yet.
Addy’s article on "Loading Priorities in Chrome" shows how exactly Chrome interprets resource hints, so once you’ve decided which assets are critical for rendering, you can assign high priority to them. To see how your requests are prioritized, you can enable a "priority" column in the Chrome DevTools network request table (as well as Safari).

(Image credit: Pat Meenan) (Large preview) Since fonts usually are important assets on a page, sometimes it's a good idea to request the browser to download critical fonts with
preload. However, double check if it actually helps performance as there is a puzzle of priorities when preloading fonts: aspreloadis seen as high importance, it can leapfrog even more critical resources like critical CSS. (thanks, Barry!)You could also load JavaScript dynamicallyeffectively lazy-loading execution. Also, since
accepts amediaattribute, you could choose to selectively prioritize resources based on@mediaquery rules.A few gotchas to keep in mind:
preloadis good for moving the start download time of an asset closer to the initial request, but preloaded assets land in the memory cache which is tied to the page making the request.preloadplays well with the HTTP cache: a network request is never sent if the item is already there in the HTTP cache.Hence, it’s useful for late-discovered resources, a hero image loaded via background-image, inlining critical CSS (or JavaScript) and pre-loading the rest of the CSS (or JavaScript). Also, a
preloadtag can initiate a preload only after the browser has received the HTML from the server and the lookahead parser has found thepreloadtag.Preloading via the HTTP header could be a bit faster since we don’t to wait for the browser to parse the HTML to start the request (it's debated though). Early Hints will help even further, enabling preload to kick in even before the response headers for the HTML are sent (on the roadmap in ChromiumFirefox). Plus, Priority Hints will help us indicate loading priorities for scripts.
Beware: if you’re using
preloadasmust be defined or nothing loadsplus preloaded fonts without thecrossoriginattribute will double fetch. - Use service workers for caching and network fallbacks.
No performance optimization over a network can be faster than a locally stored cache on a user’s machine. If your website is running over HTTPS, use the "Pragmatist’s Guide to Service Workers" to cache static assets in a service worker cache and store offline fallbacks (or even offline pages) and retrieve them from the user’s machine, rather than going to the network. Also, check Jake’s Offline Cookbook and the free Udacity course "Offline Web Applications."Browser support? As stated above, it’s widely supported and the fallback is the network anyway. Does it help boost performance? Oh yes, it does. And it’s getting better, e.g. with Background Fetch allowing background uploads/downloads from a service worker.
There are a number of use cases for a service worker. For example, you could implement "Save for offline" featurehandle broken imagesintroduce messaging between tabs or provide different caching strategies based on request types. In general, a common reliable strategy is to store the app shell in the service worker’s cache along with a few critical pages, such as offline page, frontpage and anything else that might be important in your case.
There are a few gotchas to keep in mind though. With a service worker in place, we need to beware range requests in Safari (if you are using Workbox for a service worker it has a range request module). If you ever stumbled upon
DOMException: Quota exceeded.error in the browser console, then look into Gerardo’s article When 7KB equals 7MB.As Gerardo writes, “If you are building a progressive web app and are experiencing bloated cache storage when your service worker caches static assets served from CDNs, make sure the proper CORS response header exists for cross-origin resources, you do not cache opaque responses with your service worker unintentionally, you opt-in cross-origin image assets into CORS mode by adding the
crossoriginattribute to thetag.”A good starting point for using service workers would be Workboxa set of service worker libraries built specifically for building progressive web apps.
- Are you using service workers on the CDN/Edge, e.g. for A/B testing?
At this point, we are quite used to running service workers on the client, but with CDNs implementing them on the serverwe could use them to tweak performance on the edge as well.For example, in A/B tests, when HTML needs to vary its content for different users, we could use Service Workers on the CDN servers to handle the logic. We could also stream HTML rewriting to speed up sites that use Google Fonts.
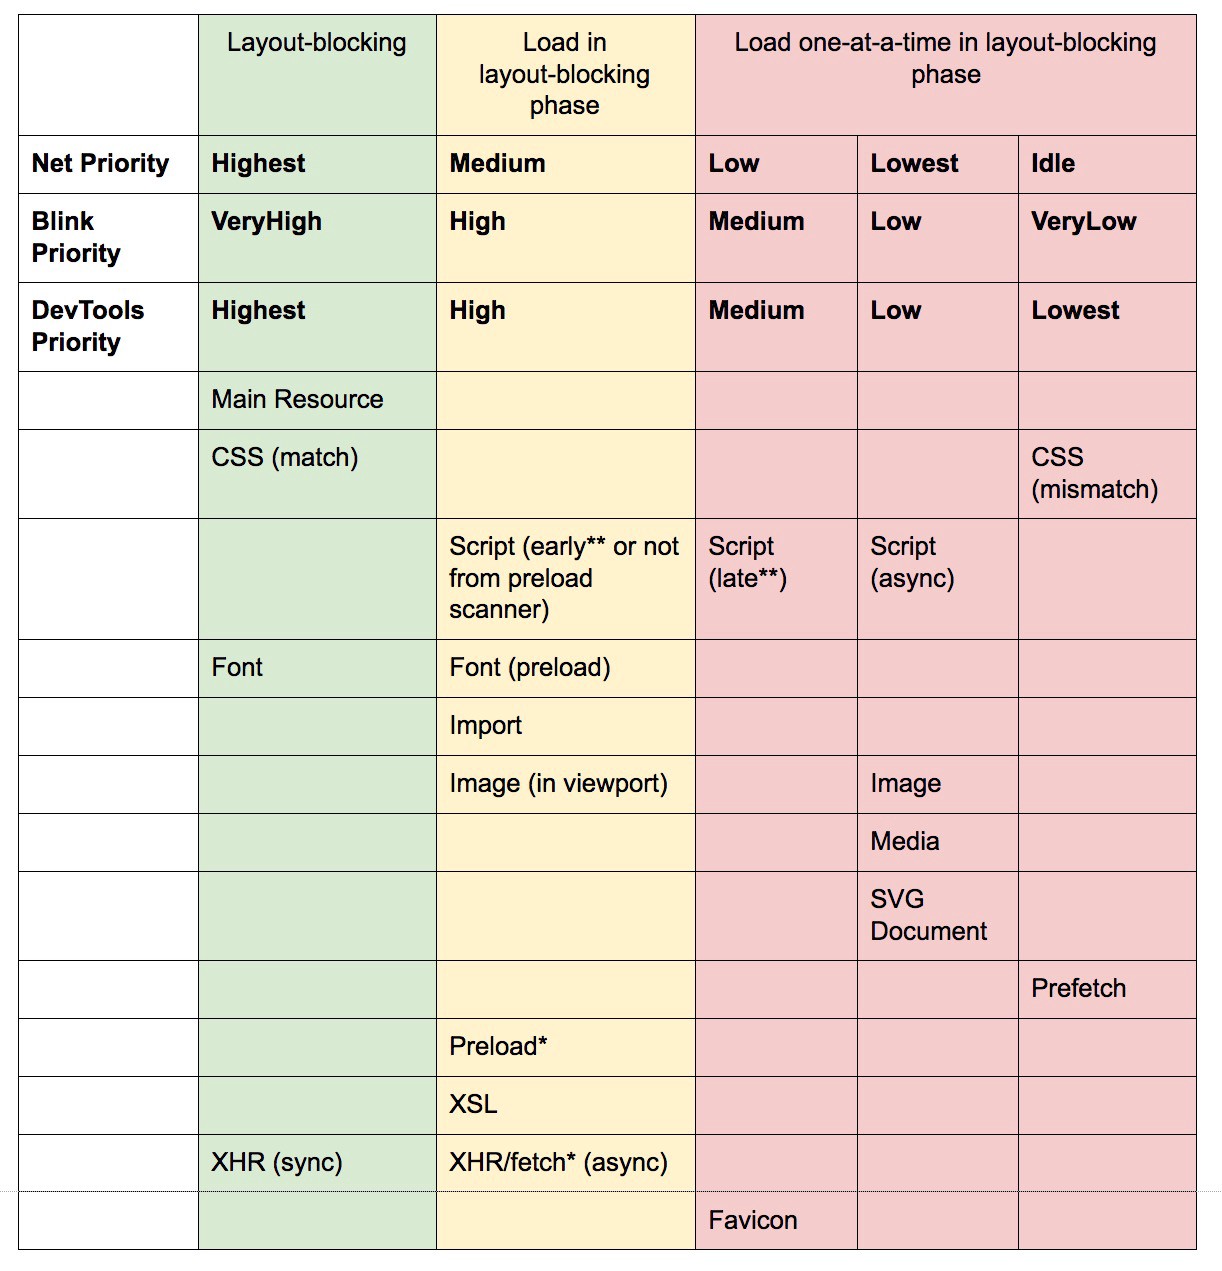

- Optimize rendering performance.
Isolate expensive components with CSS containment — for example, to limit the scope of the browser’s styles, of layout and paint work for off-canvas navigation, or of third-party widgets. Make sure that there is no lag when scrolling the page or when an element is animated, and that you’re consistently hitting 60 frames per second. If that’s not possible, then at least making the frames per second consistent is preferable to a mixed range of 60 to 15. Use CSS’will-changeto inform the browser of which elements and properties will change.Also, measure runtime rendering performance (for example, in DevTools). To get started, check Paul Lewis’ free Udacity course on browser-rendering optimization and Georgy Marchuk’s article on Browser painting and considerations for web performance.
If you want to dive deeper into the topic, Nolan Lawson has shared tricks to accurately measure layout performance in his article, and Jason Miller suggested alternative techniques, too. We also have a lil' article by Sergey Chikuyonok on how to get GPU animation right.
Note: changes to GPU-composited layers are the least expensiveso if you can get away by triggering only compositing via
opacityandtransformyou’ll be on the right track. Anna Migas has provided a lot of practical advice in her talk on Debugging UI Rendering Performancetoo. - Have you optimized rendering experience?
While the sequence of how components appear on the page, and the strategy of how we serve assets to the browser matter, we shouldn’t underestimate the role of perceived performancetoo. The concept deals with psychological aspects of waiting, basically keeping customers busy or engaged while something else is happening. That’s where perception managementpreemptive startearly completion and tolerance management come into play.What does it all mean? While loading assets, we can try to always be one step ahead of the customer, so the experience feels swift while there is quite a lot happening in the background. To keep the customer engaged, we can test skeleton screens (implementation demo) instead of loading indicators, add transitions/animations and basically cheat the UX when there is nothing more to optimize. Beware though: skeleton screens should be tested before deploying as some tests showed that skeleton screens can perform the worst by all metrics.
- Do you prevent layout shifts and repaints?
In the realm of perceived performance probably one of the more disruptive experiences is layout shiftingor reflowscaused by rescaled images and videos, web fonts, injected ads or late-discovered scripts that populate components with actual content. As a result, a customer might start reading an article just to be interrupted by a layout jump above the reading area. The experience is often abrupt and quite disorienting: and that's probably a case of loading priorities that need to be reconsidered.The community has developed a couple of techniques and workarounds to avoid reflows. Always set width and height attributes on images, so modern browsers allocate the box and reserve the space by default (Firefox, Chrome).
For both images or videos, we can use an SVG placeholder to reserve the display box in which the media will appear in. That means that the area will be reserved properly when you need to maintain its aspect ratio as well.
Instead of lazy-loading images with external scripts, consider using native lazy-loadingor hybrid lazy-loading when we load an external script only if native lazy-loading isn't supported.
As mentioned above, always group web font repaints and transition from all fallback fonts to all web fonts at once — just make sure that that switch isn’t too abrupt, by adjusting line-height and spacing between the fonts with font-style-matcher. (Note that adjustments are complicated with complicated font stacks though.)
To ensure that the impact of reflows is contained, measure the layout stability with the Layout Instability API. With it, you can calculate the Cumulative Layout Shift (CLS) score and include it as a requirement in your tests, so whenever a regression appears, you can track it and fix it.
To calculate the layout shift score, the browser looks at the viewport size and the movement of unstable elements in the viewport between two rendered frames. Ideally, the score would be close to
0. There is a great guide by Milica Mihajlija and Philip Walton on what CLS is and how to measure it. It's a good starting point to measure and maintain perceived performance and avoid disruption, especially for business-critical tasks.Bonus: if you want to reduce reflows and repaints, check Charis Theodoulou's guide to Minimising DOM Reflow/Layout Thrashing and Paul Irish's list of What forces layout / reflow as well as CSSTriggers.coma reference table on CSS properties that trigger layout, paint and compositing.
Networking and HTTP/2
- Is OCSP stapling enabled?
By enabling OCSP stapling on your serveryou can speed up your TLS handshakes. The Online Certificate Status Protocol (OCSP) was created as an alternative to the Certificate Revocation List (CRL) protocol. Both protocols are used to check whether an SSL certificate has been revoked. However, the OCSP protocol does not require the browser to spend time downloading and then searching a list for certificate information, hence reducing the time required for a handshake. - Have you adopted IPv6 yet?
Because we’re running out of space with IPv4 and major mobile networks are adopting IPv6 rapidly (the US has reached a 50% IPv6 adoption threshold), it’s a good idea to update your DNS to IPv6 to stay bulletproof for the future. Just make sure that dual-stack support is provided across the network — it allows IPv6 and IPv4 to run simultaneously alongside each other. After all, IPv6 is not backwards-compatible. Also, studies show that IPv6 made those websites 10 to 15% faster due to neighbor discovery (NDP) and route optimization. - Make sure all assets run over HTTP/2.
With Google pushing towards a more secure HTTPS web over the last few years, a switch to HTTP/2 environment is definitely a good investment. In fact, according to Web Almanac, 54% of all requests are running over HTTP/2 already.It’s important to understand that HTTP/2 isn’t perfect and has prioritization issuesbut it’s supported very wellit isn’t going anywhere; and, in most cases, you’re better off with it.
If you’re still running on HTTP, the most time-consuming task will be to migrate to HTTPS firstand then adjust your build process to cater for HTTP/2 multiplexing and parallelization. For the rest of this article, I’ll assume that you’re either switching to or have already switched to HTTP/2.

- Properly deploy HTTP/2.
Again, serving assets over HTTP/2 can benefit from a partial overhaul of how you’ve been serving assets so far. You’ll need to find a fine balance between packaging modules and loading many small modules in parallel. At the end of the day, still the best request is no requesthowever, the goal is to find a fine balance between quick first delivery of assets and caching.On the one hand, you might want to avoid concatenating assets altogether, instead of breaking down your entire interface into many small modules, compressing them as a part of the build process and loading them in parallel. A change in one file won’t require the entire style sheet or JavaScript to be re-downloaded. It also minimizes parsing time and keeps the payloads of individual pages low.
On the other hand, packaging still matters. By using many small scripts, overall compression will suffer. The compression of a large package will benefit from dictionary reuse, whereas small separate packages will not. There’s standard work to address that, but it’s far out for now. Secondly, browsers have not yet been optimized for such workflows. For example, Chrome will trigger inter-process communications (IPCs) linear to the number of resources, so including hundreds of resources will have browser runtime costs.

To achieve best results with HTTP/2, consider to load CSS progressivelyas suggested by Chrome’s Jake Archibald. Still, you can try to load CSS progressively. In fact, in-body CSS no longer blocks rendering for Chrome. But there are some prioritization issues so it’s not as straightforward, but worth experimenting with.
You could get away with HTTP/2 connection coalescingwhich allows you to use domain sharding while benefiting from HTTP/2, but achieving this in practice is difficult, and in general, it’s not considered to be good practice. Also, HTTP/2 and Subresource Integrity don't always get on.
What to do? Well, if you’re running over HTTP/2, sending around 6–10 packages seems like a decent compromise (and isn’t too bad for legacy browsers). Experiment and measure to find the right balance for your website.
- Do your servers and CDNs support HTTP/2?
Different servers and CDNs support HTTP/2 differently. Use Is TLS Fast Yet? to check your options, or quickly look up how your servers are performing and which features you can expect to be supported.Consult Pat Meenan’s incredible research on HTTP/2 priorities (video) and test server support for HTTP/2 prioritization. According to Pat, it’s recommended to enable BBR congestion control and set
tcp_notsent_lowatto 16KB for HTTP/2 prioritization to work reliably on Linux 4.9 kernels and later (thanks, Yoav!). Andy Davies did a similar research for HTTP/2 prioritization across browsers, CDNs and Cloud Hosting Services.While on it, double check if your kernel supports TCP BBR and enable it if possible. It's currently used on Google Cloud Platform, Amazon CloudfrontLinux (e.g. Ubuntu).
- Do your servers and CDNs support HTTP over QUIC (HTTP/3)?
If you feel adventurious or cutting-edge, you might want to check if your servers or CDNs support HTTP over QUIC (also known as HTTP/3). While HTTP/2 has brought significant improvements, it doesn't perform particularly well in situations when network is slow or unreliable (significant packet loss).To address the issue, Google has been working on Google QUICwhich is the protocol used by Chrome for many Google services today. Google has then brought many of the learnings to IETF in 2015 which is being standardized now.
QUIC and HTTP/3 are better and more bulletproof: with faster handshakes, better encryption, more reliable independent streams, more encrypted, and with 0-RTT if the client previously had a connection with the server. However, it's quite CPU intensive (2-3x CPU usage for the same bandwidth), UDP stacks are unoptimized, and there are some unresolved issues with hardware and TLS layer.
HTTP/3 is expected to ship early 2020 as a standard. Chrome and Safari confirmed that they have in-house implementations already, with HTTP/3 available in Chrome Canary and Firefox Nightly. Some CDNs support QUIC and HTTP/3 already. Neither Apache, nginx or IIS support it yet, but it might change in 2020.

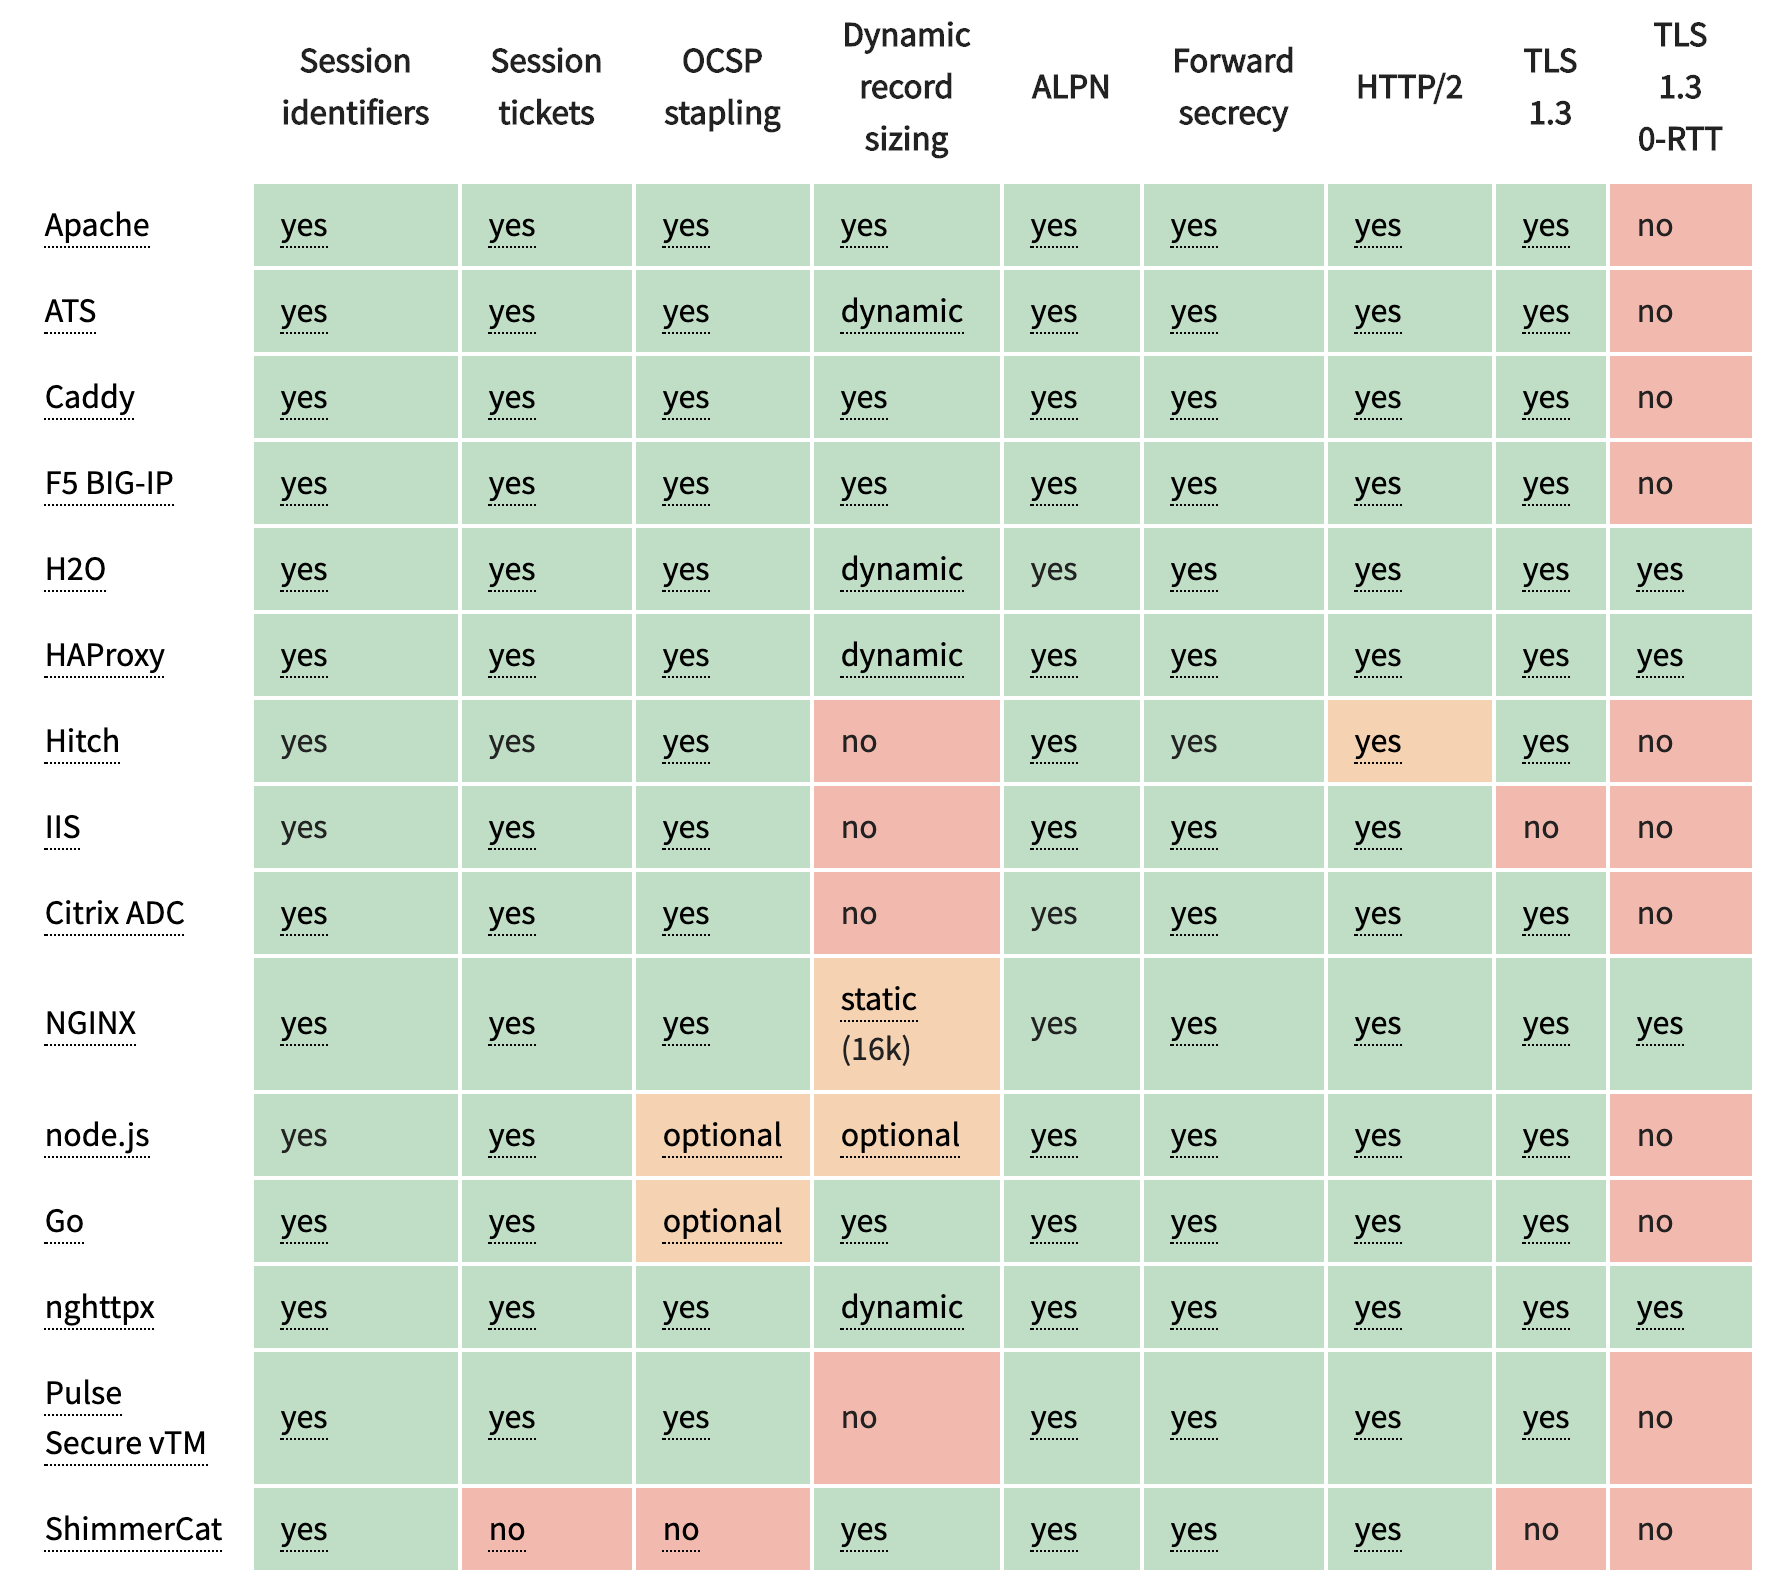
- Is HPACK compression in use?
If you’re using HTTP/2, double-check that your servers implement HPACK compression for HTTP response headers to reduce unnecessary overhead. Because HTTP/2 servers are relatively new, they may not fully support the specification, with HPACK being an example. H2spec is a great (if very technically detailed) tool to check that. HPACK’s compression algorithm is quite impressiveand it works. - Make sure the security on your server is bulletproof.
All browser implementations of HTTP/2 run over TLS, so you will probably want to avoid security warnings or some elements on your page not working. Double-check that your security headers are set properlyeliminate known vulnerabilitiesand check your HTTPS setup. Also, make sure that all external plugins and tracking scripts are loaded via HTTPS, that cross-site scripting isn’t possible and that both HTTP Strict Transport Security headers and Content Security Policy headers are properly set.
Testing And Monitoring
- Have you optimized your auditing workflow?
It might not sound like a big deal, but having the right settings in place at your fingertips might save you quite a bit of time in testing. Consider using Tim Kadlec’s Alfred Workflow for WebPageTest for submitting a test to the public instance of WebPageTest. In fact, WebPageTest has many obscure features, so take the time to learn how to read a WebPageTest Waterfall View chart and how to read a WebPageTest Connection View chart to diagnose and resolve performance issues faster.You could also drive WebPageTest from a Google Spreadsheet and incorporate accessibility, performance and SEO scores into your Travis setup with Lighthouse CI or straight into Webpack.
And if you need to debug something quickly but your build process seems to be remarkably slow, keep in mind that "whitespace removal and symbol mangling accounts for 95% of the size reduction in minified code for most JavaScript — not elaborate code transforms. You can simply disable compression to speed up Uglify builds by 3 to 4 times."

- Have you tested in proxy browsers and legacy browsers?
Testing in Chrome and Firefox is not enough. Look into how your website works in proxy browsers and legacy browsers. UC Browser and Opera Mini, for instance, have a significant market share in Asia (up to 35% in Asia). Measure average Internet speed in your countries of interest to avoid big surprises down the road. Test with network throttling, and emulate a high-DPI device. BrowserStack is fantastic, but test on real devices as well.

- Have you tested the impact on accessibility?
When the browser starts to load a page, it builds a DOM, and if there is an assistive technology like a screen reader running, it also creates an accessibility tree. The screen reader then has to query the accessibility tree to retrieve the information and make it available to the user — sometimes by default, and sometimes on demand. And sometimes it takes time.When talking about fast Time to Interactive, usually we mean an indicator of how soon a user can interact with the page by clicking or tapping on links and buttons. The context is slightly different with screen readers. In that case, fast Time to Interactive means how much time passes by until the screen reader can announce navigation on a given page and a screen reader user can actually hit keyboard to interact.
Léonie Watson has given an eye-opening talk on accessibility performance and specifically the impact slow loading has on screen reader announcement delays. Screen readers are used to fast-paced announcements and quick navigation, and therefore might potentially be even less patient than sighted users.
Large pages and DOM manipulations with JavaScript will cause delays in screen reader announcements. A rather unexplored area that could use some attention and testing as screen readers are available on literally every platform (Jaws, NVDA, Voiceover, Narrator, Orca).
- Is continuous monitoring set up?
Having a private instance of WebPagetest is always beneficial for quick and unlimited tests. However, a continuous monitoring tool — like SitespeedCalibre and SpeedCurve — with automatic alerts will give you a more detailed picture of your performance. Set your own user-timing marks to measure and monitor business-specific metrics. Also, consider adding automated performance regression alerts to monitor changes over time.Look into using RUM-solutions to monitor changes in performance over time. For automated unit-test-alike load testing tools, you can use k6 with its scripting API. Also, look into SpeedTrackerLighthouse and Calibre.
Quick Wins
This list is quite comprehensive, and completing all of the optimizations might take quite a while. So, if you had just 1 hour to get significant improvements, what would you do? Let’s boil it all down to 15 low-hanging fruits. Obviously, before you start and once you finish, measure results, including start rendering time and Time To Interactive on a 3G and cable connection.
- Measure the real world experience and set appropriate goals. A good goal to aim for is Largest Contentful Paint < 1 s, a Speed Index < 3s, Time to Interactive < 5s on slow 3G, for repeat visits, TTI < 2s. Optimize for start rendering time and time-to-interactive.
- Prepare critical CSS for your main templates, and include it in the
of the page. For CSS/JS, operate within a critical file size budget of max. 170KB gzipped (0.7MB decompressed). - Trim, optimize, defer and lazy-load as many scripts as possible, check lightweight alternatives and limit the impact of third-party scripts.
- Serve legacy code only to legacy browsers with and module/nomodule pattern.
- Experiment with regrouping your CSS rules and test in-body CSS.
- Add resource hints to speed up delivery with faster
dns-lookuppreconnectprefetchpreloadandprerender. - Subset web fonts and load them asynchronously, and utilize
font-displayin CSS for fast first rendering. - Optimize images with mozjpegguetzlipingo and SVGOMGand consider serving WebP with an image CDN.
- Check that HTTP cache headers and security headers are set properly.
- Enable Brotli compression on the server. (If that’s not possible, don’t forget to enable Gzip compression.)
- Enable TCP BBR congestion as long as your server is running on the Linux kernel version 4.9+.
- Enable OCSP stapling and IPv6 if possible.
- If HTTP/2 is available, enable HPACK compression and enable HTTP/3 if it's available on CDNs.
- Cache assets such as fonts, styles, JavaScript and images in a service worker cache.
- Explore options to avoid rehydration, use progressive hydration and streaming server-side rendering for your SPA.
Download The Checklist (PDF, Apple Pages)
With this checklist in mind, you should be prepared for any kind of front-end performance project. Feel free to download the print-ready PDF of the checklist as well as an editable Apple Pages document to customize the checklist for your needs: If you need alternatives, you can also check the front-end checklist by Dan Rublicthe "Designer’s Web Performance Checklist" by Jon Yablonski and the FrontendChecklist.Off We Go!
Some of the optimizations might be beyond the scope of your work or budget or might just be overkill given the legacy code you have to deal with. That’s fine! Use this checklist as a general (and hopefully comprehensive) guide, and create your own list of issues that apply to your context. But most importantly, test and measure your own projects to identify issues before optimizing. Happy performance results in 2019, everyone!A huge thanks to Guy Podjarny, Yoav Weiss, Addy Osmani, Artem Denysov, Denys Mishunov, Ilya Pukhalski, Jeremy Wagner, Colin Bendell, Mark Zeman, Patrick Meenan, Leonardo Losoviz, Andy Davies, Rachel Andrew, Anselm Hannemann, Barry Pollard, Patrick Hamann, Gideon Pyzer, Andy Davies, Maria Prosvernina, Tim Kadlec, Rey Bango, Matthias Ott, Peter Bowyer, Phil Walton, Mariana Peralta, Jean Pierre Vincent, Philipp Tellis, Ryan Townsend, Ingrid Bergman, Mohamed Hussain S. H., Jacob Groß, Tim Swalling, Bob Visser, Kev Adamson, Adir Amsalem, Aleksey Kulikov and Rodney Rehm for reviewing this article, as well as our fantastic community which has shared techniques and lessons learned from its work in performance optimization for everybody to use. You are truly smashing!

Source link